Disclaimer: When using Unity assets, be mindful of licensing restrictions, version compatibility issues, and reliance on third-party content. Always check the asset’s terms and documentation before adding it to your project.
While creating your environment in Unity, you’re allowed to use the Unity Asset Store to download assets and use them for your project, following the correct guidelines.
From here you’ll find a multitude of assets ranging from 3D to 2D assets, for this guide we’ll mainly be focusing on using the 3D tools. Heres the link to the 3D Unity Asset Store, make sure you’re logged into your Unity Account to access downloads.
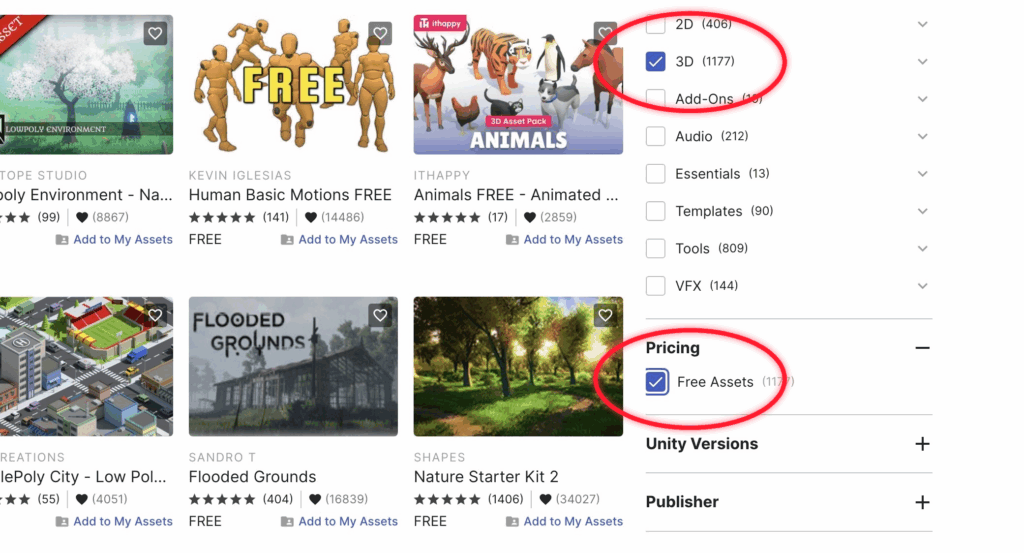
On the side of the Unity Asset Store theres going to be a filter that allows you to find any type of asset, we’ll be using the free assets, so under Pricing you want to check Free Assets.
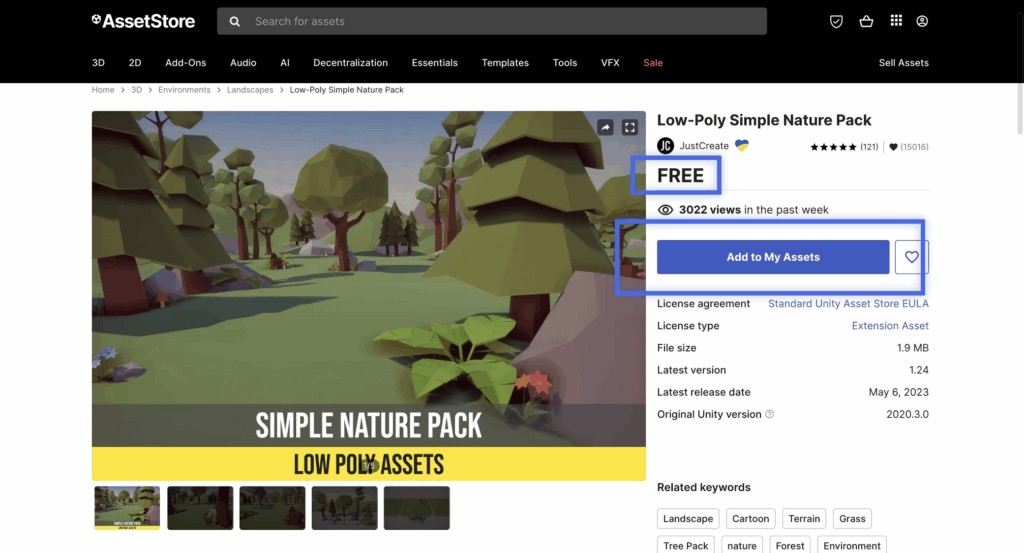
Then choose a free asset to download, and it’ll bring you to asset page with a “Add to My Assets” button. Make sure the page also has the word FREE above the button.
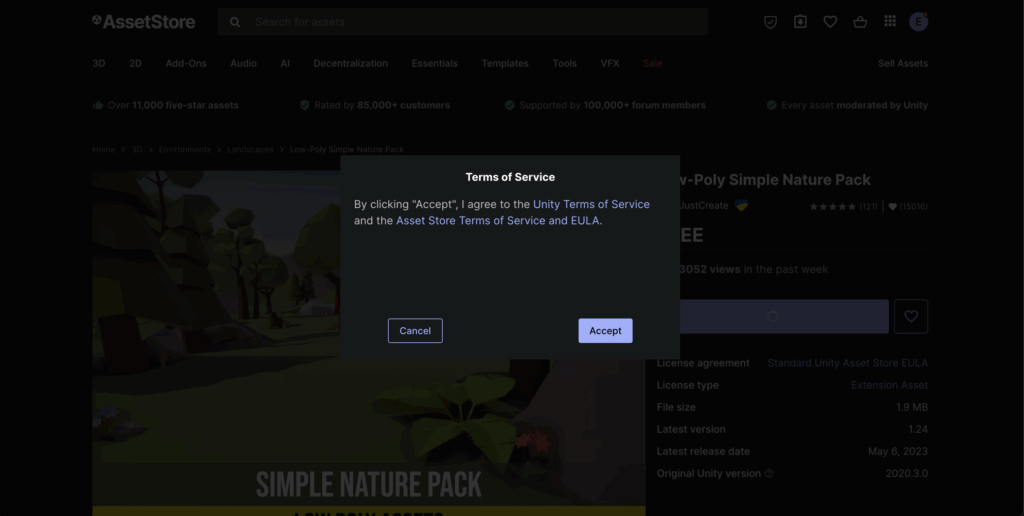
After clicking “Add to My Asset,” you’ll see a pop-up appear about the Terms of Service. It’s important to understand that even free assets may come with specific rules or restrictions on how they can be used.
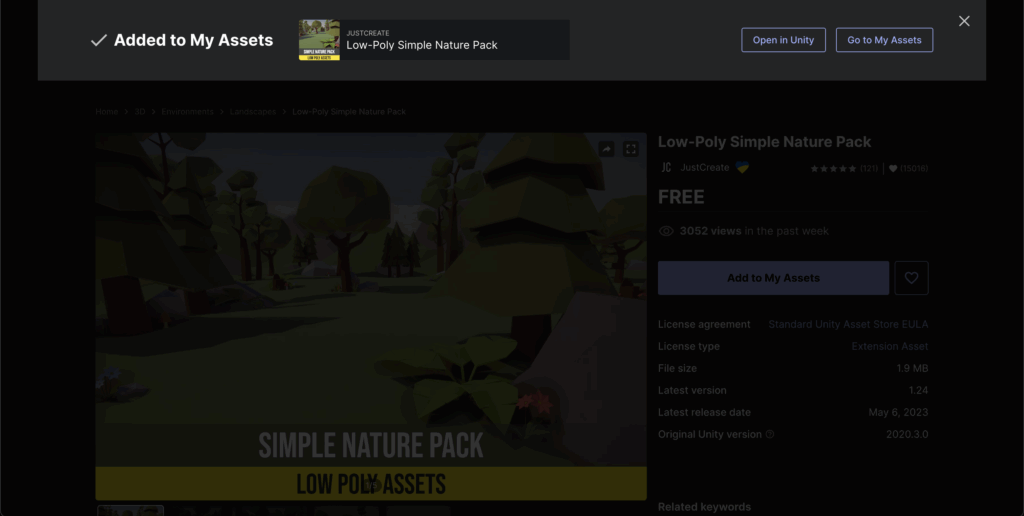
After accepting the terms, another pop-up will appear asking if you want to open your assets in Unity. Click “Open in Unity.”
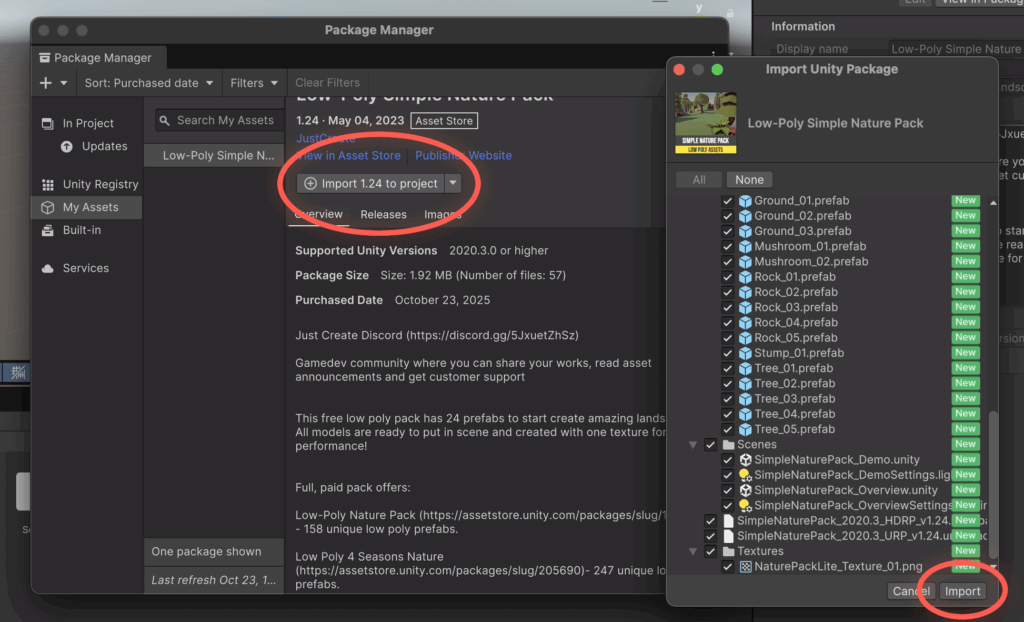
After opening Unity, you’ll see your package manager appear, then you want to select the asset you want to download and add it into your project by clicking download -> import to project -> import.
After downloading, you’ll see the folder appear in your assets folder, in there it should be organized and contain a material, model, prefabs, and textures folders!
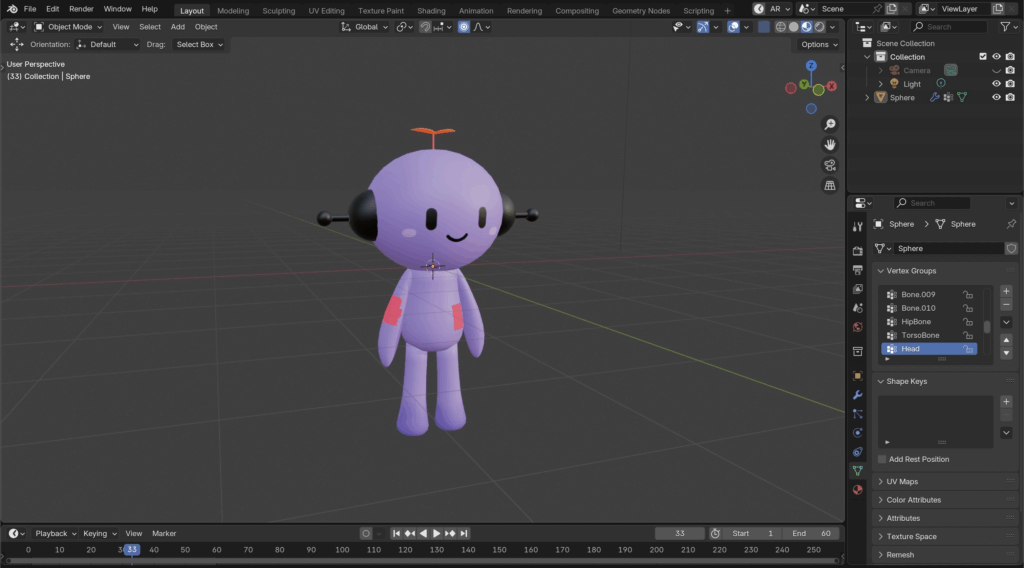
Every face in a 3D mesh has a normal direction, which defines its “front” side. Blender uses this to determine how light interacts with it, whether it should be rendered, and how textures are mapped.
Front side (normal): Considered the correct side of the face.
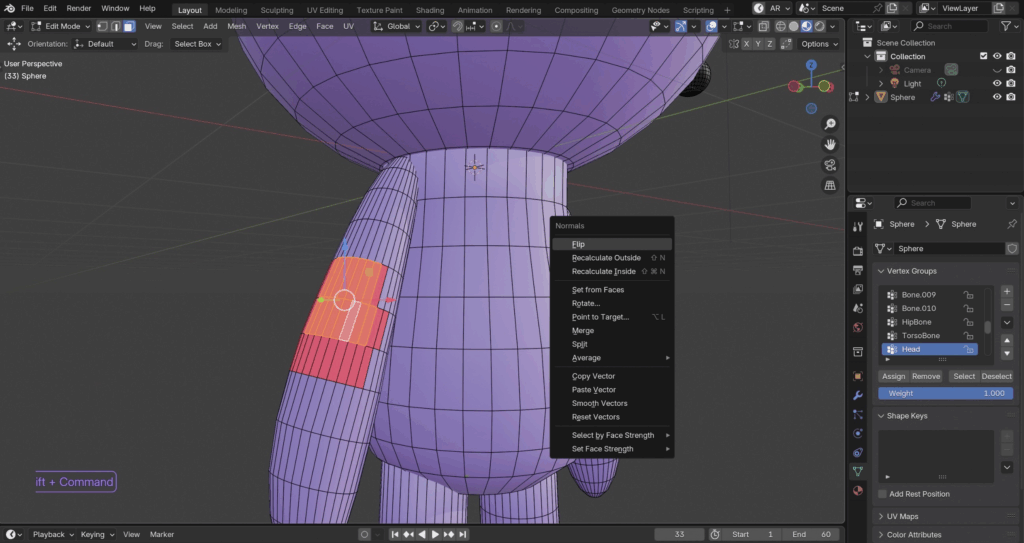
Back side: Considered the inside or wrong side—can cause issues if facing outwards. Usually appears in Red.
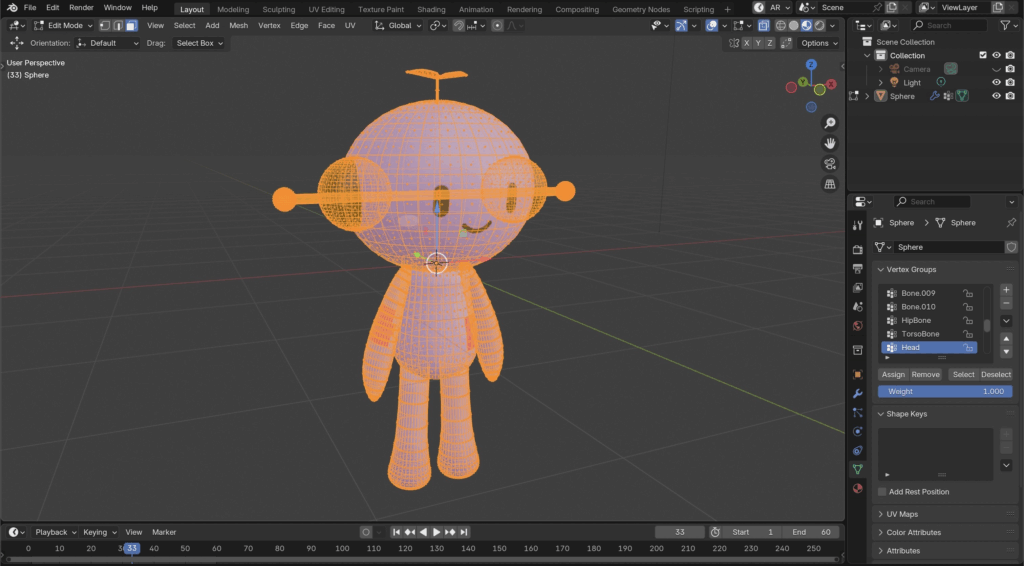
Step 1: Go into Edit Mode and Select your entire mesh by pressing A, you’ll know when everything is selected when your 3D model turns orange.
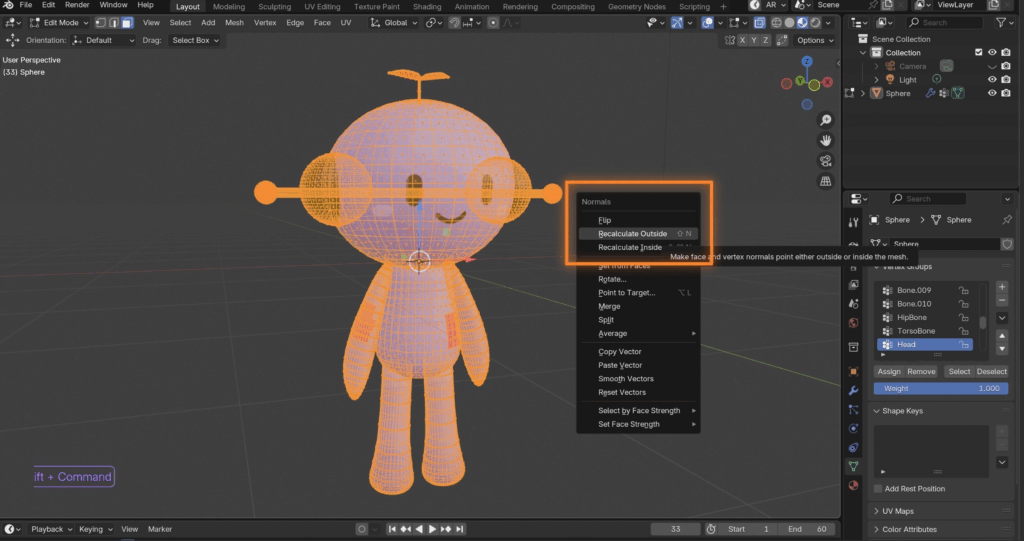
Step 2: Now Press Option + N (Mac) or Alt + N (Windows) to open up the Normals Panel and click Recalculated Outside
Alternatively, You can flip normals manually by selecting the faces and then pressing Option + N (Mac) or Alt + N (Windows) and clicking Flip
To make this more simple, I’m going to show you how I would make a simple walking animation with my character, that way you can intuitively create your own animations later on.
Animating a character is kind of like playing with an action figure. You move its body into different poses, and then tell Blender to remember each pose. When you play the animation, Blender connects those poses to make the character move!
What is a Keyframe?
A keyframe, simply put, is a ‘marker’ on a timeline that stores the state of an object’s properties at a specific point in time.
What is a TImeline?
The Timeline is a panel in Blender used to control when things happen in your animation. You can find it at the bottom of your viewport hidden away, all you have to do is hover over the bar click and drag it up!
Step 1: First let’s make sure your rig is resetted.
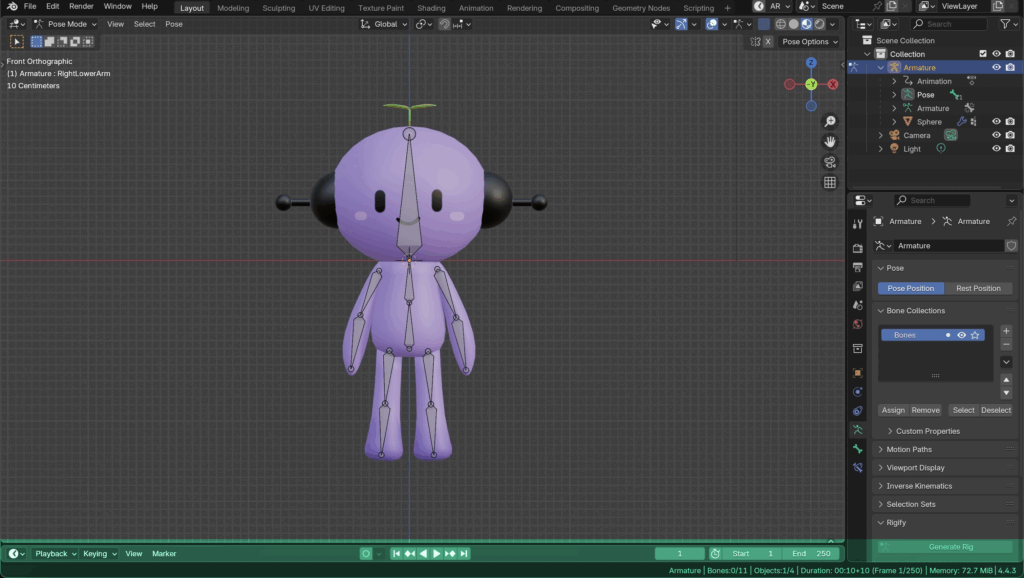
Select your armature in the hierarchy and switch to pose mode.
Then select your entire armature by pressing A.
Press ALT + R (Windows) or Option + R to reset your rig
Step 2: Animating Positions with Keyframes
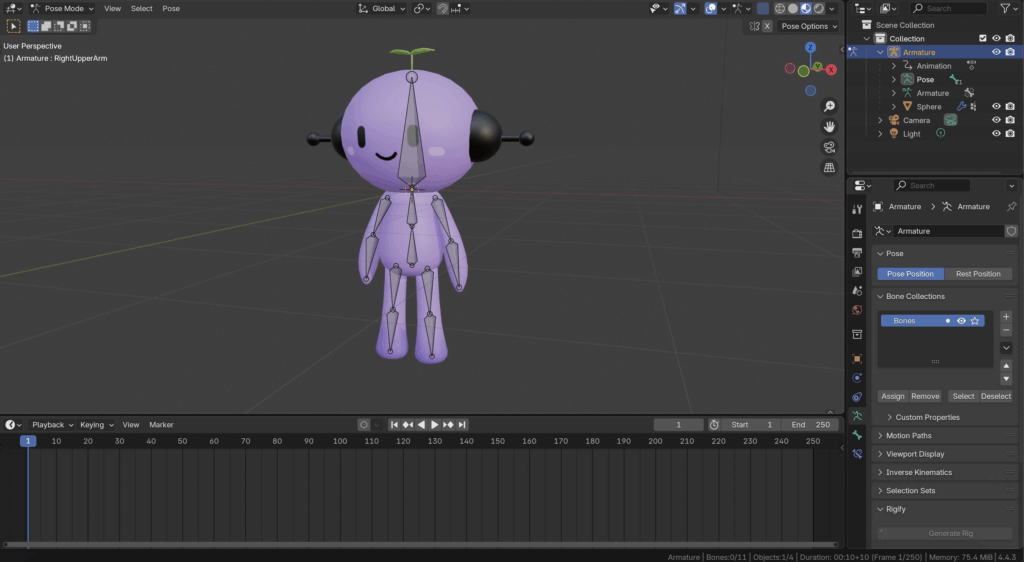
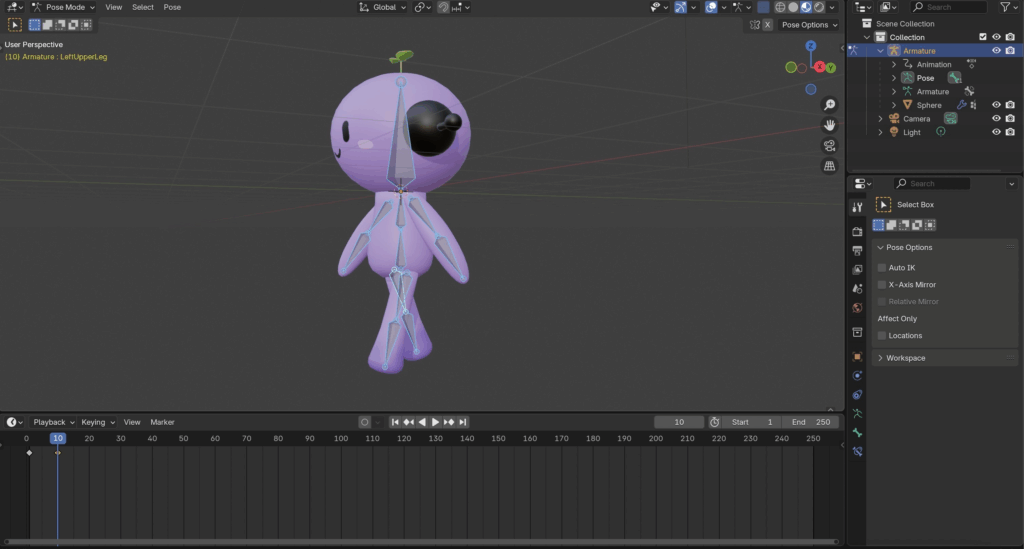
To make my character walk, I’ll start by creating a walking pose. I’ll move the arms and legs by selecting the bones and pressing R to rotate them into the right position. To make it easier to rotate, I turned to the side of the character, you should also do this to check if your pose looks right from all angles.
Step 3: Now we want to capture our pose within the timeline as a keyframe.
Make sure your timeline is set at the first keyframe.
Select your entire armature by pressing A.
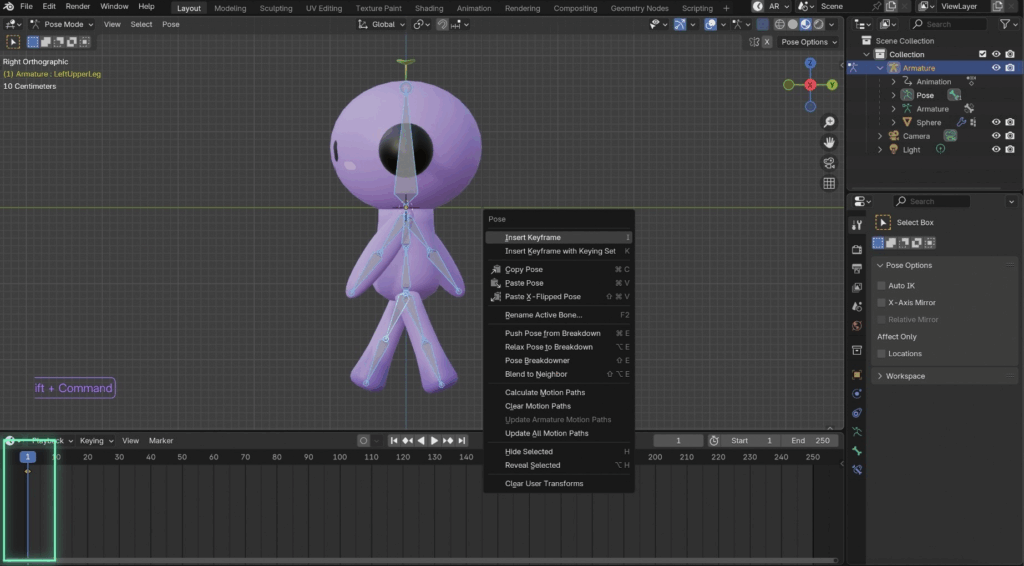
Then right click on your character and press Insert Keyframe.
You’ll know when you done it correctly when you see a little yellow diamond appear on your timeline.
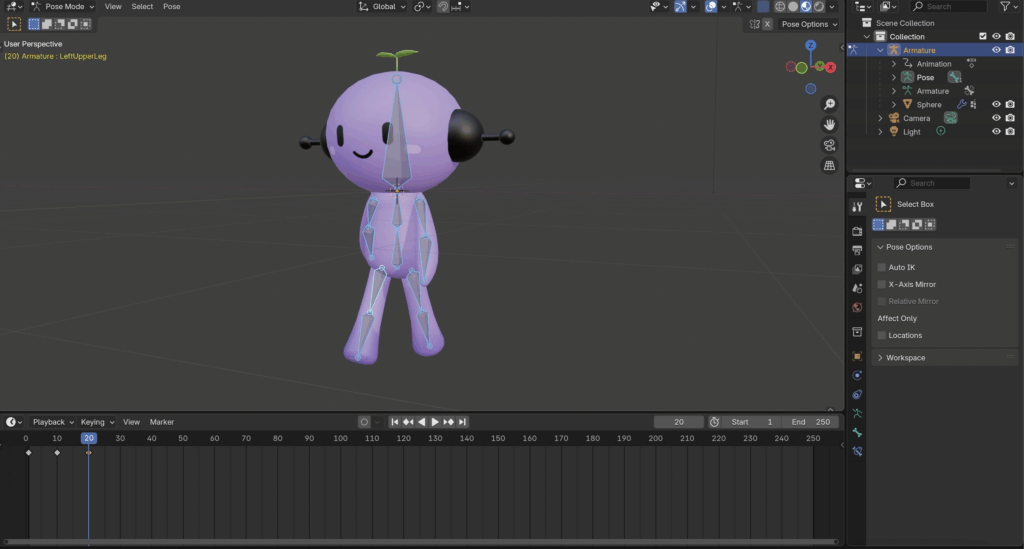
Step 4: Now let’s move along on our timeline, I’m going to just move to 10 seconds on my timeline by dragging the blue marker, then repeat Step 2 and 3. I’m going to move my bones onto the opposite side and insert another keyframe at 10 seconds.
After you insert the second keyframe, you can now use your blue marker and scroll through the timeline to see your animation!
Step 5: Now let’s create another keyframe at 20 seconds, but this time instead of rigging our character we’re going to copy and paste our previous keyframe to finish the animation loop!
Set your blue marker to 20 seconds
Select your first keyframe at 1 second (you’ll know that you’ve selected it when the keyframe turns orange
Copy with Command + C and paste it with Command + P
This will copy all the data from the first keyframe to our new keyframe at 20 seconds.
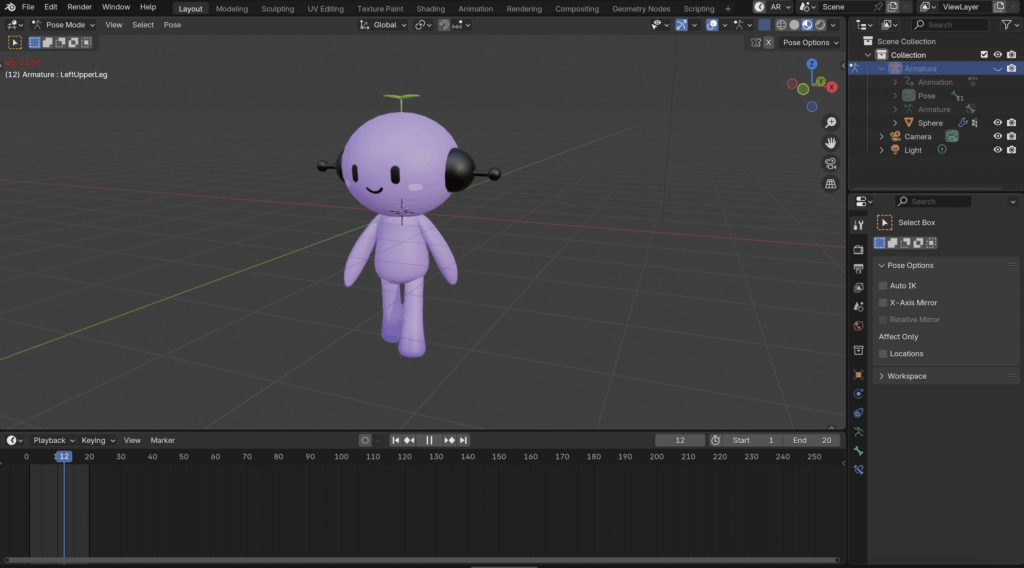
Step 6: Check your animation, you want to set your End from 250 seconds to 20 seconds (since thats where our last keyframe is) and then click space to see your animation.
If you want a better view of your character, you can hide the armature in the hierachy by clicking on the eye icon next to it!
Step 7: And you’re all done! If you have any questions or get stuck while animating, feel free to ask for help in the Studio X Discord channel. Feel free to experiment with your animations, and remember to constantly save your progress.
If you’re done animating, and want to learn how to export the animation into Unity, use the Exporting Animations Tutorial.
In Blender, a rig is essentially a skeleton or armature composed of bones that controls a model’s movement. This allows you to animate and pose your model dynamically.
Step 1: In Blender, make sure your character is centered and lined up with the origin. To do this, you want to select your model > press N to open the transform tab > hover over location > and press backspace.
You want to make sure that your character’s origin (the small orange dot on your character is at the center of your model. To do this, you can right-click the model > set origin > geometry to origin.
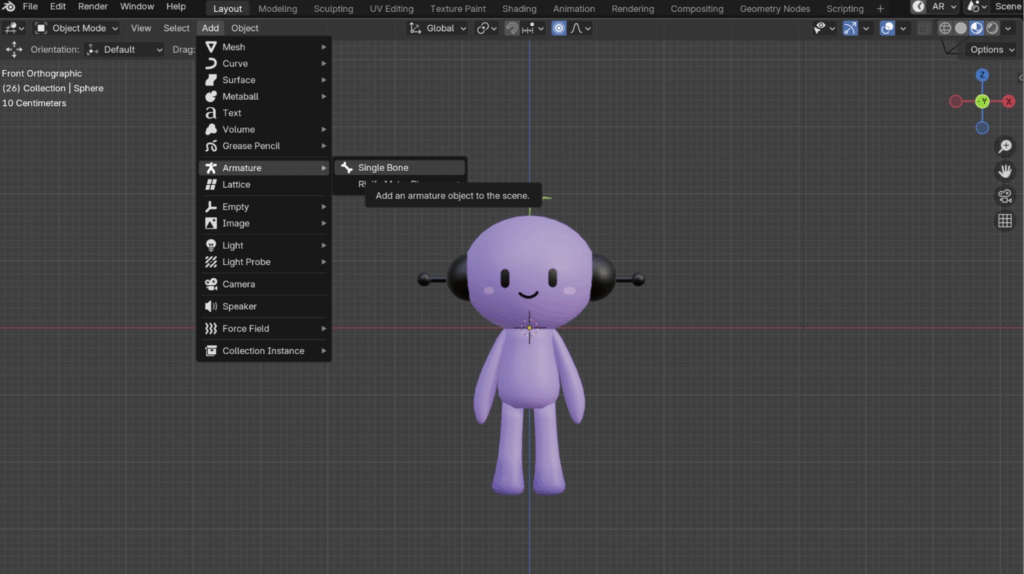
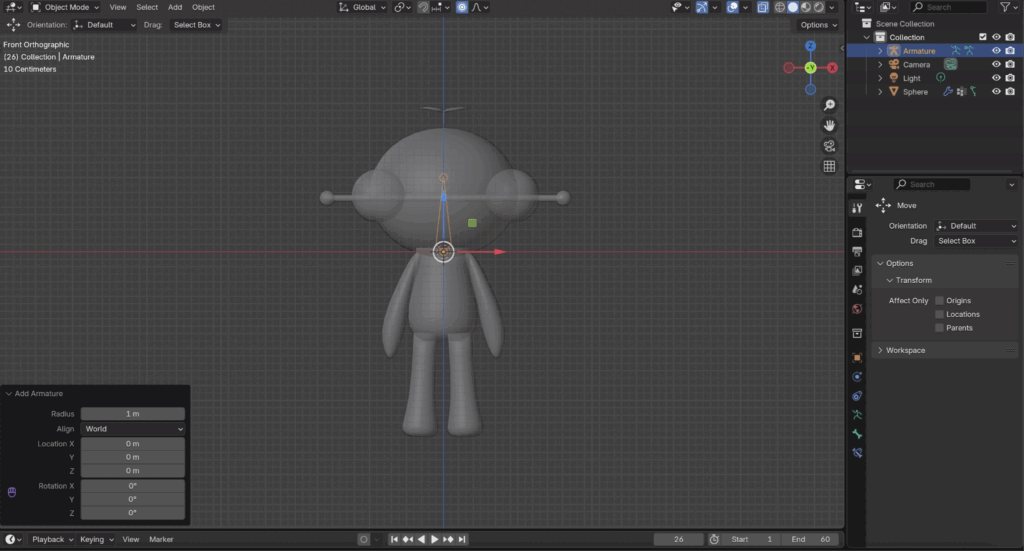
Step 2: Once you’ve confirmed your model is at the origin center, ensure you’re in Object Mode and click Add > Hover over Armature > and click Single Bone to add a single bone.
Step 3: After adding your single bone, to make editing easier, ensure you’re in viewport shading mode (solid) and that transparency is enabled. After making sure you have selected your armature, return to Edit Mode.
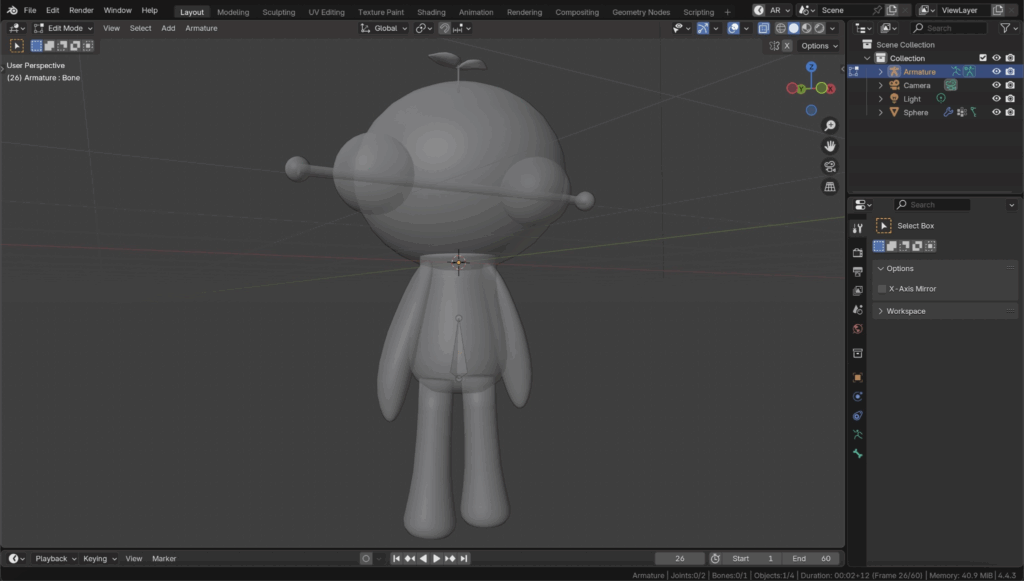
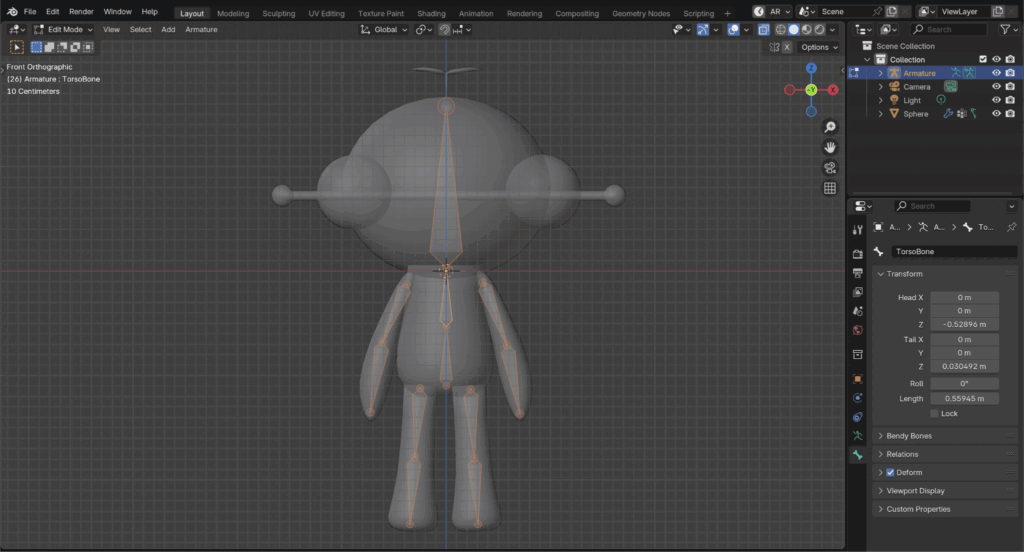
Step 4: Now that we have our armature set up, let’s start at the hip! Since a bone is an object, we can treat it just like the other meshes in Blender. That means we can transform, rotate, and scale them. So move the first bone to the lower half of our character’s torso.
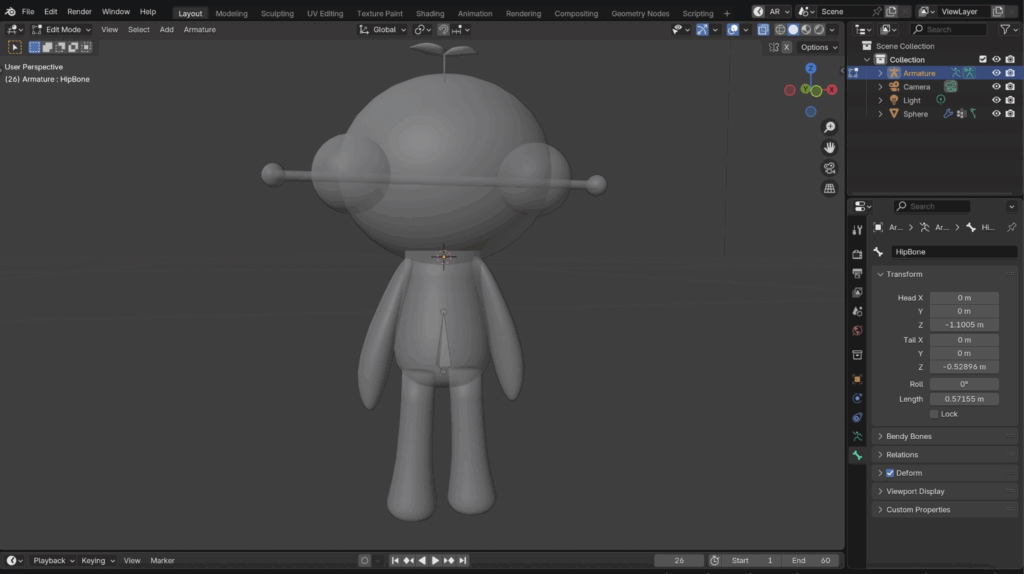
Step 5: Now, let’s name our bone. This is just to keep everything organized for later. To do that, select your bone in edit mode, and drop down to the bone property tab (the green bone) and rename the bone in the name panel to “HipBone”
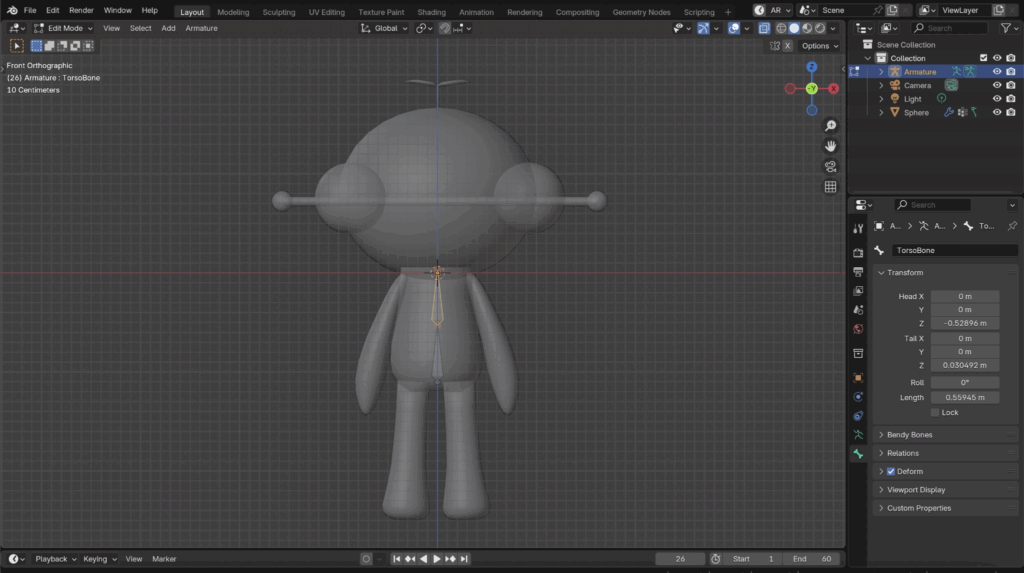
Step 6: We’re going to name every bone we add to our character. To add a new connecting bone, select the small ball on top of your current bone, then press E to extrude. Make sure to press Z while extruding to keep the bone straight. Now, we’ve created a torso bone.
Step 7: Now, try to make bones for your character’s Head, Body, Arms, and Legs. To add new bones, go to Add > Create a New Bone > and place it where needed. Use the image below as a reference for positioning your character’s bones. Remember to name them!
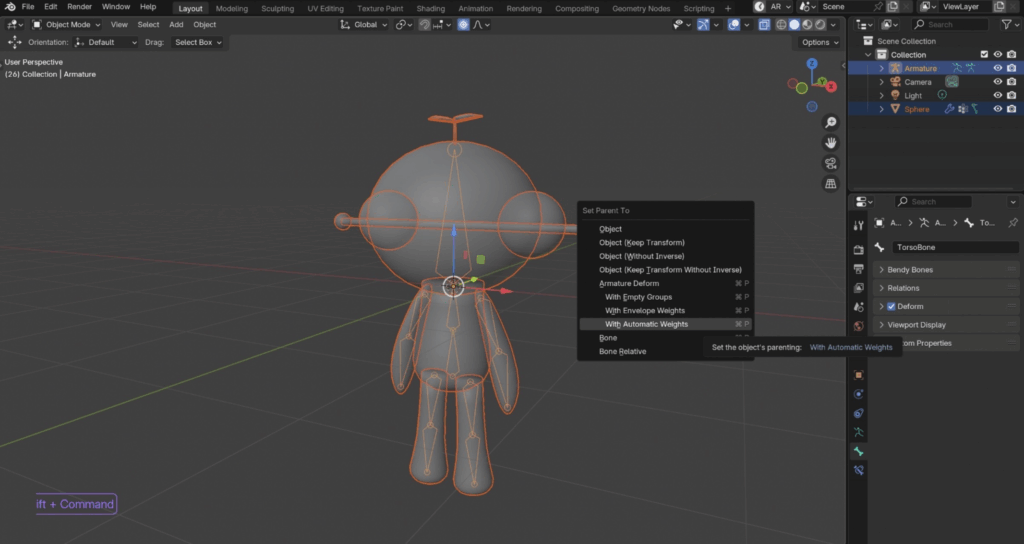
Step 8: After you finish adding all your bones, we’re going to attach the mesh to the armature. First, make sure your layout is in Object Mode. Then select the mesh first, and then Shift click the armature. Afterwards, press Control P and a pop-up will appear. Find the option “With Automatic Weights” and click it. This will now join both the armature you created on top of your mesh.
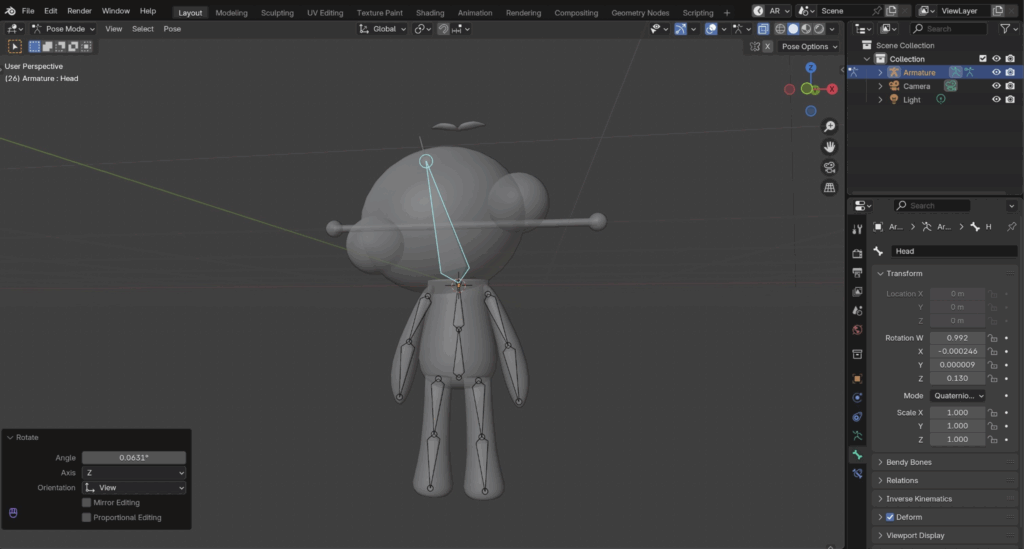
After joining your character with automatic weights, you can now access pose mode! Go into pose mode, and try moving around your armature’s bones by clicking on them and rotating them with R.
Weight Painting
Now, after playing with your armature for a bit, you might notice that some parts of your mesh aren’t rigged correctly, and that’s completely fine! We’re going to fix it with a bit of weight painting.
What is Weight Painting?
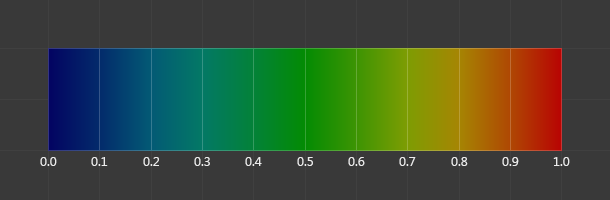
In Blender, a process assigns varying degrees of influence, or “weight,” to each bone in a character’s armature, impacting the mesh’s vertices. This influence is shown as a color gradient from red (full influence) to blue (no influence), helping artists manage how the mesh deforms as the bones move.
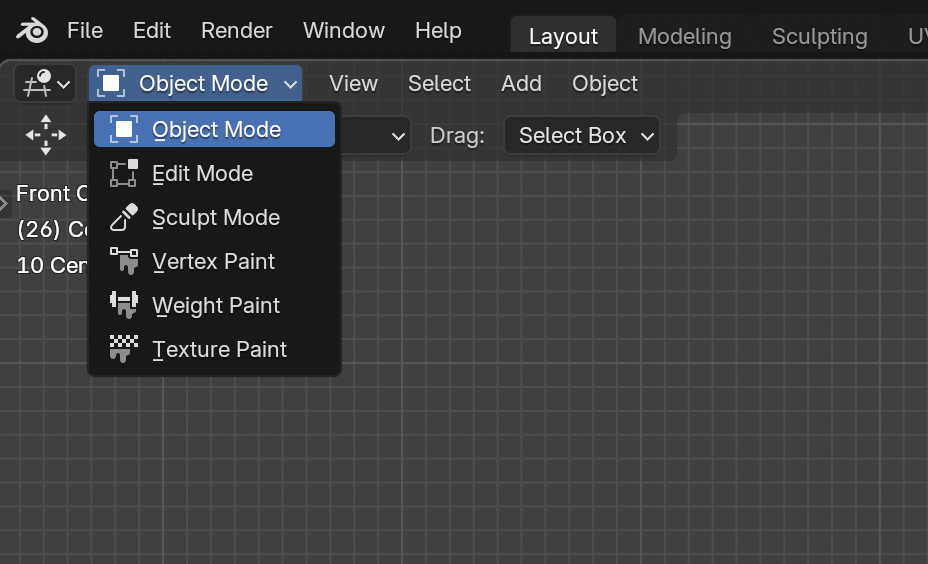
To access the weight painting option, make sure you’re in object mode, then select the mesh and NOT the armature. When you open the mode tab, you will find the weight painting option.
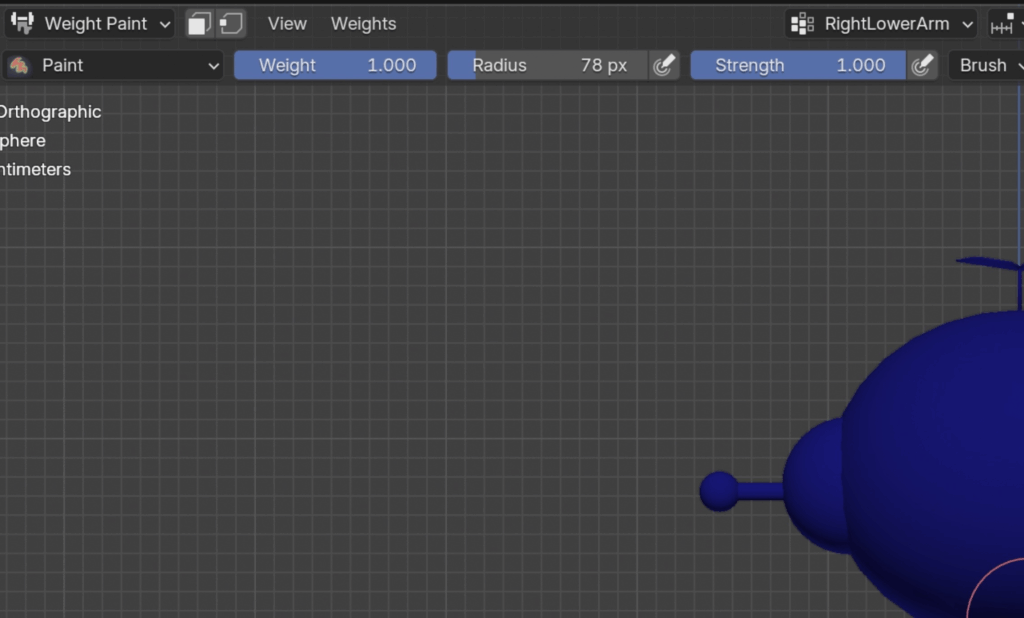
Step 1: Once you enter Weight Paint mode, your mesh will turn blue and show different colors. Focus on the paint options and the tab at the top center of your screen, which displays the names of your bones from earlier.
Weight
Controls how strongly a bone will influence a specific part of the model. A weight of 1 means full influence, while a weight of 0 means no influence at all.
Radius
Controls the size of the brush you’re using to paint weights. A larger radius covers a bigger area, while a smaller radius allows for more detailed painting.
Strength
Adjusts the amount of weight applied each time you paint. A higher strength applies more weight quickly, while a lower strength allows you to build influence gradually.
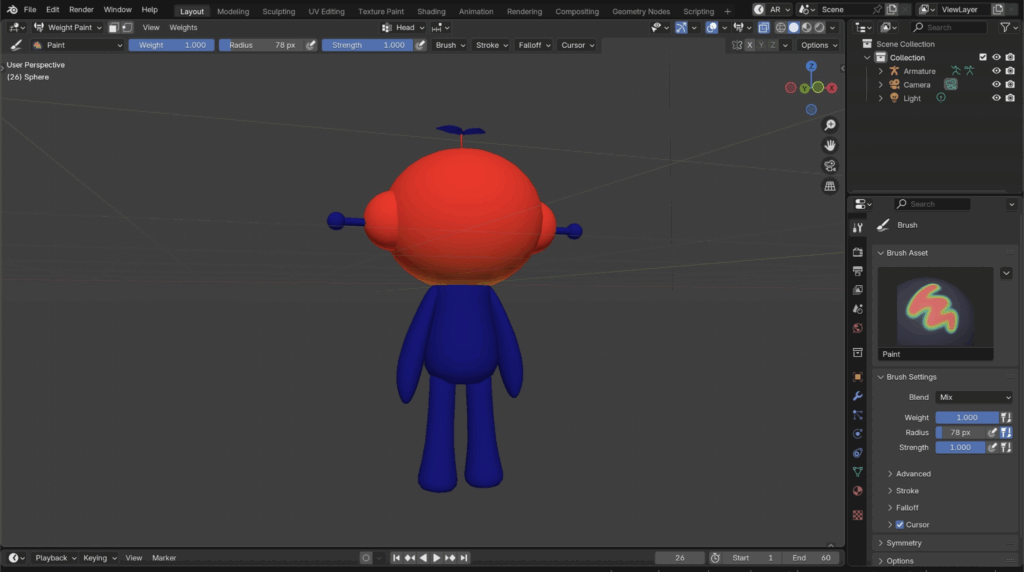
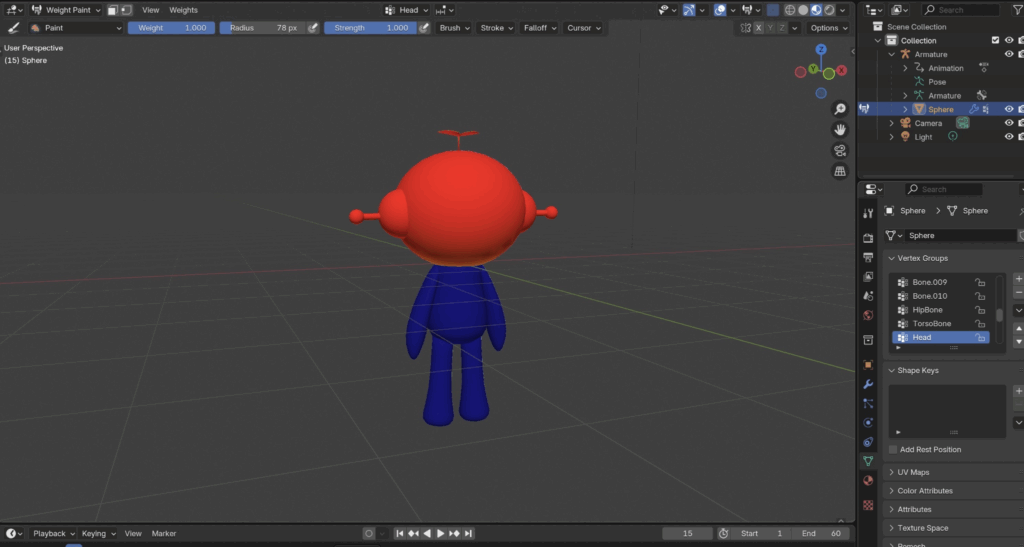
Step 2: Now you need to decide which part to work on in the weight paint. I’ll show you the head of my character and how I plan to fix the weight paint. For my character’s head, the accessories weren’t automatically applied, so we’ll paint them on. The red indicates where the bone was affected, and the blue isn’t.
Step 3: Now you can adjust your weight, radius, and strength to meet your needs. Set them to 1.0 for weight, 75 for radius, and 1.0 for strength. After adjusting your paint settings, simply click and drag on the blue areas of your model to turn them red.
Now you want to do this for each part of your model that needs adjusting. If you need extra help with this part of the workshop, please use the Studio X Discord and contact an XR Specialist for assistance! Switch between pose mode and weight paint mode to test each of your bones.
Step 4: If you have any questions or get stuck while rigging, feel free to ask for help in the Studio X Discord channel. Remember to constantly save your progress.
Blender is an open-source and free 3D modeling software tool that runs on Windows, macOS, Linux, and other operating systems. It’s used in a wide range of media, most commonly found in animation, the gaming industry, 3D-printed models, motion graphics, and virtual reality.
To install Blender, follow the link here and select the version most compatible with your device. Blender doesn’t automatically update, so you’re encouraged to stay current with the latest version, but it’s not mandatory.
How to navigate through Blender
In Blender, there are three main parts of its interface:
Viewport: a view of the 3D space, where you’re mainly going to be working
Hierarchy: a layer view of all the objects within your viewport, organized in folders called collections. You can toggle the view of the objects and select them through the hierarchy.
Properties: allows you to edit and change the properties of selected objects. You can find your modifiers, rendering options, and tools through this interface.
The main workspace you’ll start with is ‘Layout’. There are many other workspace options that you can select on top of your Blender application. The most commonly used workspaces are Layout, Sculpting, UV Editing, Texture Paint, and Shading.
To learn more about navigating through Blender, follow the first part of the Intro to Blender tutorial linked here.
Extensions in Blender
Because Blender is open-source, there are multiple extensions available online that we can install to help us speed up our work process and make our workspace more efficient.
Make sure to install the official extensions available on the Blender Extension Page. For Blender version 4.4 and newer, you can directly download extensions within the Blender application. To add extensions, go to Edit > Preferences > Add-ons. Afterward, you can search for your preferred extension and click Install; once installed, it should appear in your workspace.
Intro to Blender Workshop
If you want to learn Blender through a simple abstract art workshop, follow the tutorial here:
After completing the Intro to Blender Abstract Art Workshop, you’ll learn how to create your first 3D character in Blender. To learn how to create a 3D character in Blender, follow the tutorial here:
After creating your 3D character in blender, you’ll learn how to apply a material over the model. To learn how to create a material for your 3D model, follow the tutorial here: