Before starting this tutorial, please make sure you’ve at least completed steps 1 through 8 from the previous tutorial.
In this tutorial, I will be using a model created by Emmie for her Odyssey project. This particular character is called a siren.
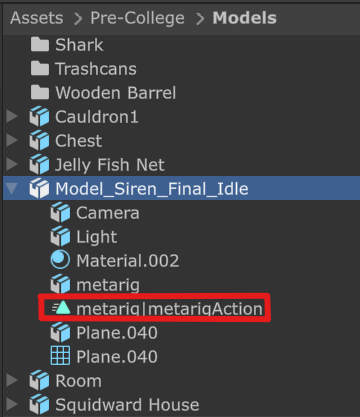
Step 1: Ensure your animation is included in the .fbx file you imported. You can do so by making sure there is at least 1 metarigAction clip in your .fbx file. If there is not, then redo the previous tutorial or ask for help in the discord.
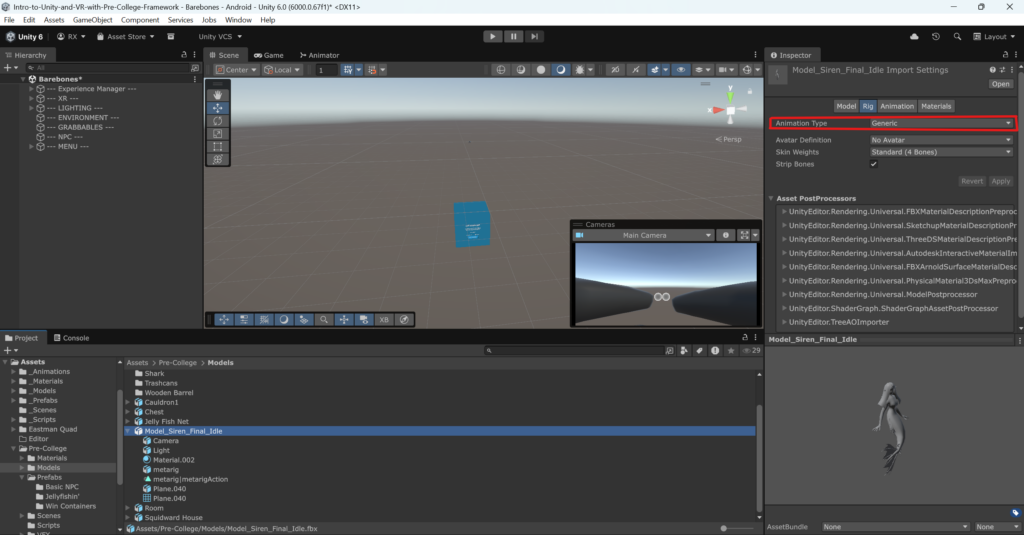
Step 2: Select your model, and in the inspector, make sure your Animation Type is set to Generic in the Rig tab.
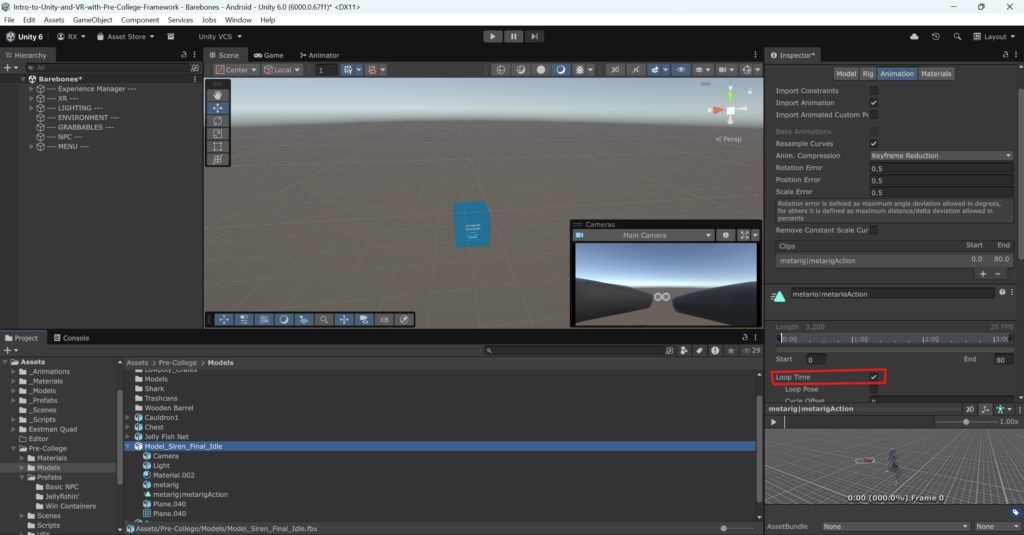
Step 3: If you want your animation to loop continuously, then you can select the Animation tab and set Loop Time to true by checking the box in the Animation tab:
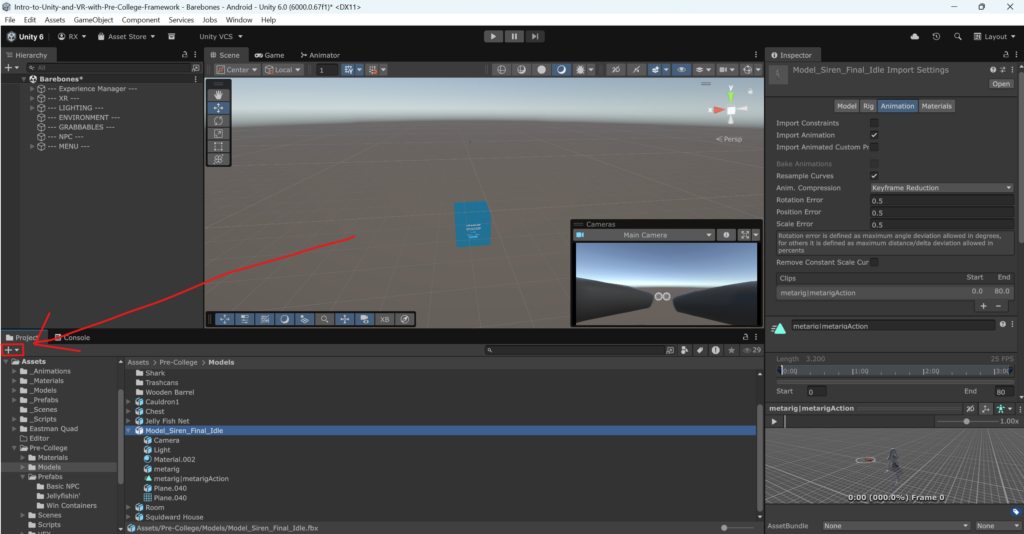
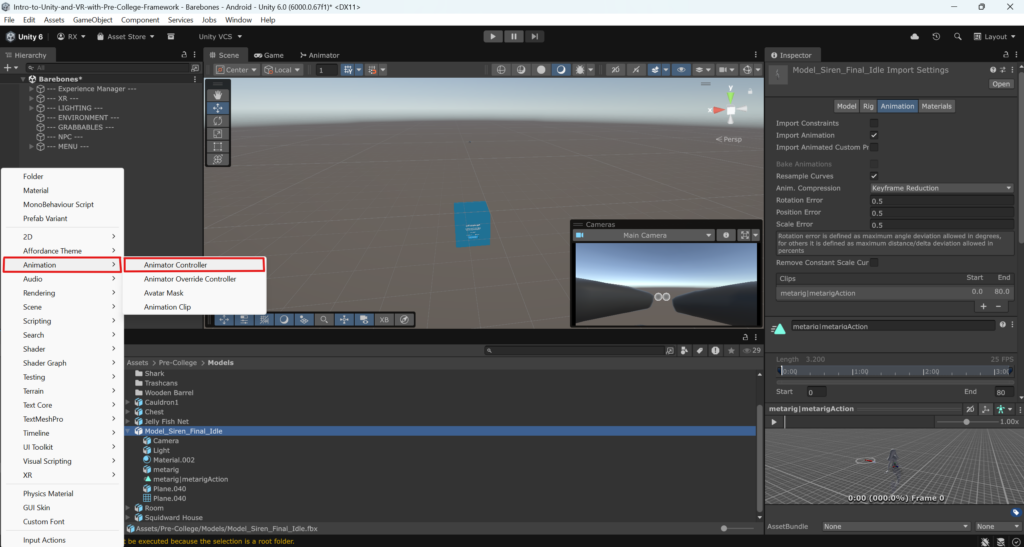
Step 4: Create an Animation Controller. In your project window, click the + icon.
Then, select Animation -> Animation Controller.
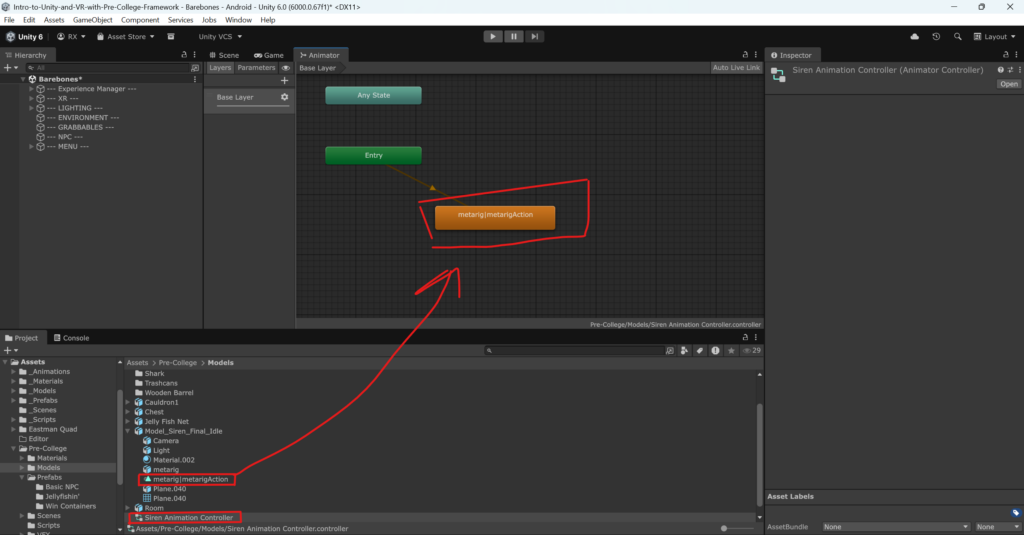
Rename your animation controller to whatever you like. I renamed mine to Siren Animation Controller.
Double click the animation controller to open it, then drag your metarigAction into the Animator window.
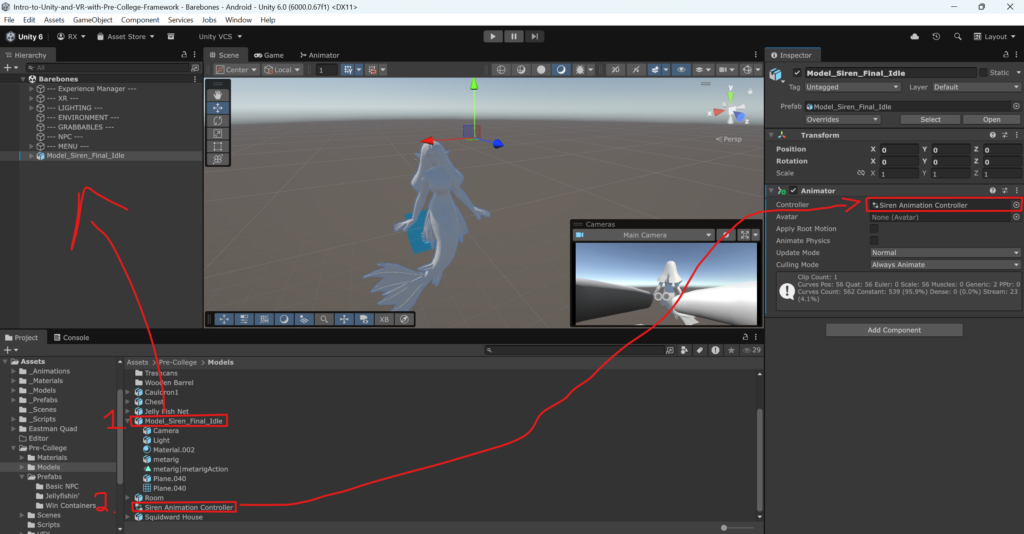
Step 5: Drag your model into your Unity scene, add an Animator component to it, and assign the Controller as the Animation Controller you made in the last step.
Step 6: Enter play mode, and make sure your model is animated! If it is not, ask for help in the discord.
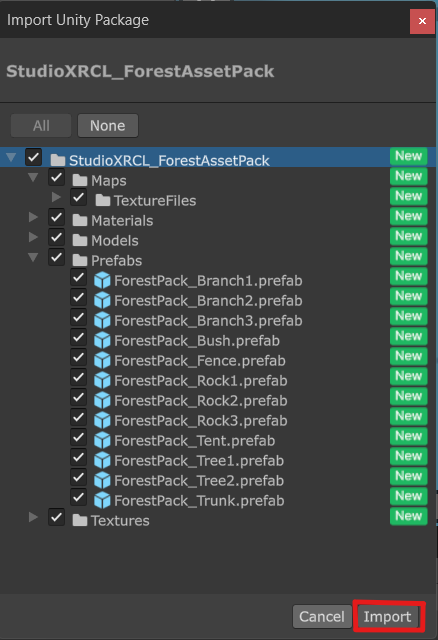
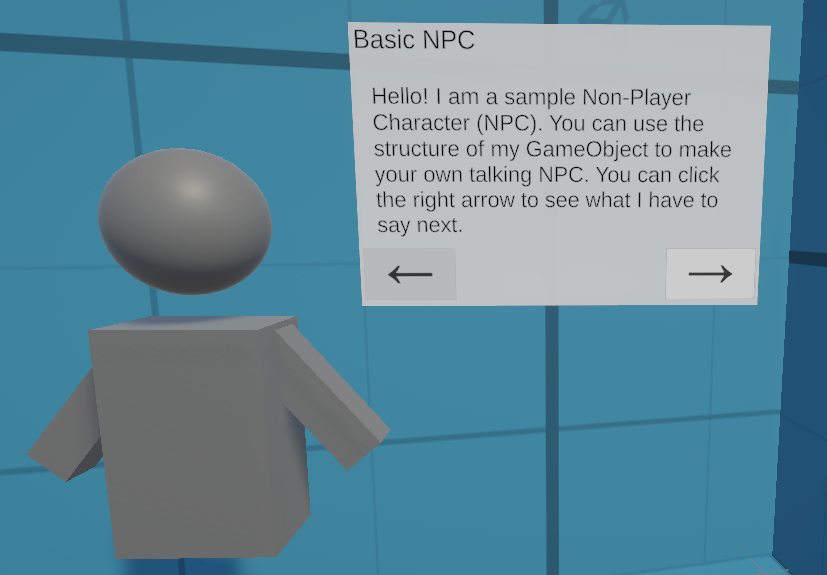
Once you’ve installed the unity package, simply drag the prefab Basic NPC with Speech Bubble located in Assets/Pre-College/Prefabs/Basic NPC and replace the NPC’s model with that of your own NPC.
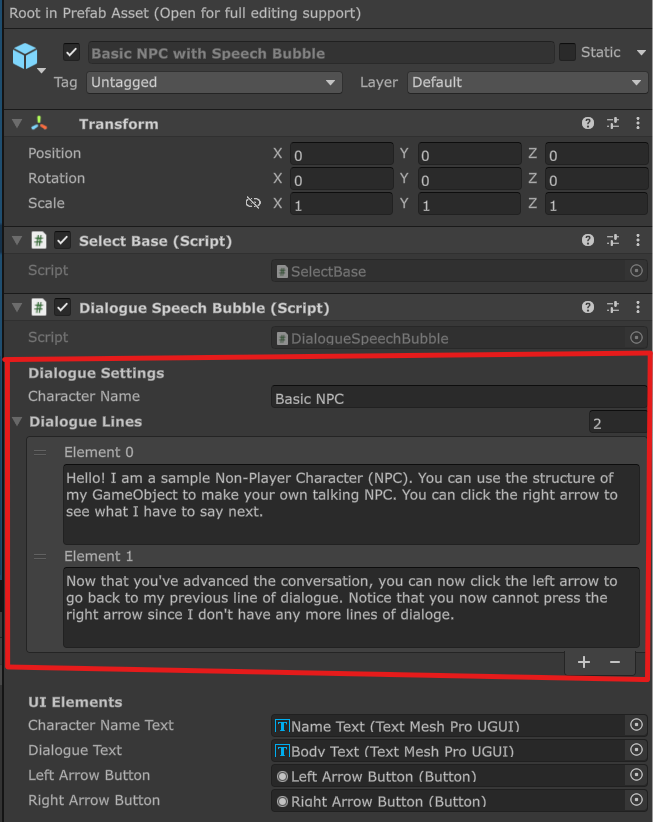
Then, to change the dialogue and the NPC name, simply edit the Dialogue Speech Bubble component in the parent GameObject of that prefab:
These workshops are presented by iZone, a library space on campus that provides robust programming and services to students interested in developing their skills as creative problem solvers.
These workshops are designed to get you thinking about your project in these ways:
What kind of experience do you want to make? What is the overall concept?
What kind of audience are you making your experience for?
What kind of Non-player Character (NPC), win objects, and win containers would fit your experience?
This workshop will take you through a brief introduction into XR technologies, the history and current issues of these technologies, the resources we have here at Studio X, and an overview of the Pre-College program (which is what you are going to be doing!).
Note: Libby mentions that the win container of Jellyfishin' is the crate, but in more recent versions of Jellyfishin' the win container is now the net.
Step 1: Check the pre-made win containers to see if there are any that will match your experience.
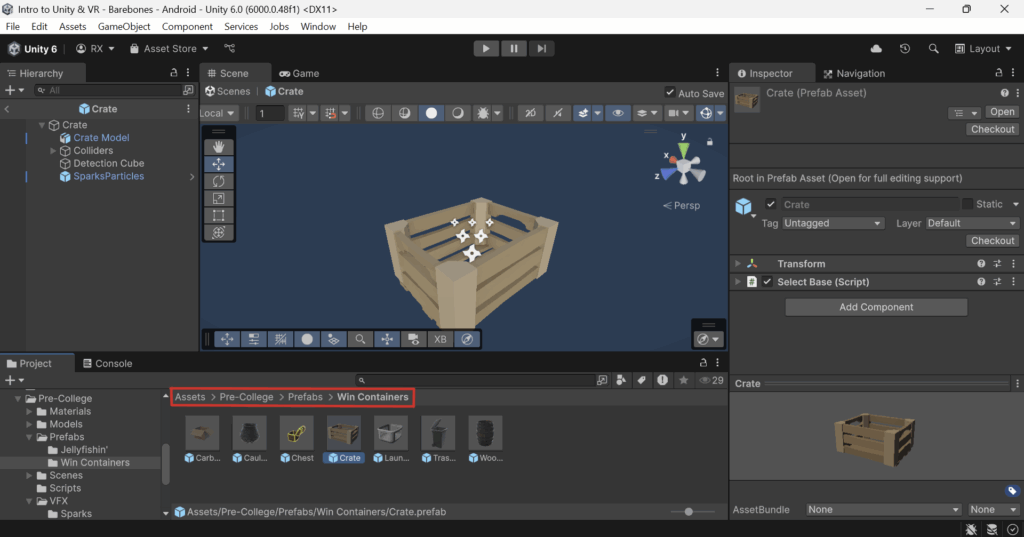
In this project, we have given you pre-made win containers that you can use. These are located in Assets/Pre-College/Prefabs/Win Containers in the Project Window.
If you like one of the already existing win containers, then there’s no need to continue this tutorial! Just drag the prefab you like into your scene.
Step 2: If you want to make your own Win Container
Create an empty GameObject in your scene (I will name mine Win Container).
Depending on what kind of Win Container you are trying to make, you may or may not want to add a Rigidbody to the parent GameObject you just made.
For a non-moving stationary box like in the following example, it is not required.
Add your model to the GameObject you just made as a child GameObject (I’m going to use the crate model).
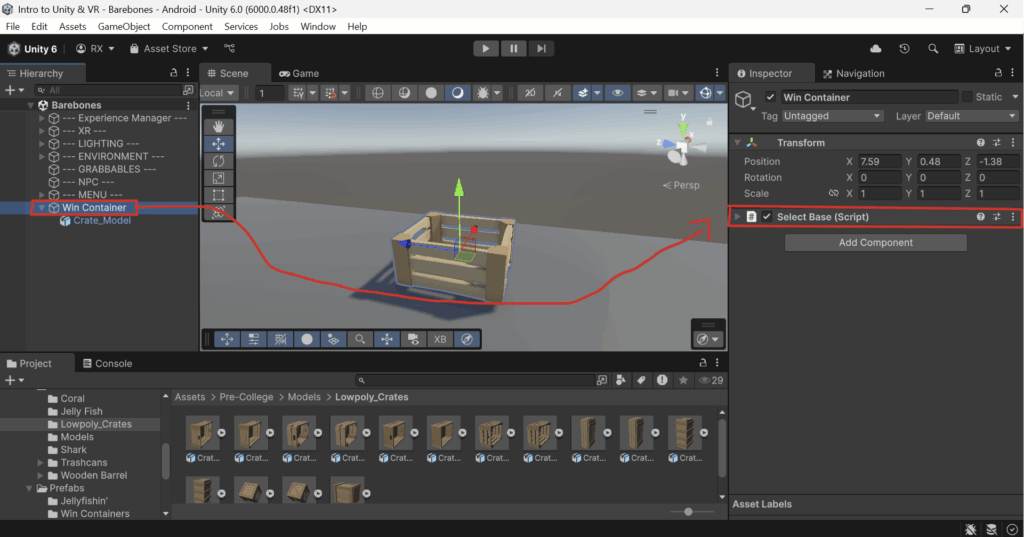
(Optional, but recommended) Add the Select Base component to your parent GameObject.
This is a component that simply prioritizes selecting the object it is attached to when clicking on an object in the Scene View. With this component attached to your parent GameObject, when you click on its child model, it will select the parent GameObject rather than the model’s GameObject.
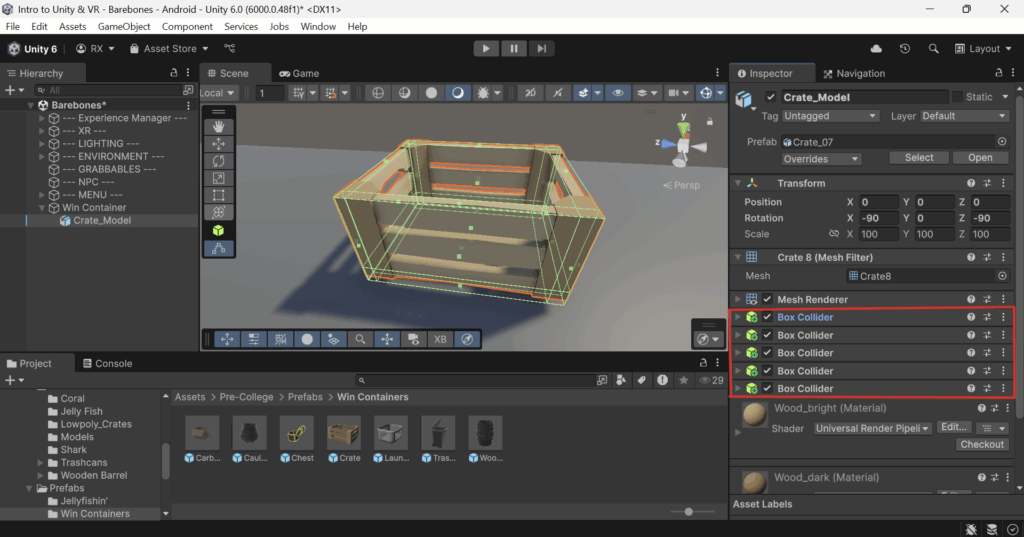
Step 3: Ensure that you have collider(s)for your Win Container.
Reminder: For more complex models, you can have multiple colliders on one GameObject.
Step 4: Make a trigger cube.
This GameObject will detect if a Win Object enters it.
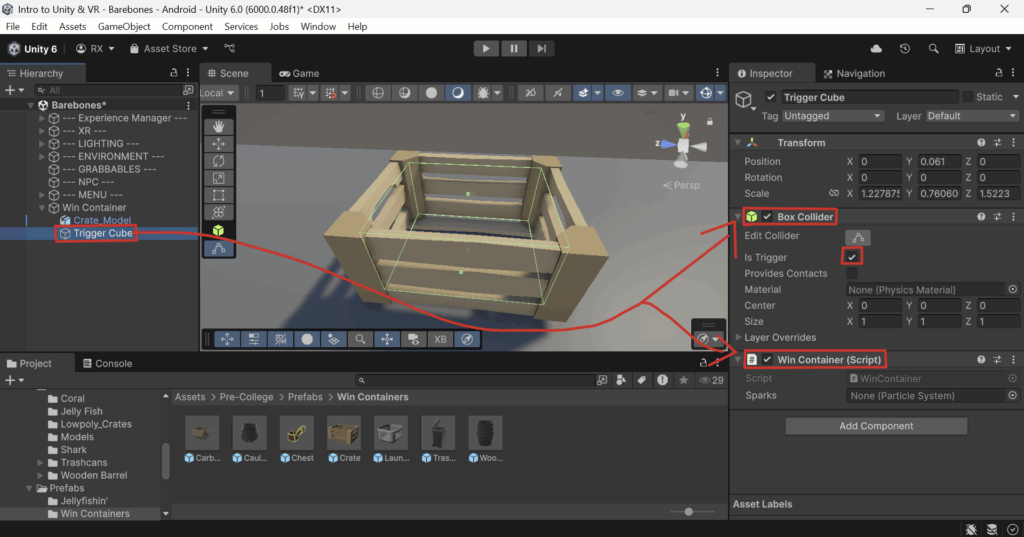
Make a new empty GameObject and give it a Box Collider.
On the Box Collider component, enable the Is Trigger variable.
This disables normal physical collisions for this collider and has it act as just a sensor for coming into contact with other colliders.
Adjust the Box Collider until it covers the empty space of the win container.
Add the Win Container component to the GameObject.
Your Win Container should now be fully functional!
Don’t forget to make it a Prefab by dragging it from the Hierarchy Window into the Assets/_Prefabs folder in the Project Window.
Step 5 (Optional): Add sparks that fly out whenever a Win Object is placed in the Win Container.
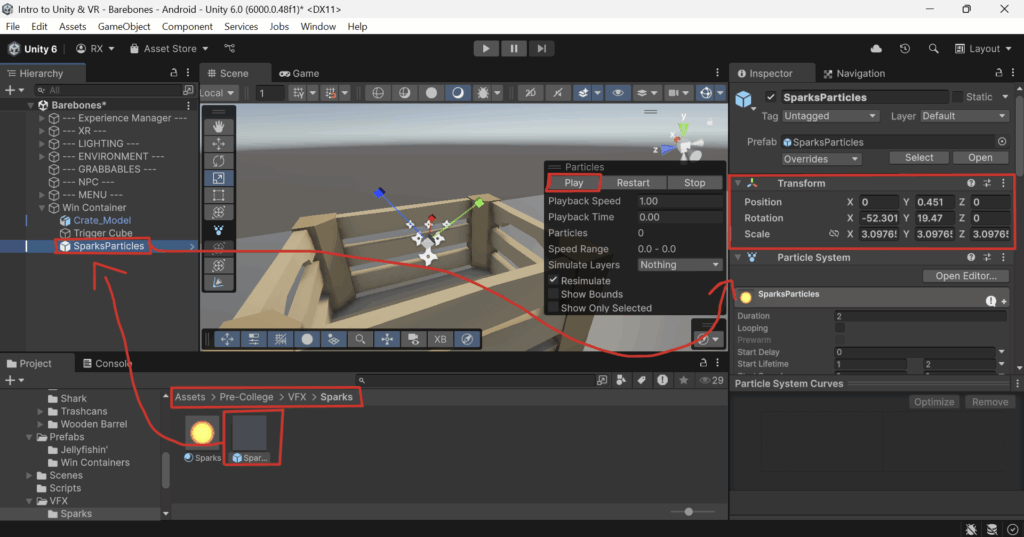
Add the SparksParticles prefab from Assets/Pre-College/VFX/Sparks to your Win Container‘s parent GameObject.
Select the SparksParticles in the Hierarchy Window, and reset the Transform‘s position values to 0,0,0 in the Inspector Window.
Test the Particle System by clicking the Play button in the Scene View.
Adjust the Position, Rotation and Scale of the SparksParticles object.
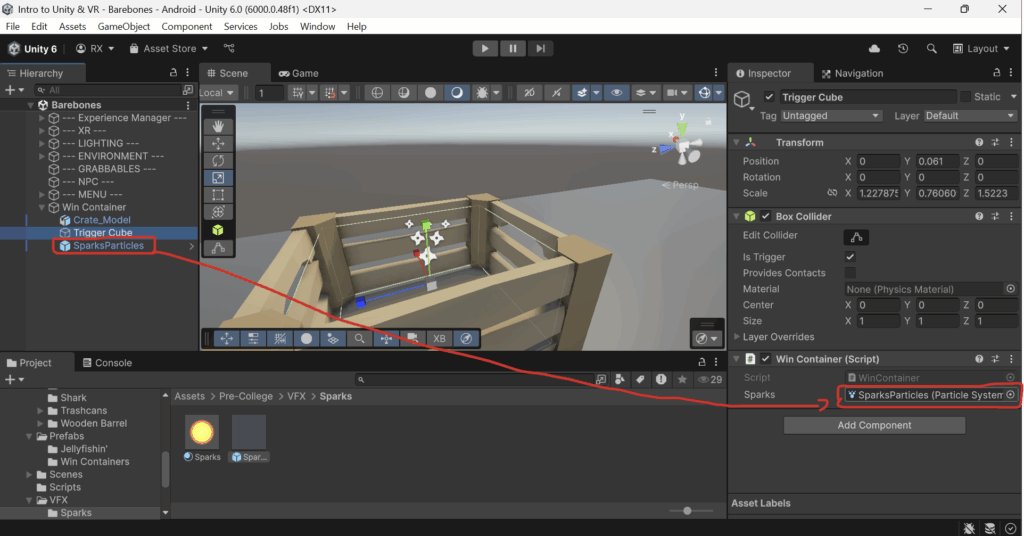
Assign the SparksParticles object to the Sparks variable in the Win Container component in your Trigger Cube object.
Step 1: Make an empty GameObject to hold your Win Object‘s model.
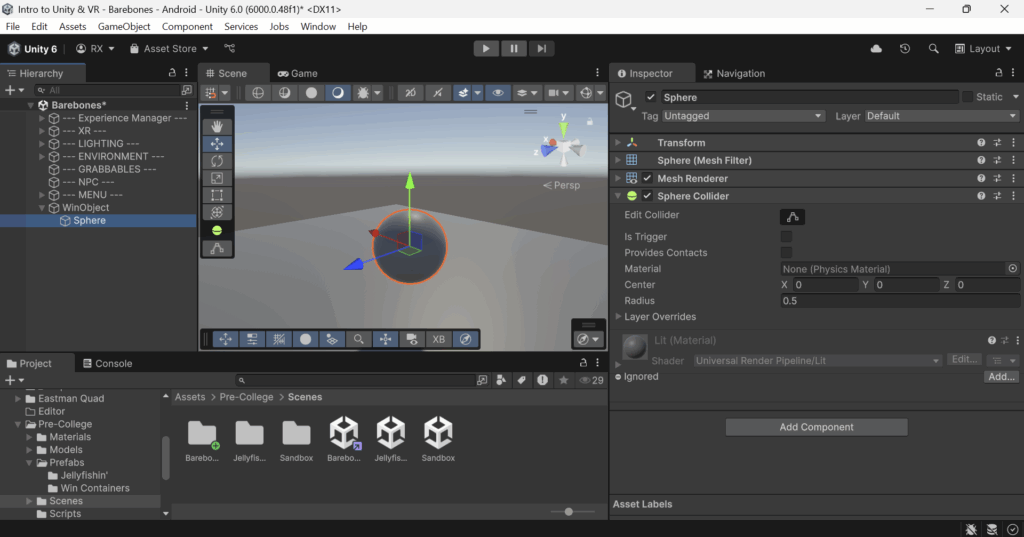
Create a new empty GameObject (I’m going to name mine WinObject).
Add the model you would like to use as a child object (I’m going to just be using a Sphere).
Step 2: Make your Win Object grabbable.
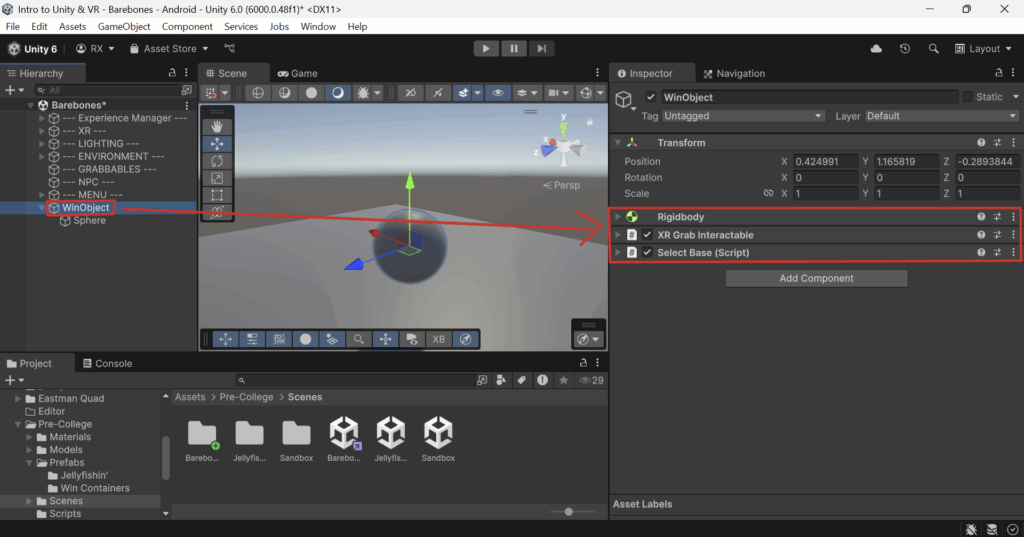
In the parent GameObject, add the Rigidbody and XR Grab Interactable components
Configure these components however you would like.
DO NOT place a Collider on the parent GameObject. Place the Collider(s) on your child GameObject that contains the model.
(Optional, but recommended) Add the Select Base component to your parent GameObject.
This is a component that simply prioritizes selecting the object it is attached to when clicking on an object in the Scene View. With this component attached to your parent GameObject, when you click on its child model, it will select the parent GameObject rather than the model’s GameObject.
Step 3: Add and configure the Win Object component to which ever object contains your Collider.
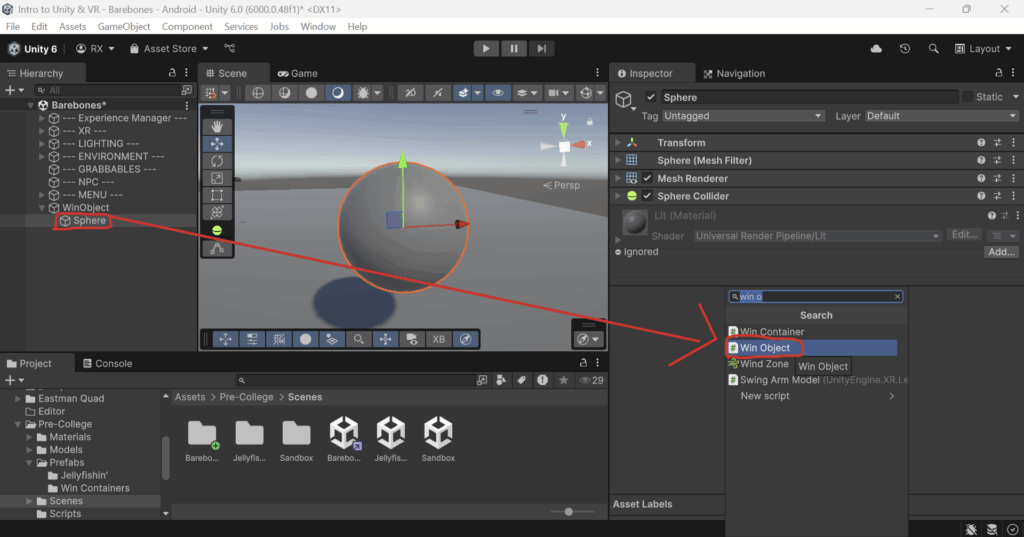
Select the object that holds your Collider. For me, this is my sphere.
Add the Win Object component in the Inspector Window.
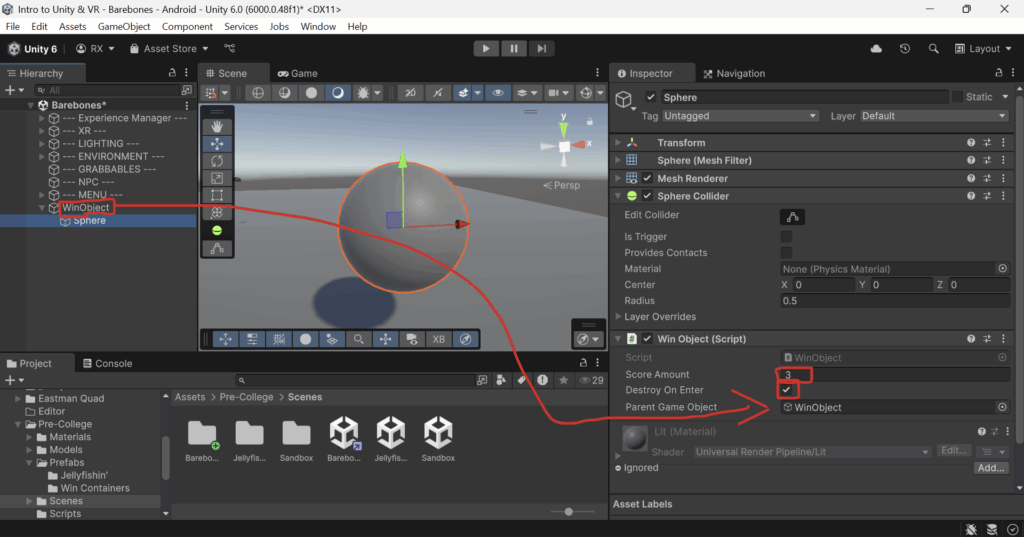
Configure the values to your liking.
Score Amount lets you change the score value that the Win Object will give the player when it is placed in a Win Container.
Destroy On Enter: If this is enabled, then the Win Object will be deleted from the game once it enters the Win Container. This is how the jellyfish in Jellyfishin' work.
If Destroy On Enter is enabled, then you must assign the Parent Game Object variable to the parent GameObject of the Win Object.
Step 4: Save your Win Object as a Prefab.
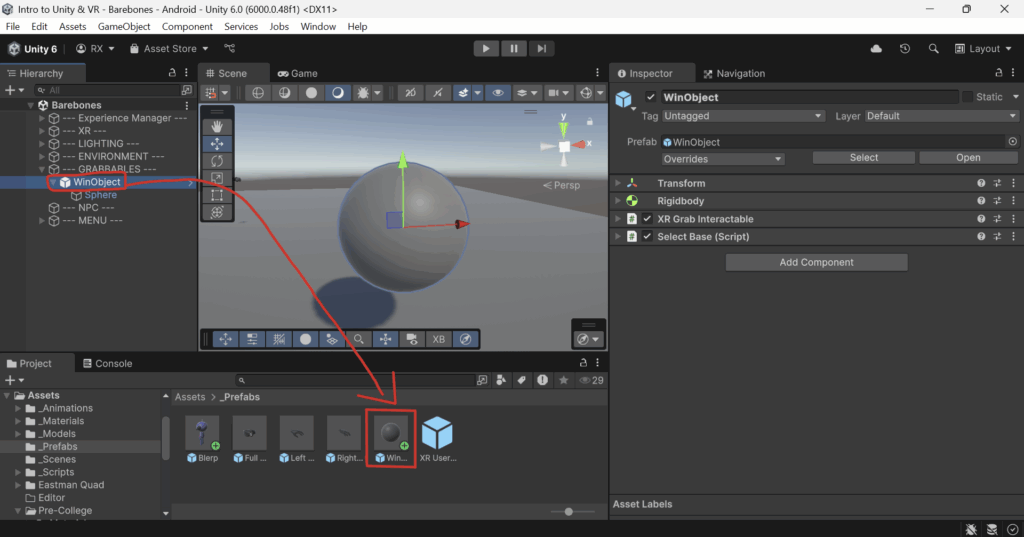
Move your Win Object to the --- GRABBABLES --- folder for organization.
Drag the parent GameObject of your Win Object from the Hierarchy into the Project Window in the Assets/_Prefabs folder.
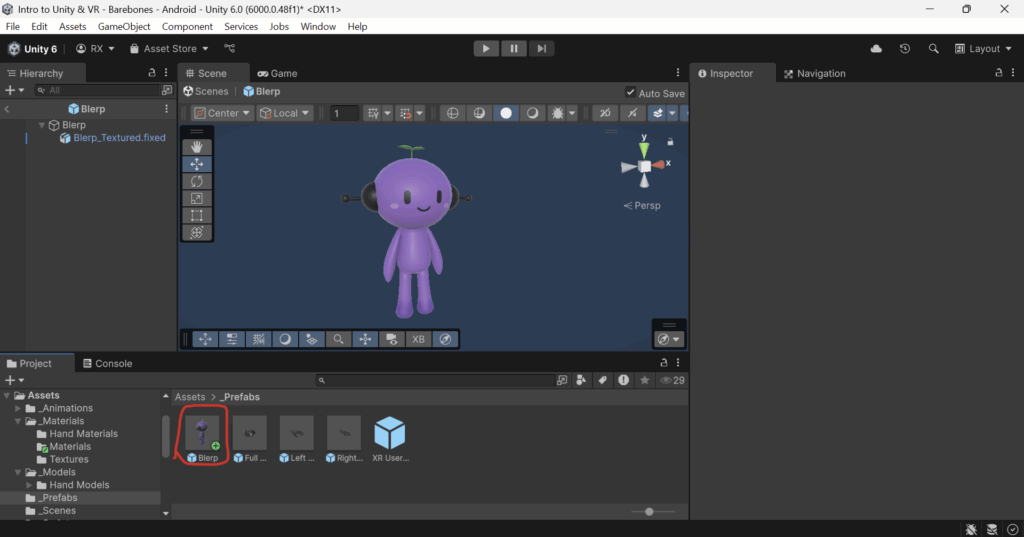
You will know that you are in the prefab editor when the background in your scene view is blue.
Prefab Editor Mode
We are going to edit our NPC in prefab editor mode rather than directly in the scene because this allows us to make direct changes to the prefab. If we were to work in the scene instead, any changes we made to the prefab would later have to be saved to the prefab. Using prefab editor mode lets us skip that extra step and allows us to directly edit the prefab.
Step 2: Add the Nav Mesh Agent Component to your Prefab’s parent GameObject.
Select the parent GameObject.
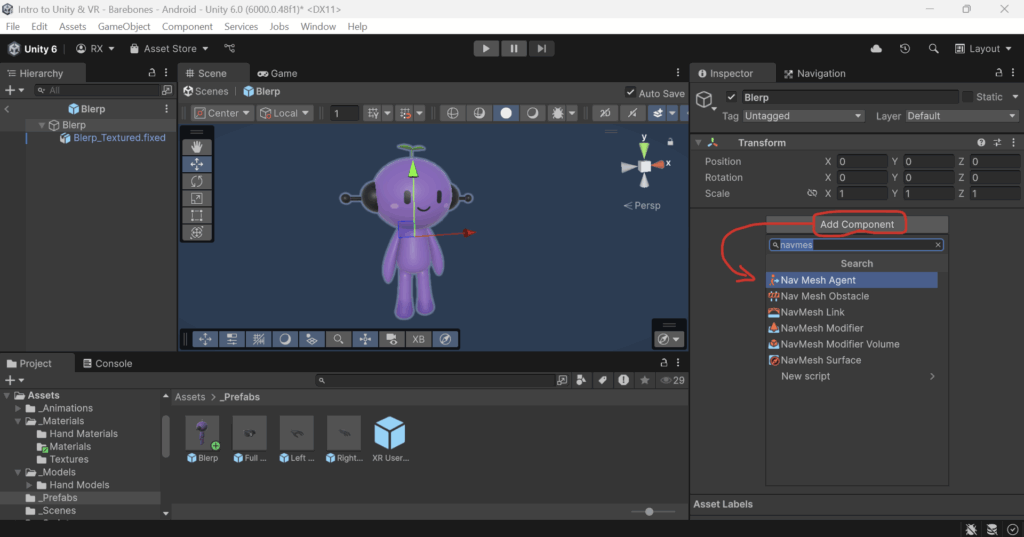
In the Inspector window, click Add Component.
Search for Nav Mesh Agent and select it.
Step 3: Enable Gizoms so you can see your Nav Mesh Agent‘s Obstacle Avoidance green cylinder.
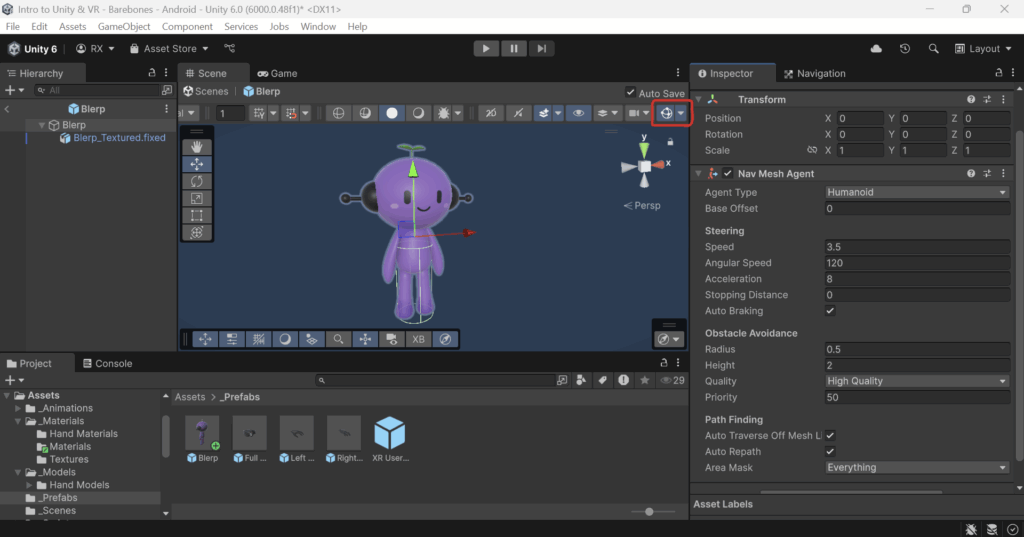
Ensure that Gizmos is on by clicking the Gizmos icon in the toolbar.
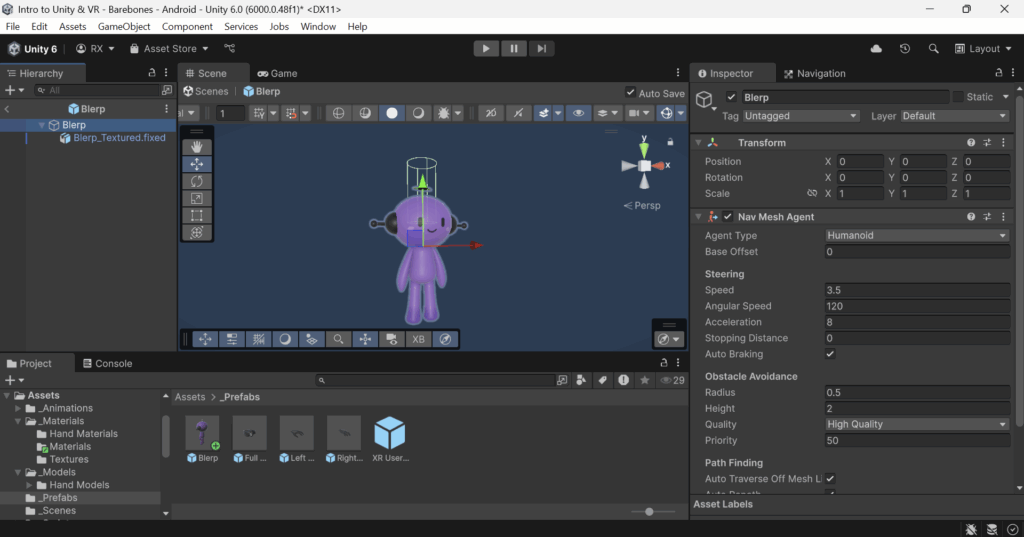
Now when you have the parent GameObject selected, you should see a green cylindrical outline on your NPC.
Step 4: Ensure that the bottom of the green cylinder matches the bottom of your NPC. If this is not already the case, follow these steps:
Why do we need to do this?
If you skip this step, then you may notice your NPC will be halfway in the ground when it tries to move during play mode. We need to ensure that the Nav Mesh Agent knows where our model’s feet are.
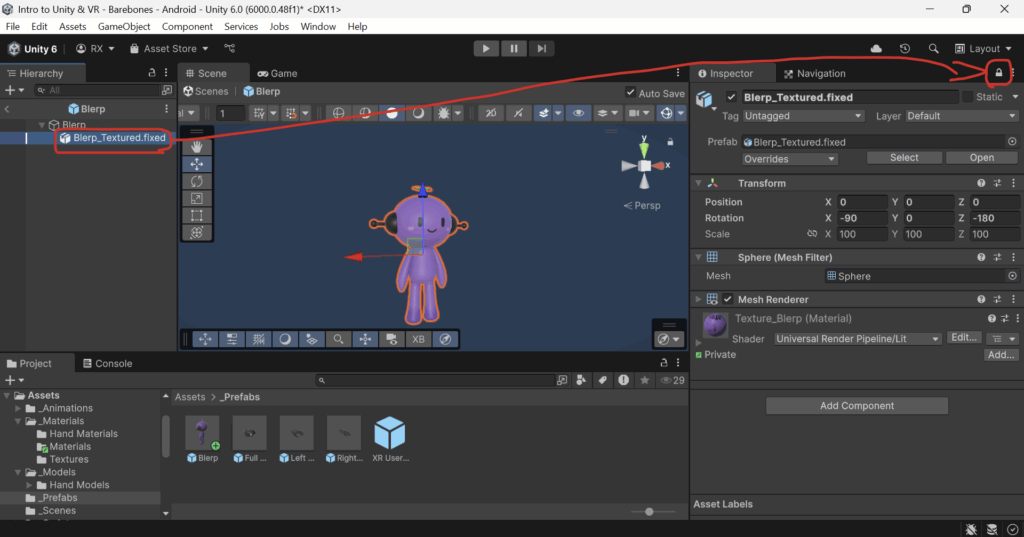
Select the GameObject holding your NPC‘s model.
Click the Lock button in the inspector to lock the inspector to your model’s GameObject.
Select the parent GameObject.
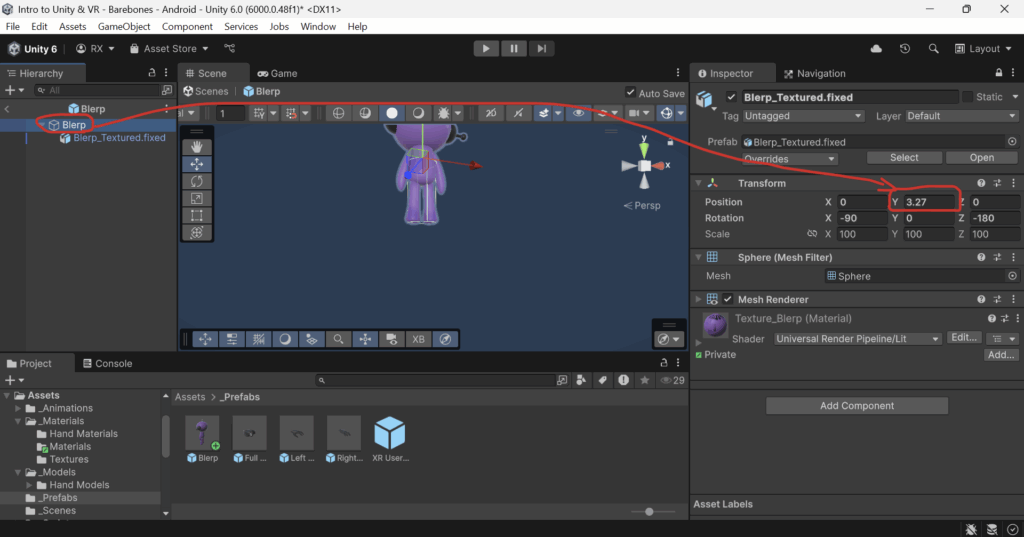
Adjust your model’s Transform‘s Y position until the bottom of the NPC matches that of the green cylinder.
Once you’ve finished, you can unlock the inspector by clicking the Lock button again.
About locking the Inspector window.
Usually, when we select an object in the Hierarchy window, it also selects that object in the Inspector window. However, there are certain times when we want to be able to select a GameObject in the Hierarchy, but edit a different GameObject in the Inspector at the same time.
In this case, in order to see the green cylinder, we need to select the parent GameObject. However, we want to edit the child GameObject at the same time. So, we can lock the child GameObject in the Inspector, then select the parent GameObject, and edit the child GameObject at the same time.
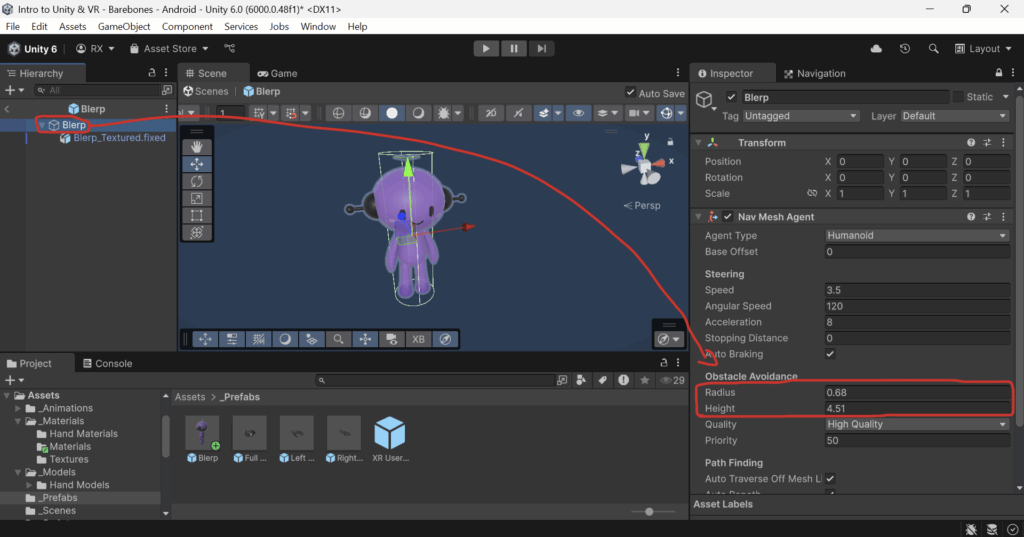
Step 5: Adjust the Radius and Height values of your Nav Mesh Agent‘s Obstacle Avoidance to match your NPC’s model.
Select the parent GameObject.
Adjust the Radius and Height values until the green cylinder covers your NPC
Tip: Don’t make your radius and height too big.
Making your radius and height too big can make it harder for your NPC to move around in tight spaces.
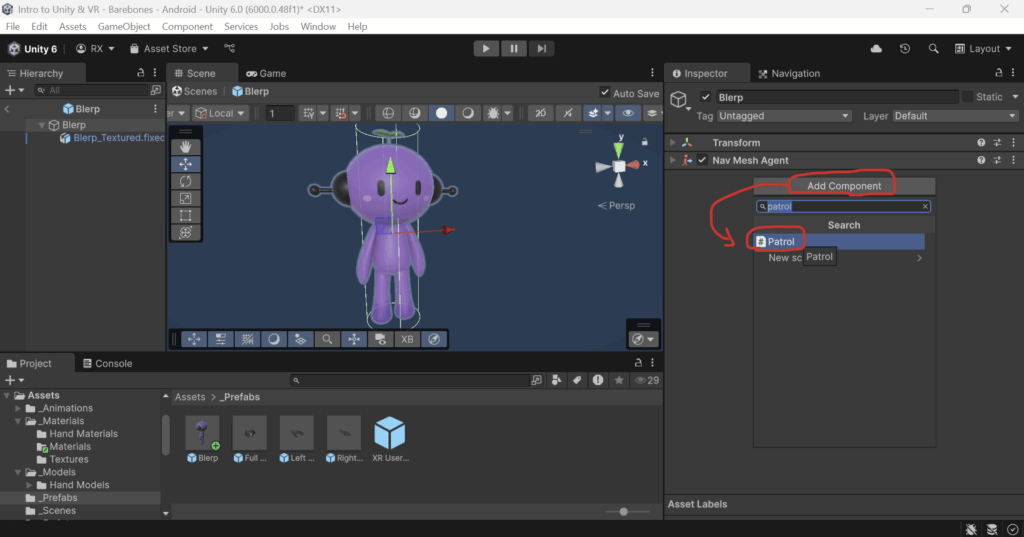
Step 6: Add the Patrol component to your NPC’s parent GameObject.
This will let us add points for the NPC to walk to later.
Step 7: Add and configure the Nav Mesh Surface component to your floor.
Enter the scene you want to work in. If you don’t know which scene to work in, then enter the Barebones Scene located in Assets/Pre-College/Scenes.
Select the floor your NPC will be traversing.
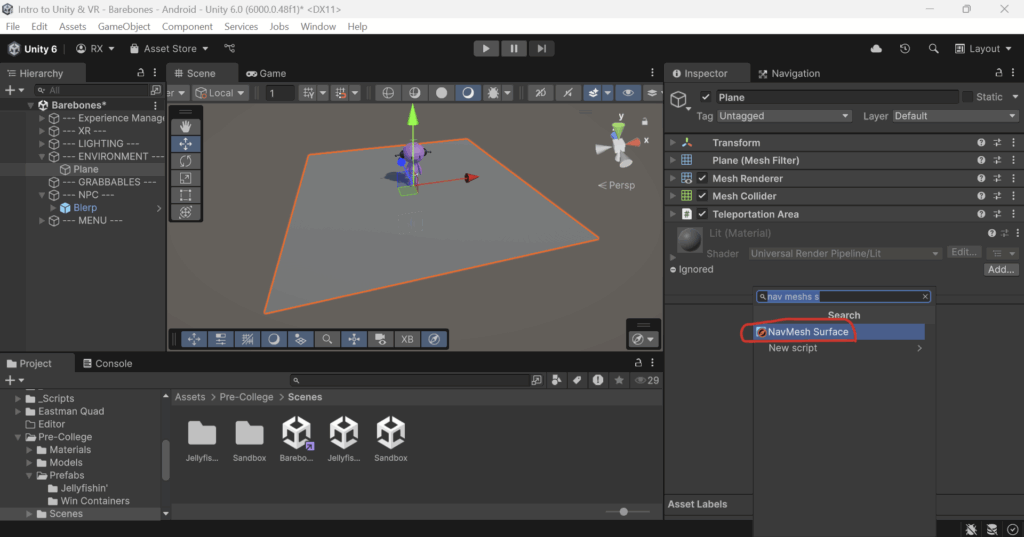
In the Inspector Window, click Add Component, then search for and add a Nav Mesh Surface component.
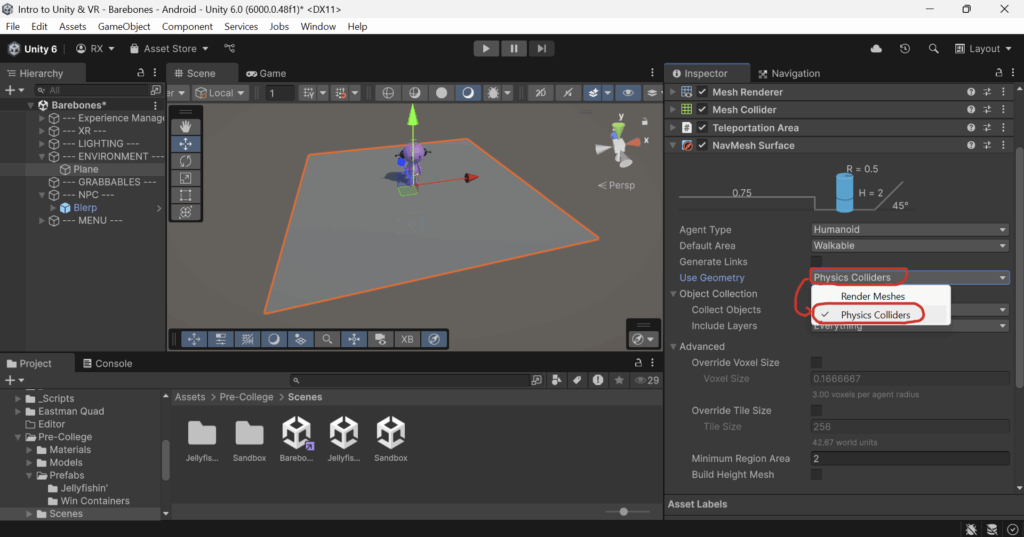
Change the Use Geometry variable in the Nav Mesh Surface component from Render Meshes to Physics Colliders.
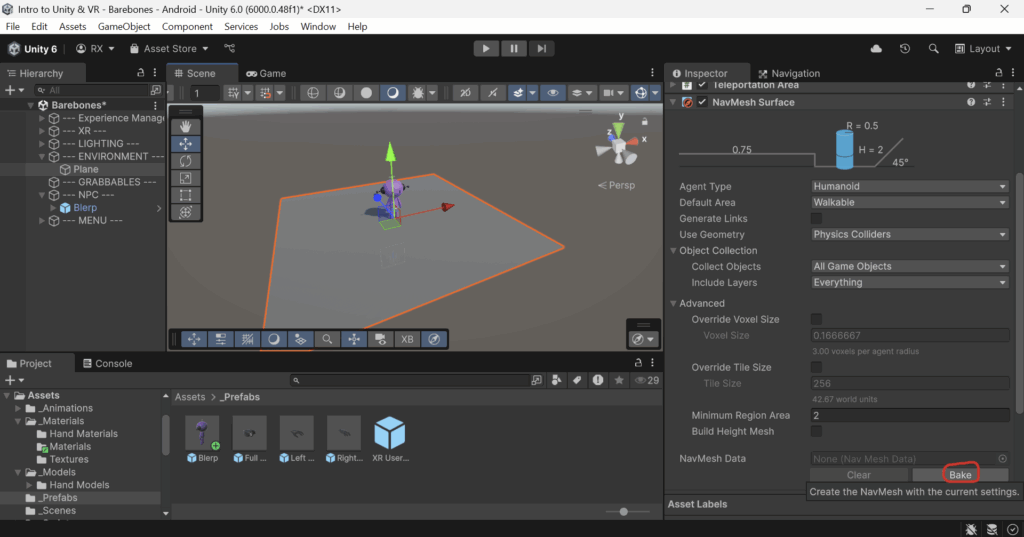
Click Bake (this process may take some time depending on how complex your floor is).
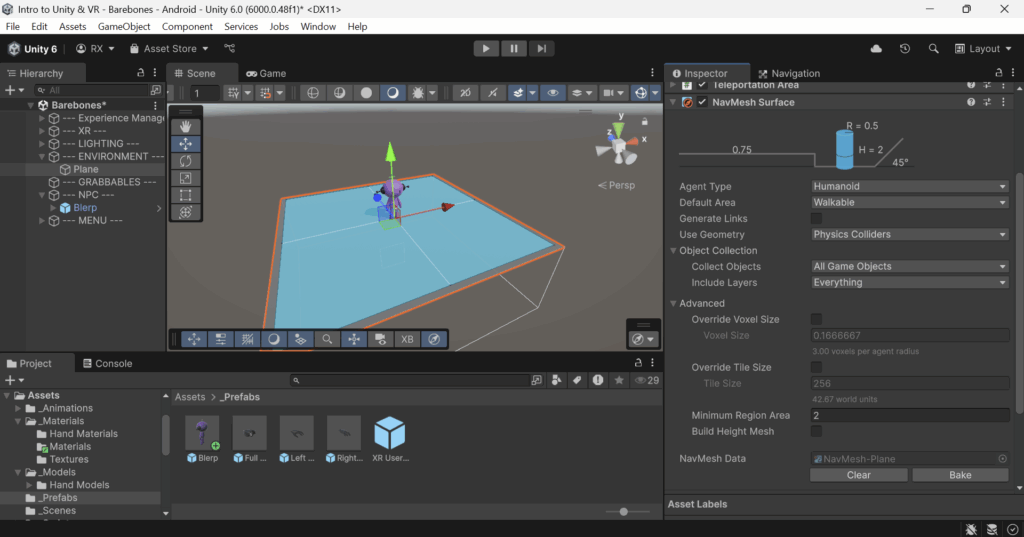
Once the Bake process is finished, with Gizmos on, you should see blue spots on your floor. These areas are where your NPC is able to traverse.
Step 8: Add patrol points so your NPC can move around.
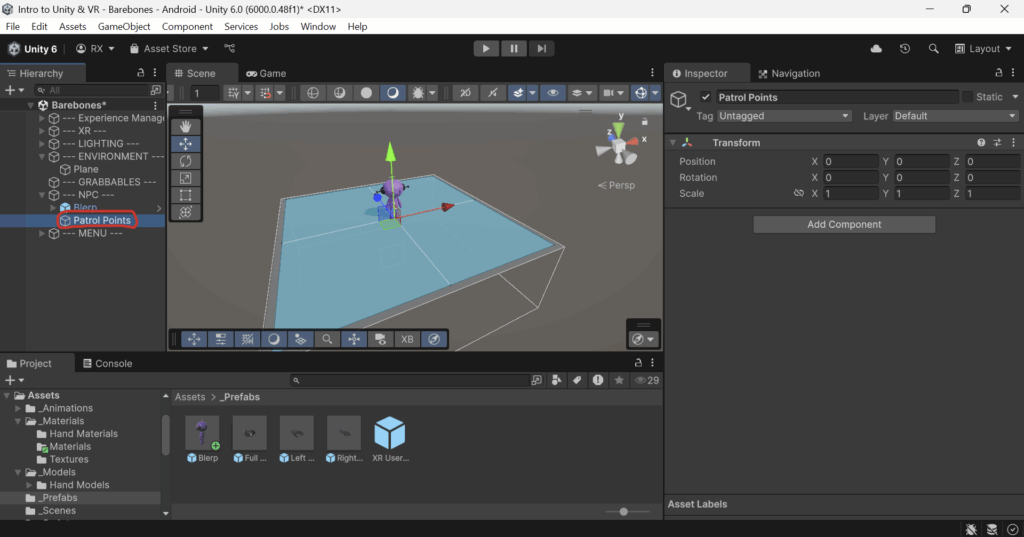
In your --- NPC --- folder, create a new empty GameObject called Patrol Points.
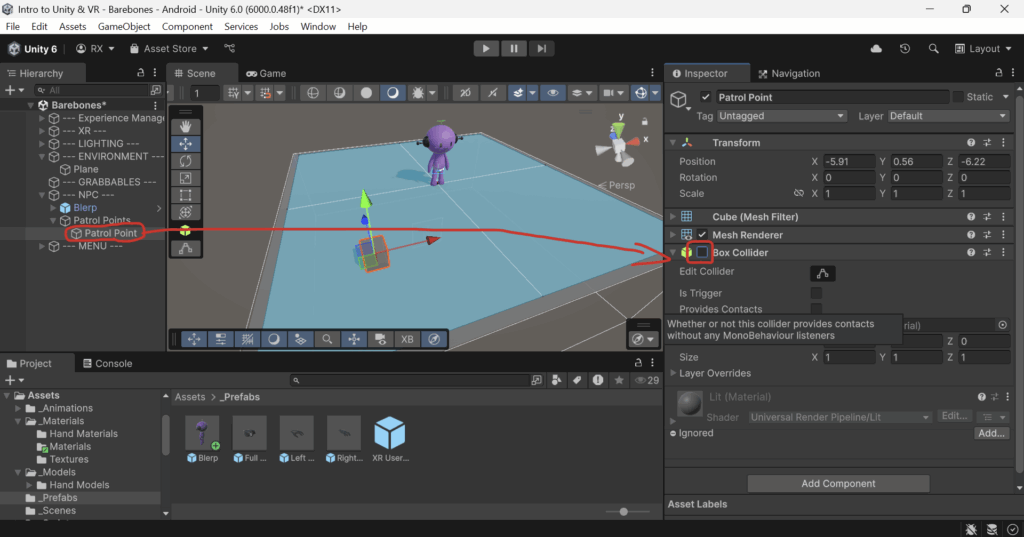
Create a new cube named Patrol Point. Disable its Box Collider component.
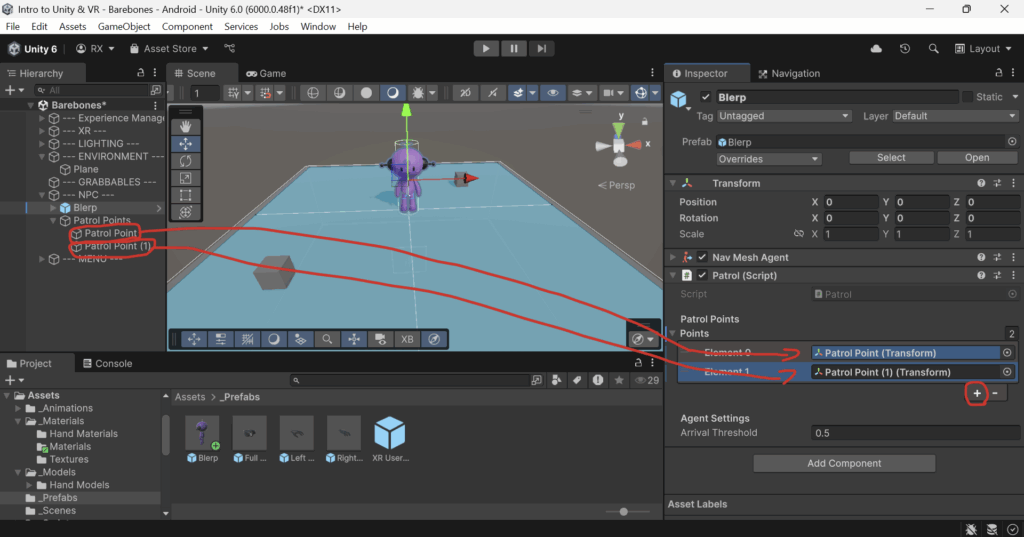
Duplicate the Patrol Point object you made by selecting the Patrol Point object and pressing Control and D on your keyboard. Then move your new Patrol Point (1) object to a different position.
Assign the Patrol Point objects you made to the Points variable in the Patrol component on your NPC’s parent GameObject by clicking the plus (+) icon and dragging the Patrol PointGameObjects from the Hierarchy Window into the Inspector Window.
Enter Play Mode, and switch back to scene view and observe your NPC moving between the points you assigned.
You can disable the Mesh Renderer component on your Patrol Points so your player does not see them. It’s just useful to have them be visible while you’re developing.
Step 9 (Optional): Make it so that your player “Loses” when they come into contact with your NPC.
Go back into prefab editing mode by double-clicking your NPC’s Prefab in the Project Window.
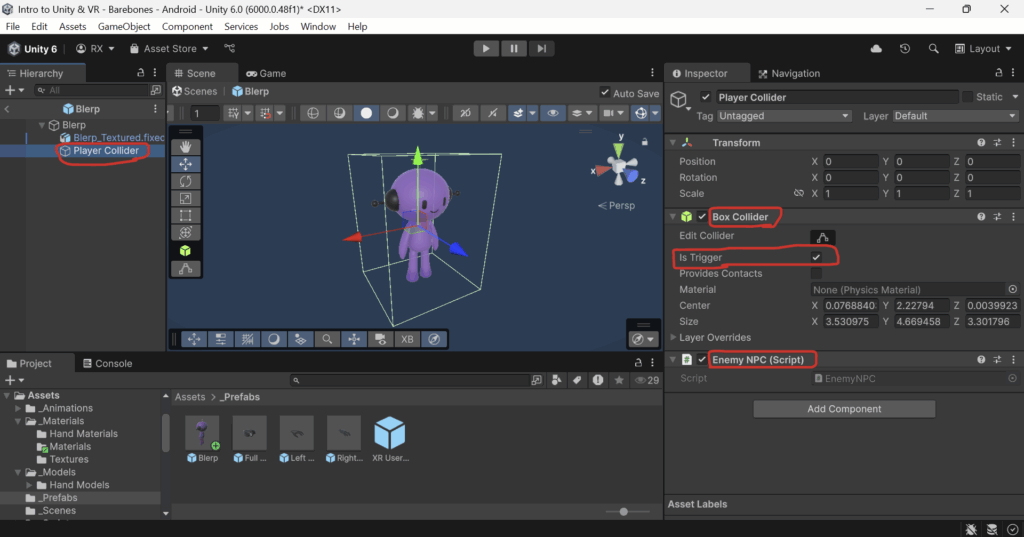
Create a new empty GameObject and name it Player Collider.
Give it a Box Collider or other collider depending on the shape you’d like to use, and edit the collider until it covers your whole NPC.
Enable the IsTrigger variable in the Collider component.
This disables normal physical collisions and has the collider act as just a sensor for coming into contact with other colliders.
Add the Enemy NPC script to the Player ColliderGameObject.
When your player comes into contact with your NPC, the player should now “lose.” (Make sure that the Sandbox Mode variable in your Experience Manager is not enabled when testing this)