An asset pack of trees, bushes, rocks, etc… made by Emmie. Feel free to use it in your project! Download this add-on here.
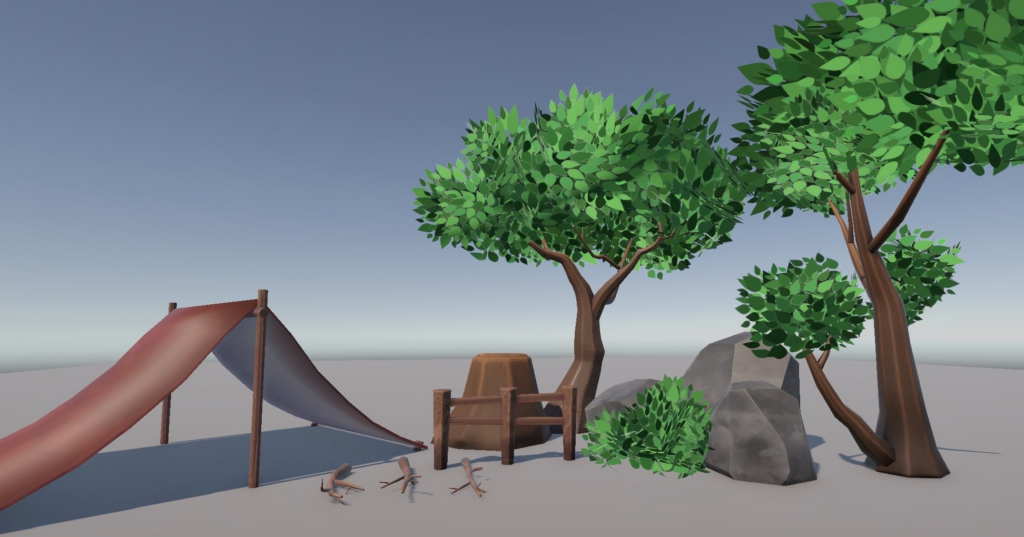
An asset pack of trees, bushes, rocks, etc… made by Emmie. Feel free to use it in your project! Download this add-on here.
First, download an add-on. This will be a file with the file extension .unitypackage.
In your Unity project, click Assets -> Import New Asset...
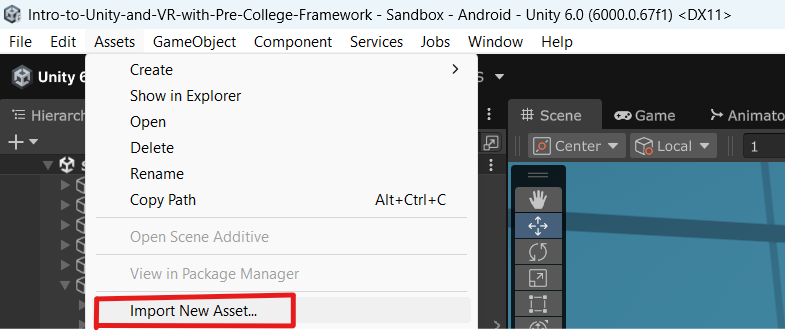
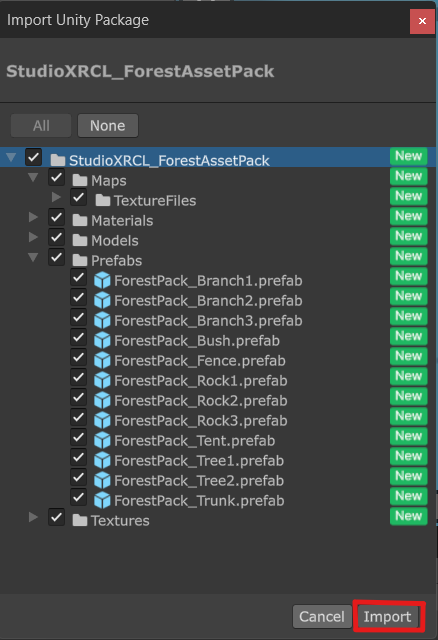
Then select your .unitypackage file. Then select Import in the Import Unity Package window.
This is an add-on for the Pre-College framework that adds a dialogue speech bubble for your NPC. Click here to download this add-on.
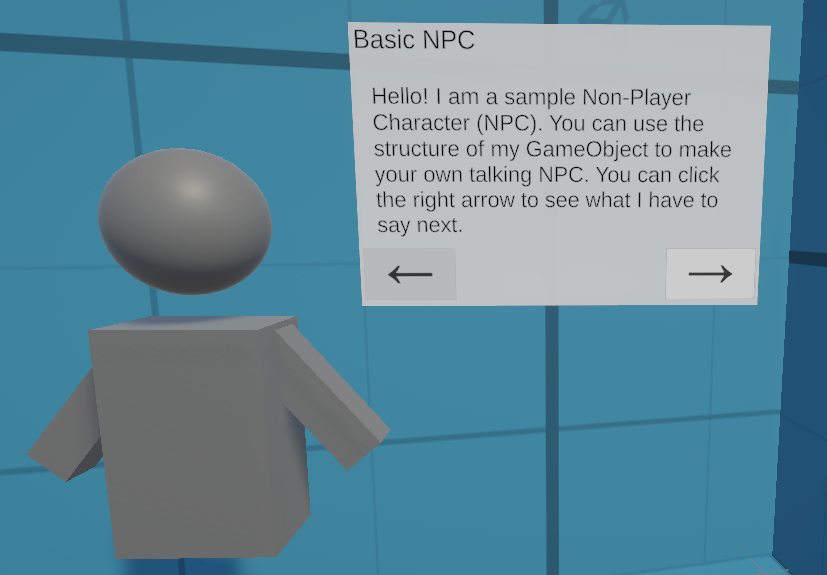
Once you’ve installed the unity package, simply drag the prefab Basic NPC with Speech Bubble located in Assets/Pre-College/Prefabs/Basic NPC and replace the NPC’s model with that of your own NPC.
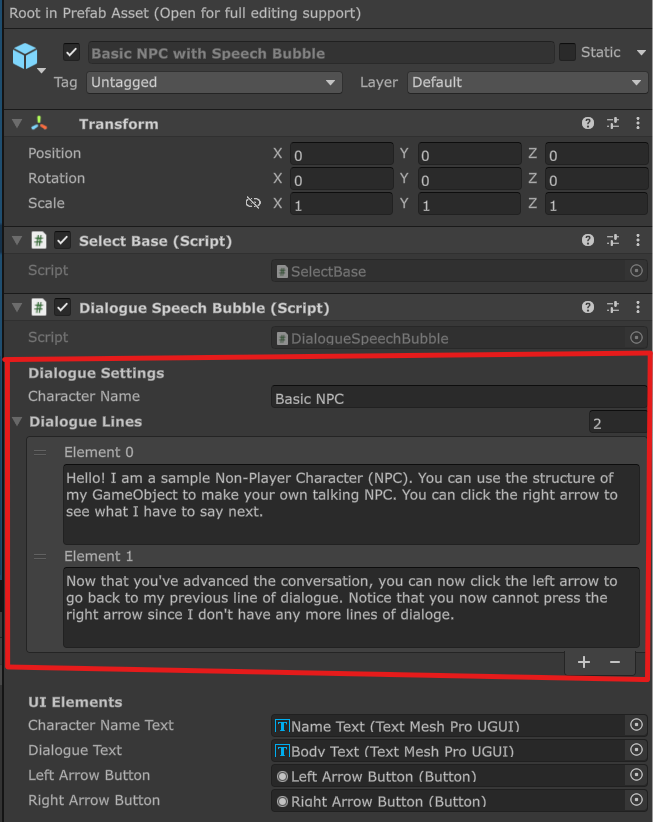
Then, to change the dialogue and the NPC name, simply edit the Dialogue Speech Bubble component in the parent GameObject of that prefab:
Disclaimer: When using Unity assets, be mindful of licensing restrictions, version compatibility issues, and reliance on third-party content. Always check the asset’s terms and documentation before adding it to your project.
While creating your environment in Unity, you’re allowed to use the Unity Asset Store to download assets and use them for your project, following the correct guidelines.
From here you’ll find a multitude of assets ranging from 3D to 2D assets, for this guide we’ll mainly be focusing on using the 3D tools. Heres the link to the 3D Unity Asset Store, make sure you’re logged into your Unity Account to access downloads.
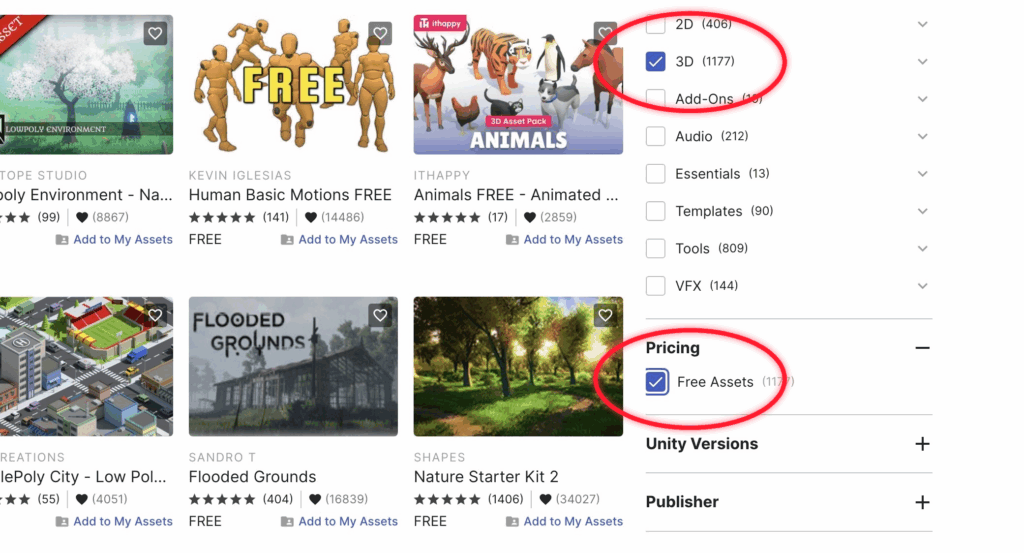
On the side of the Unity Asset Store theres going to be a filter that allows you to find any type of asset, we’ll be using the free assets, so under Pricing you want to check Free Assets.
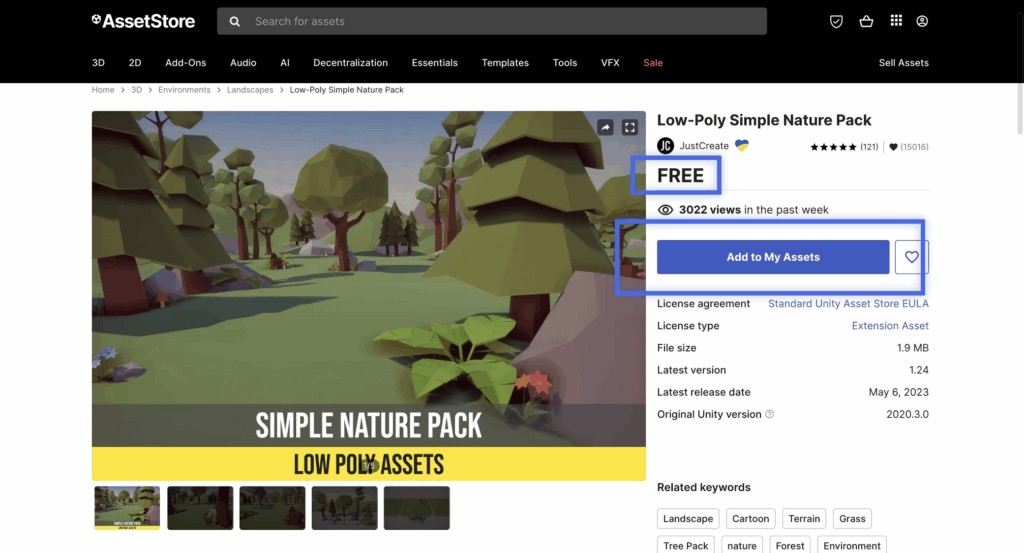
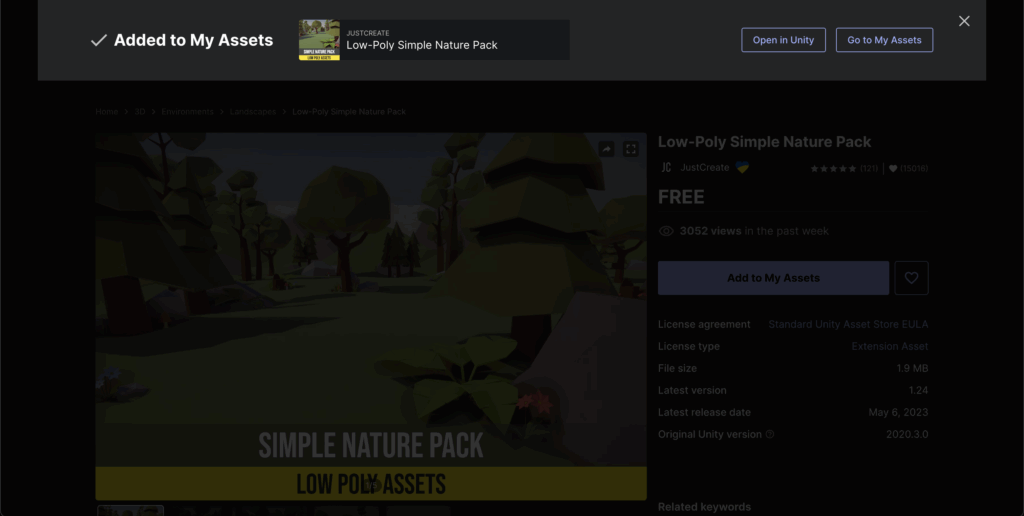
Then choose a free asset to download, and it’ll bring you to asset page with a “Add to My Assets” button. Make sure the page also has the word FREE above the button.
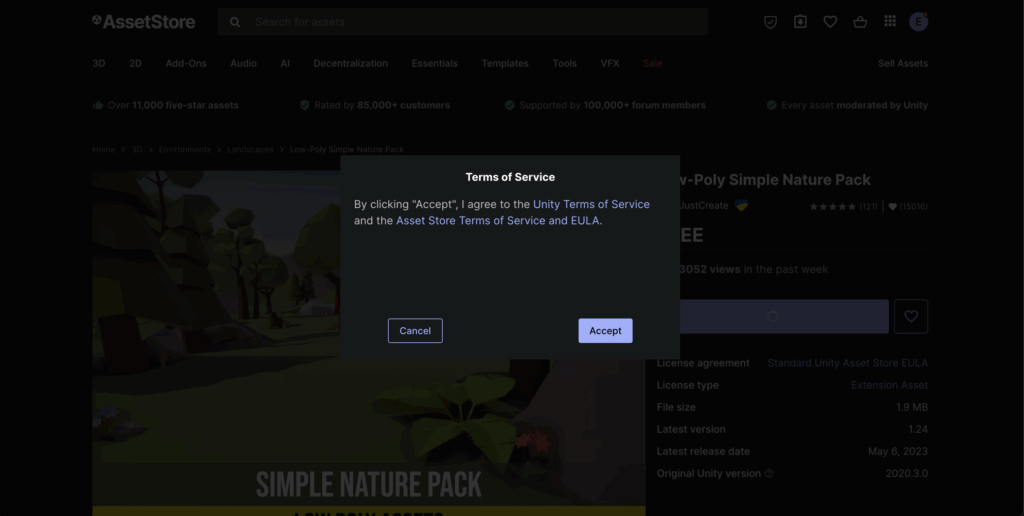
After clicking “Add to My Asset,” you’ll see a pop-up appear about the Terms of Service. It’s important to understand that even free assets may come with specific rules or restrictions on how they can be used.
After accepting the terms, another pop-up will appear asking if you want to open your assets in Unity. Click “Open in Unity.”
After opening Unity, you’ll see your package manager appear, then you want to select the asset you want to download and add it into your project by clicking download -> import to project -> import.
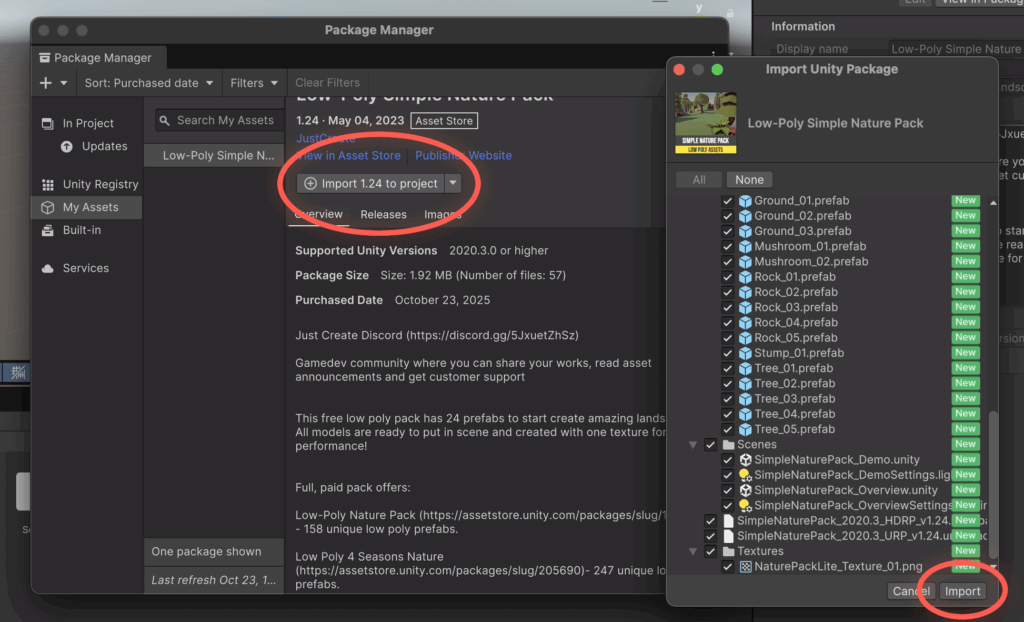
After downloading, you’ll see the folder appear in your assets folder, in there it should be organized and contain a material, model, prefabs, and textures folders!
Good Luck!
Step 1: Check the pre-made win containers to see if there are any that will match your experience.
In this project, we have given you pre-made win containers that you can use. These are located in Assets/Pre-College/Prefabs/Win Containers in the Project Window.
If you like one of the already existing win containers, then there’s no need to continue this tutorial! Just drag the prefab you like into your scene.
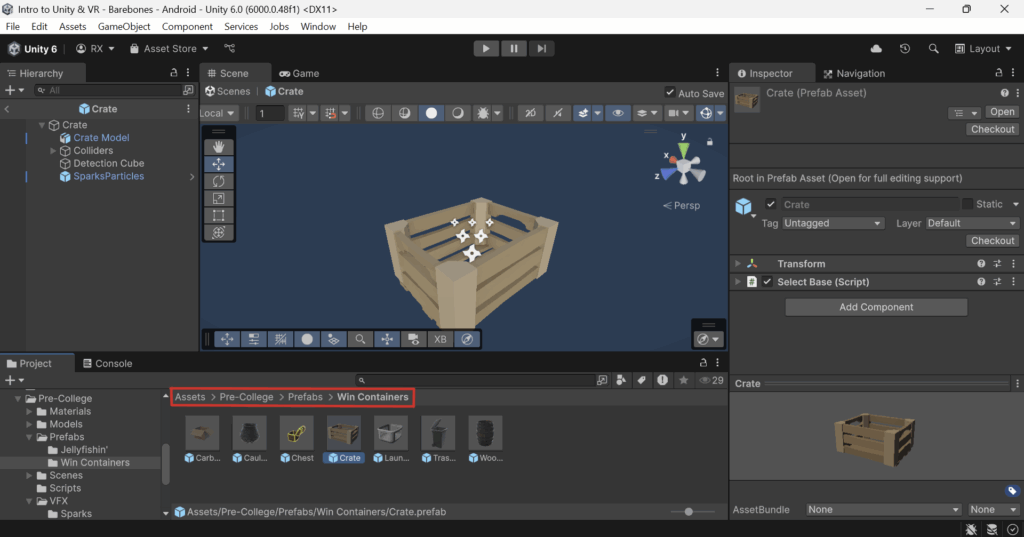
Step 2: If you want to make your own Win Container
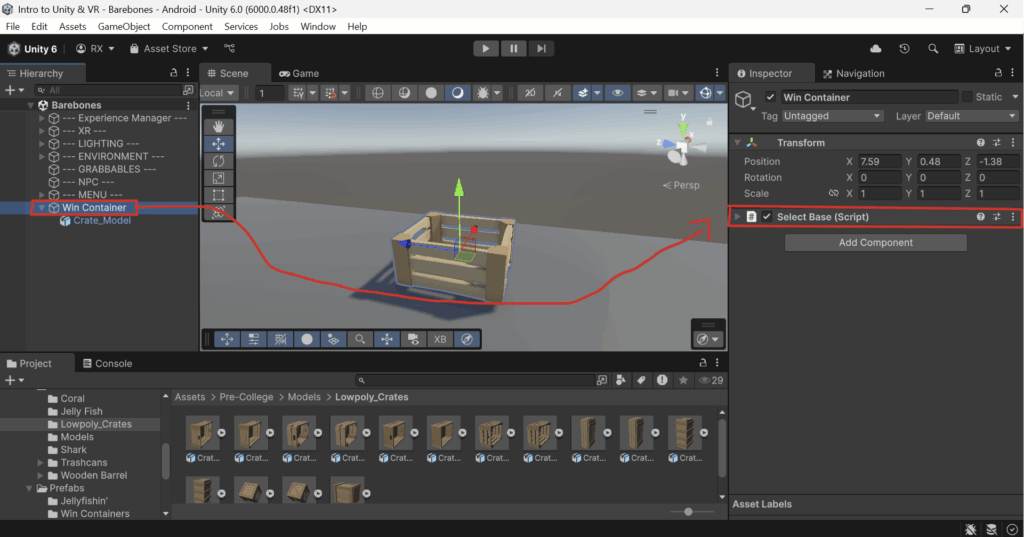
GameObject in your scene (I will name mine Win Container).
Win Container you are trying to make, you may or may not want to add a Rigidbody to the parent GameObject you just made. GameObject you just made as a child GameObject (I’m going to use the crate model).Select Base component to your parent GameObject.This is a component that simply prioritizes selecting the object it is attached to when clicking on an object in the Scene View. With this component attached to your parent GameObject, when you click on its child model, it will select the parent GameObject rather than the model’s GameObject.
Step 3: Ensure that you have collider(s)for your Win Container.
Reminder: For more complex models, you can have multiple colliders on one GameObject.
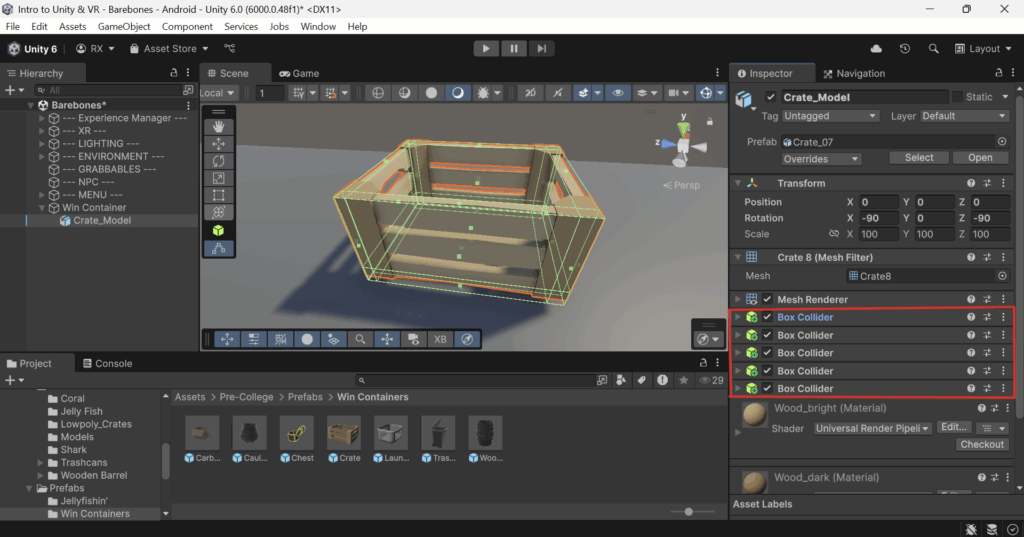
Step 4: Make a trigger cube.
This GameObject will detect if a Win Object enters it.
GameObject and give it a Box Collider.Box Collider component, enable the Is Trigger variable.
Box Collider until it covers the empty space of the win container.Win Container component to the GameObject.Win Container should now be fully functional!
Prefab by dragging it from the Hierarchy Window into the Assets/_Prefabs folder in the Project Window.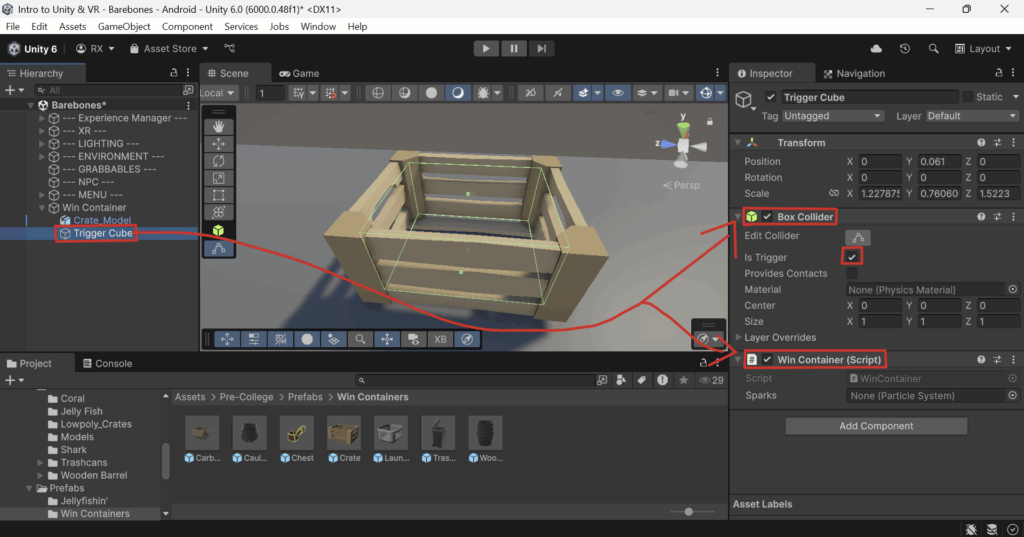
Step 5 (Optional): Add sparks that fly out whenever a Win Object is placed in the Win Container.
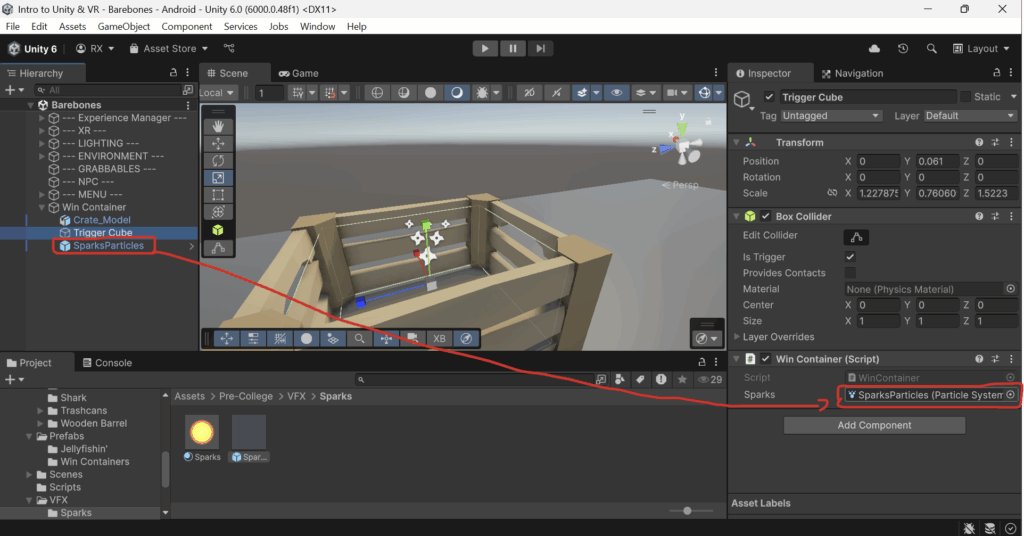
SparksParticles prefab from Assets/Pre-College/VFX/Sparks to your Win Container‘s parent GameObject.SparksParticles in the Hierarchy Window, and reset the Transform‘s position values to 0,0,0 in the Inspector Window.Particle System by clicking the Play button in the Scene View. Position, Rotation and Scale of the SparksParticles object.SparksParticles object to the Sparks variable in the Win Container component in your Trigger Cube object.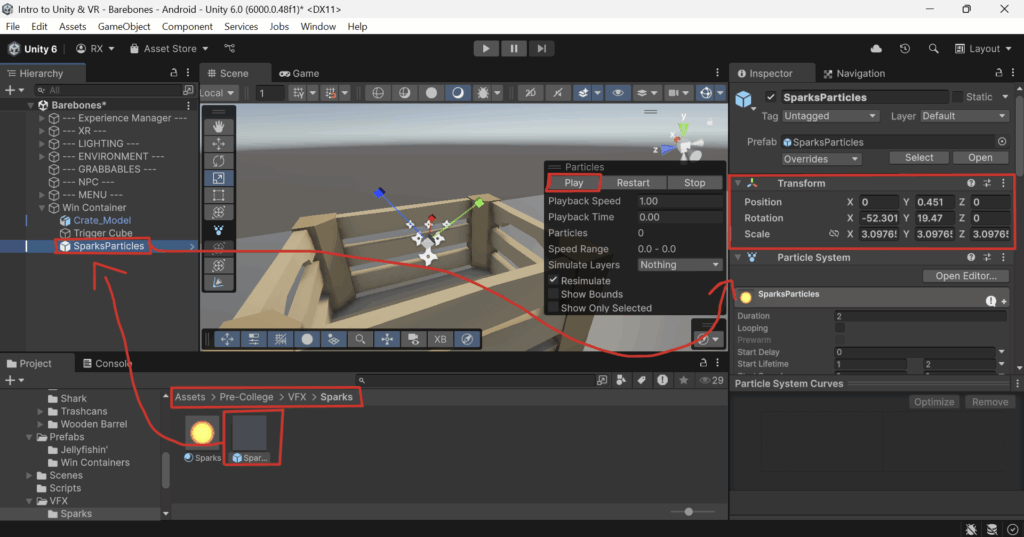
Next Steps:
Step 1: Make an empty GameObject to hold your Win Object‘s model.
GameObject (I’m going to name mine WinObject). Sphere).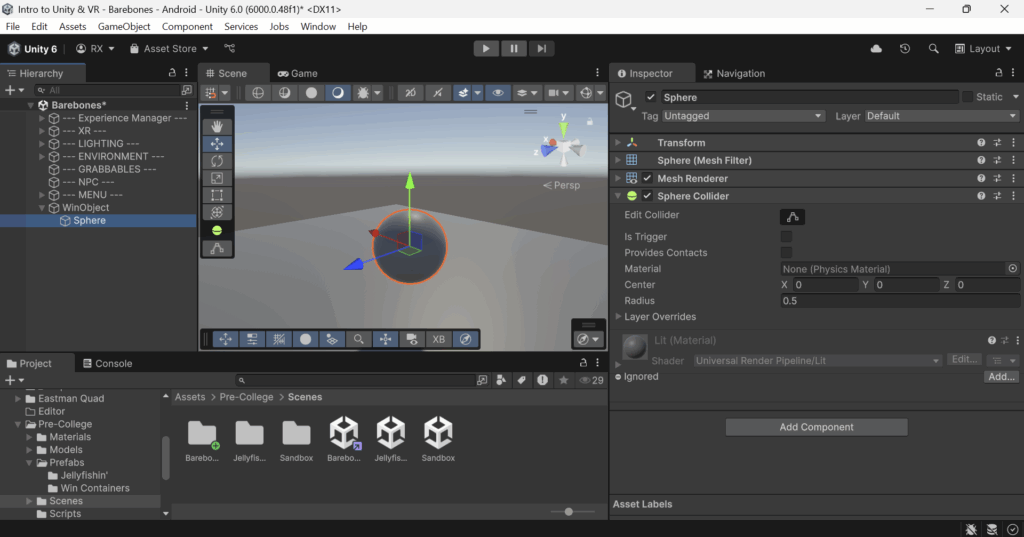
Step 2: Make your Win Object grabbable.
GameObject, add the Rigidbody and XR Grab Interactable components
Collider on the parent GameObject. Place the Collider(s) on your child GameObject that contains the model.Select Base component to your parent GameObject.This is a component that simply prioritizes selecting the object it is attached to when clicking on an object in the Scene View. With this component attached to your parent GameObject, when you click on its child model, it will select the parent GameObject rather than the model’s GameObject.
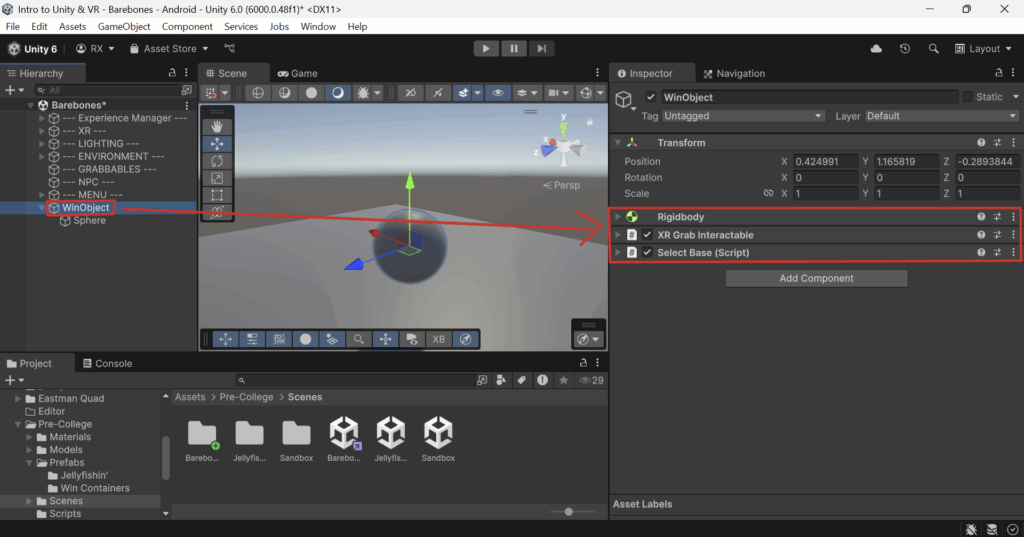
Step 3: Add and configure the Win Object component to which ever object contains your Collider.
Collider. For me, this is my sphere.Win Object component in the Inspector Window.Score Amount lets you change the score value that the Win Object will give the player when it is placed in a Win Container.Destroy On Enter: If this is enabled, then the Win Object will be deleted from the game once it enters the Win Container. This is how the jellyfish in Jellyfishin' work.Destroy On Enter is enabled, then you must assign the Parent Game Object variable to the parent GameObject of the Win Object. 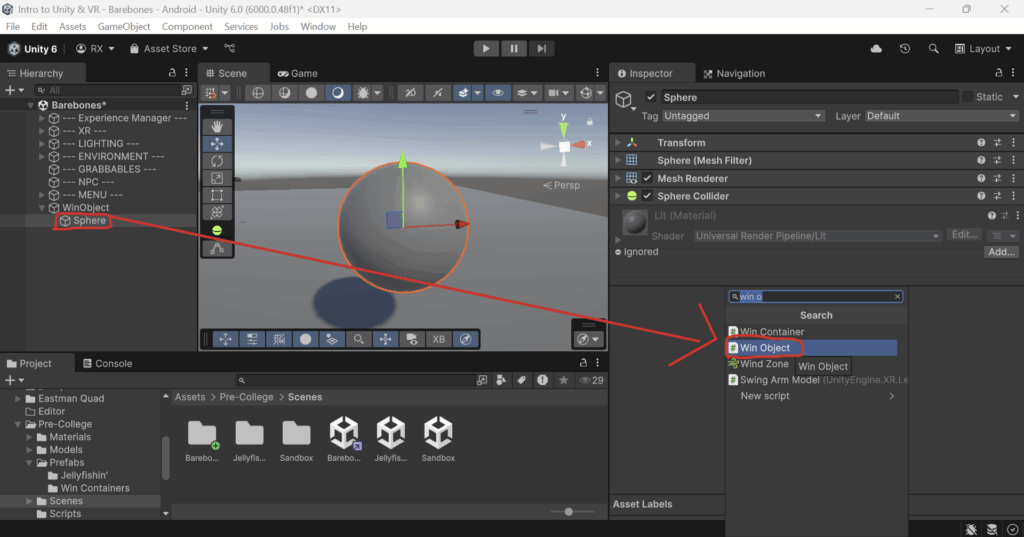
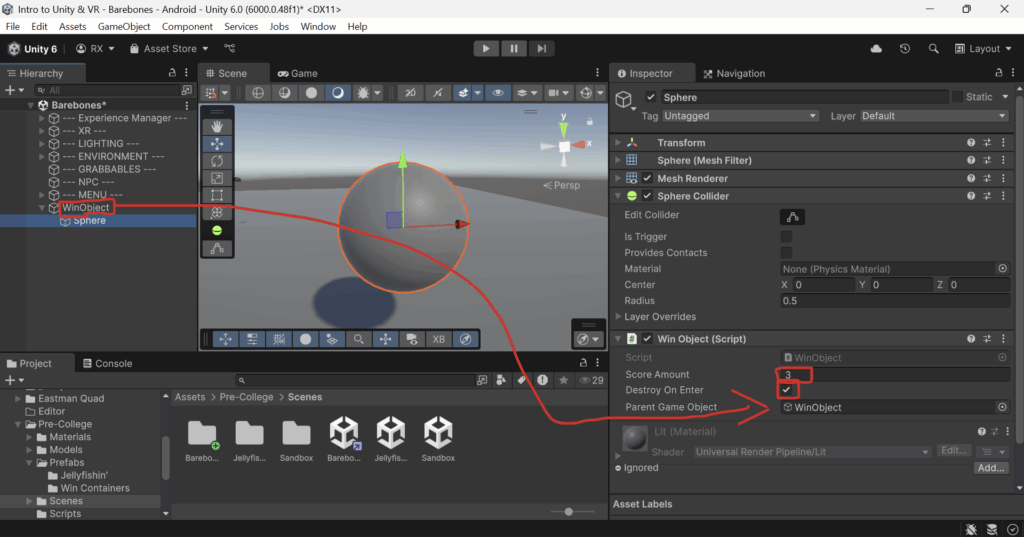
Step 4: Save your Win Object as a Prefab.
Win Object to the --- GRABBABLES --- folder for organization.GameObject of your Win Object from the Hierarchy into the Project Window in the Assets/_Prefabs folder.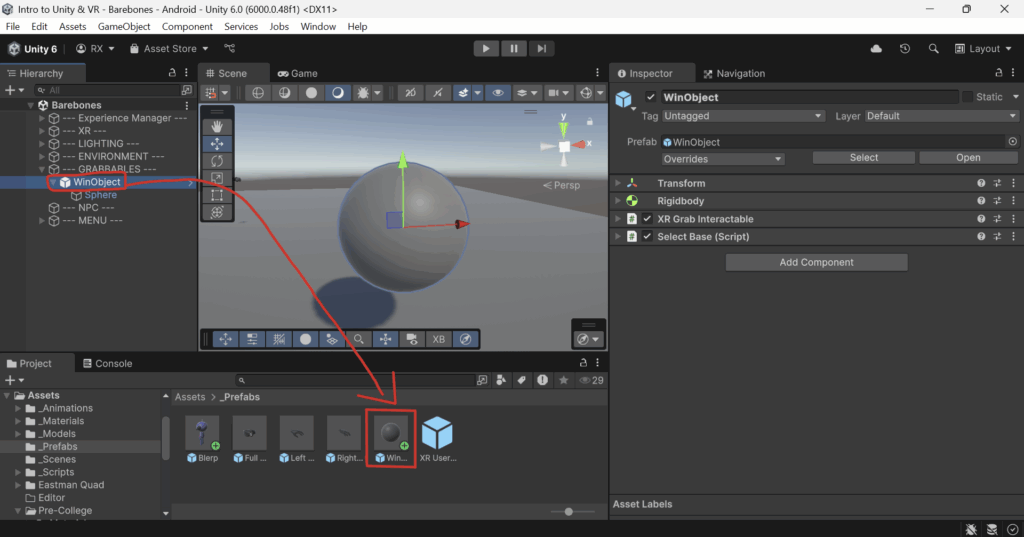
Next Steps:
Step 1: Open your NPC’s Prefab by double-clicking it in the project window. If you don’t have a prefab of your NPC, follow this guide for importing your NPC from Blender into Unity.
You will know that you are in the prefab editor when the background in your scene view is blue.
We are going to edit our NPC in prefab editor mode rather than directly in the scene because this allows us to make direct changes to the prefab. If we were to work in the scene instead, any changes we made to the prefab would later have to be saved to the prefab. Using prefab editor mode lets us skip that extra step and allows us to directly edit the prefab.
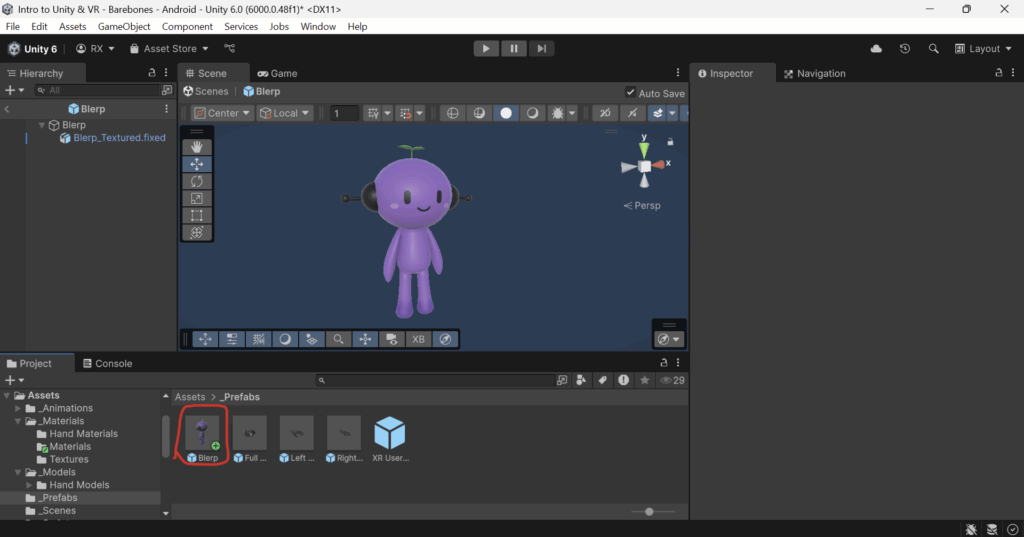
Step 2: Add the Nav Mesh Agent Component to your Prefab’s parent GameObject.
Inspector window, click Add Component.Nav Mesh Agent and select it.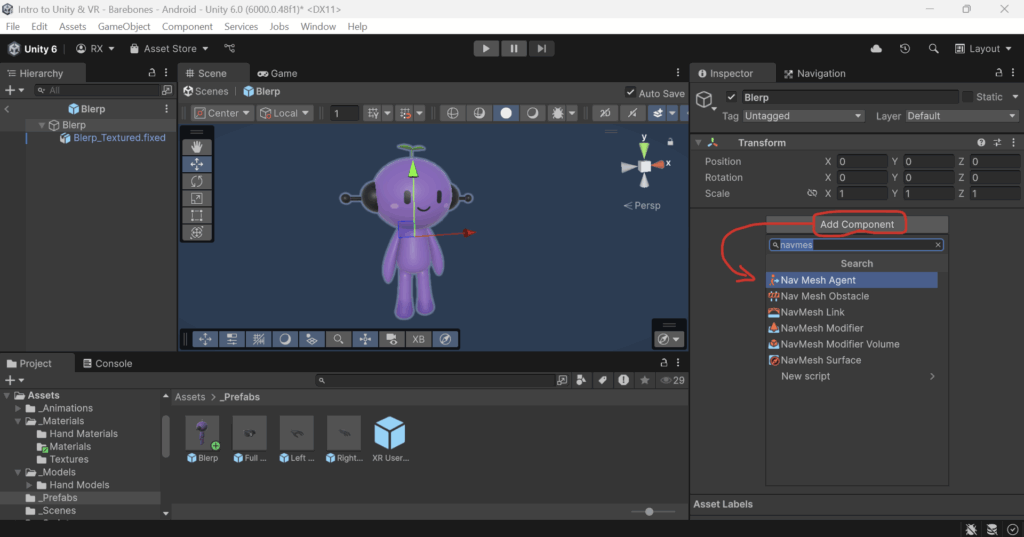
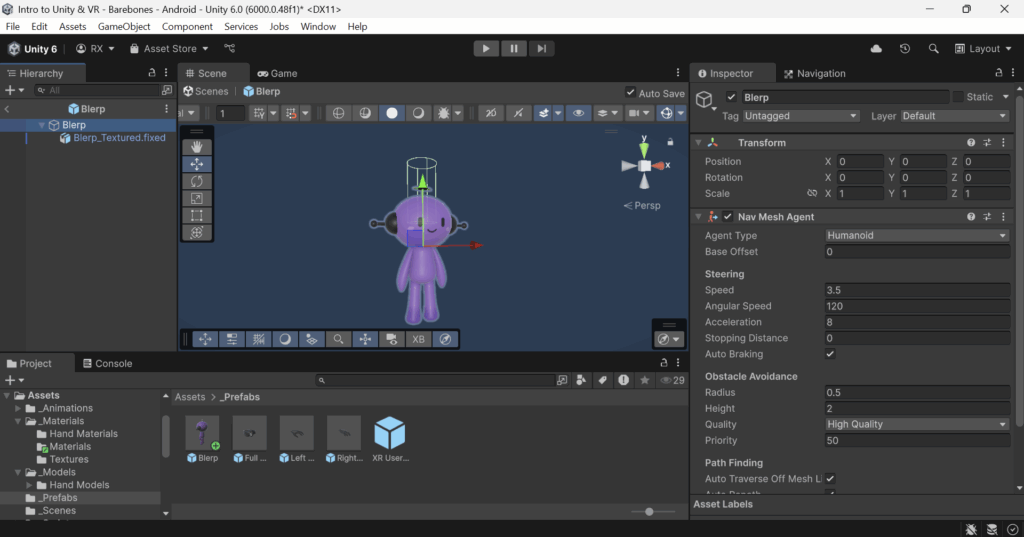
Step 3: Enable Gizoms so you can see your Nav Mesh Agent‘s Obstacle Avoidance green cylinder.
Gizmos is on by clicking the Gizmos icon in the toolbar. GameObject selected, you should see a green cylindrical outline on your NPC.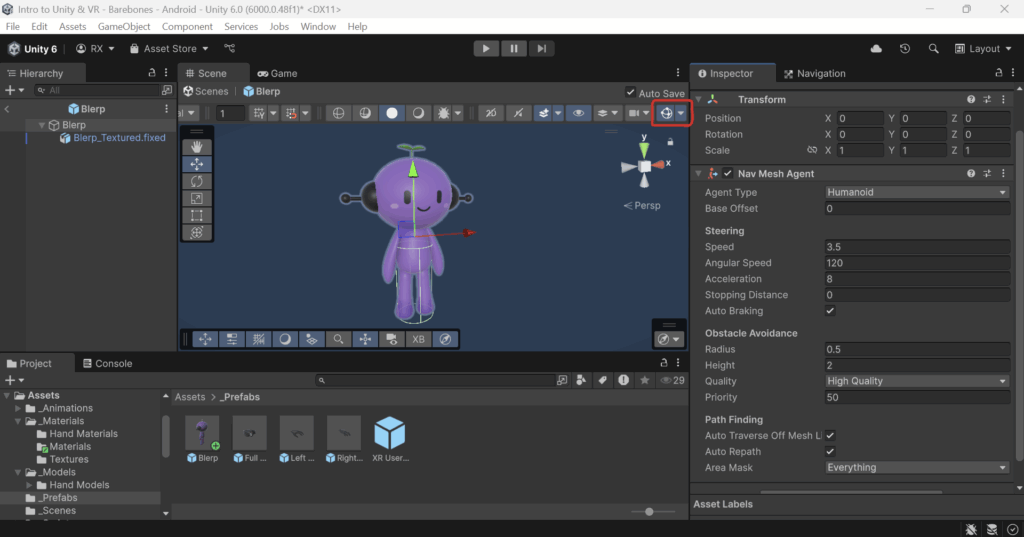
Step 4: Ensure that the bottom of the green cylinder matches the bottom of your NPC. If this is not already the case, follow these steps:
If you skip this step, then you may notice your NPC will be halfway in the ground when it tries to move during play mode. We need to ensure that the Nav Mesh Agent knows where our model’s feet are.
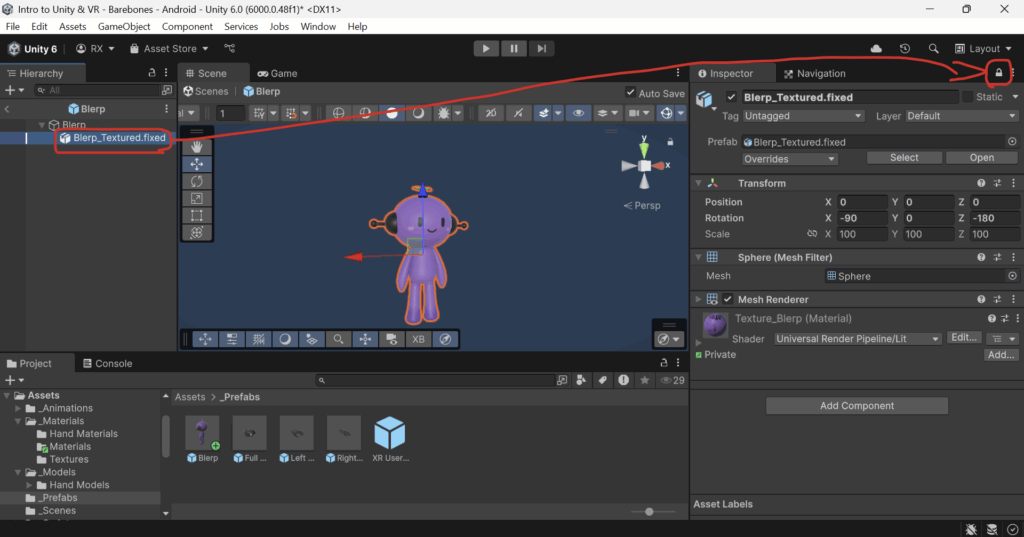
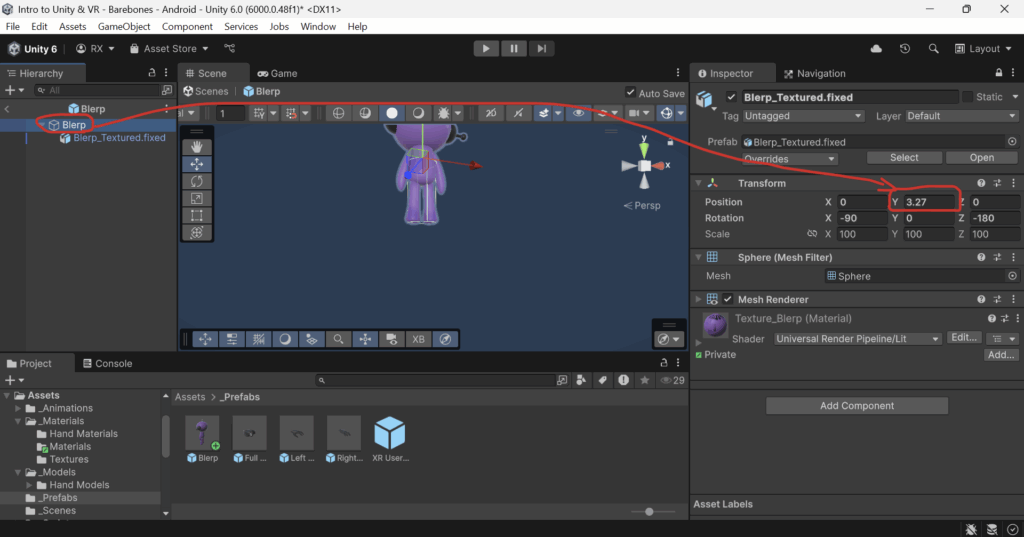
GameObject holding your NPC‘s model.Lock button in the inspector to lock the inspector to your model’s GameObject.GameObject.Transform‘s Y position until the bottom of the NPC matches that of the green cylinder.Lock button again.Inspector window.Usually, when we select an object in the Hierarchy window, it also selects that object in the Inspector window. However, there are certain times when we want to be able to select a GameObject in the Hierarchy, but edit a different GameObject in the Inspector at the same time.
In this case, in order to see the green cylinder, we need to select the parent GameObject. However, we want to edit the child GameObject at the same time. So, we can lock the child GameObject in the Inspector, then select the parent GameObject, and edit the child GameObject at the same time.
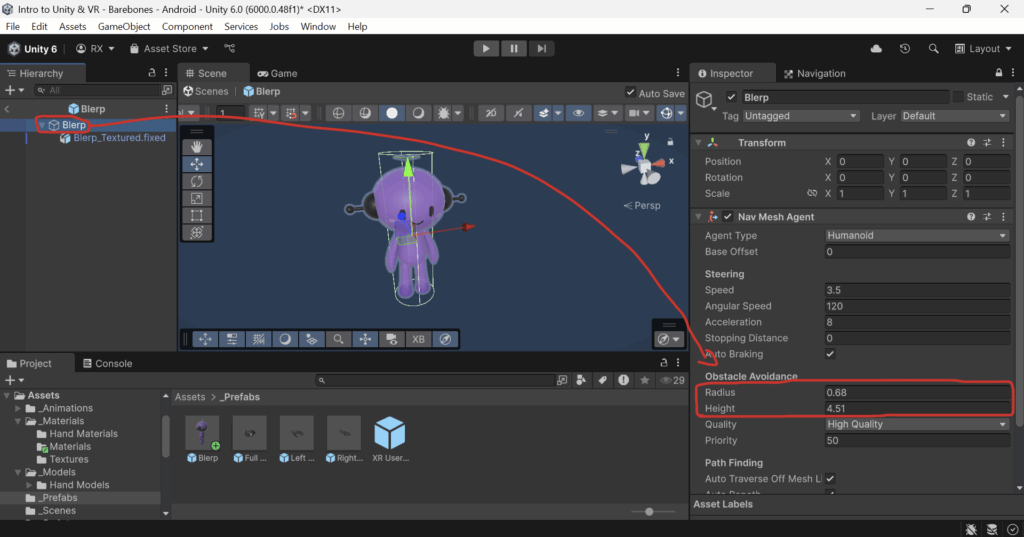
Step 5: Adjust the Radius and Height values of your Nav Mesh Agent‘s Obstacle Avoidance to match your NPC’s model.
GameObject.Radius and Height values until the green cylinder covers your NPCMaking your radius and height too big can make it harder for your NPC to move around in tight spaces.
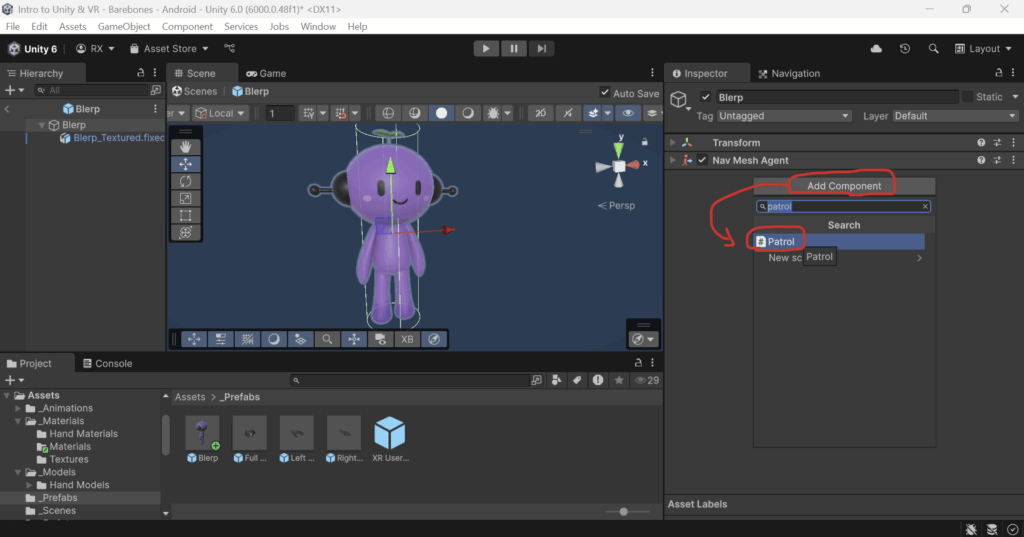
Step 6: Add the Patrol component to your NPC’s parent GameObject.
This will let us add points for the NPC to walk to later.
Step 7: Add and configure the Nav Mesh Surface component to your floor.
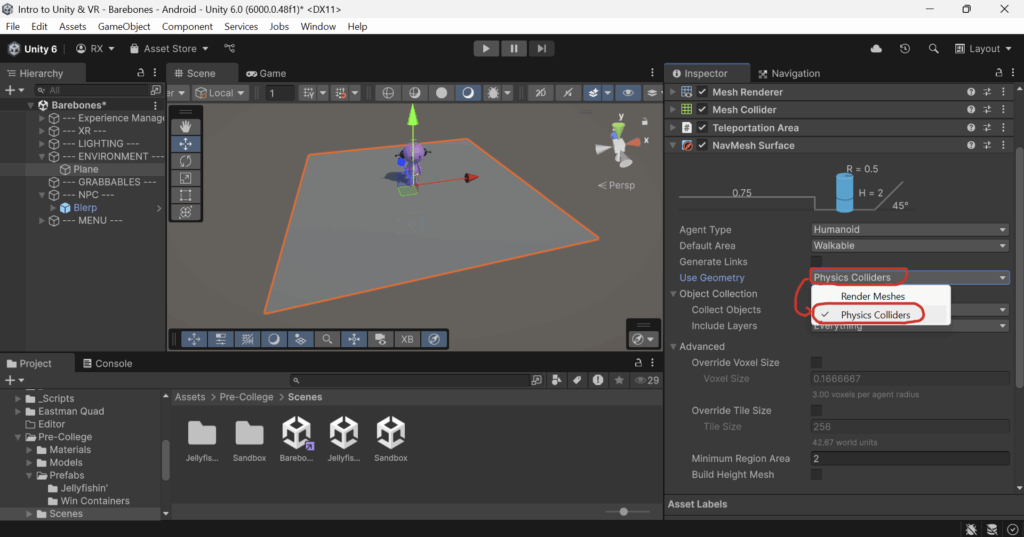
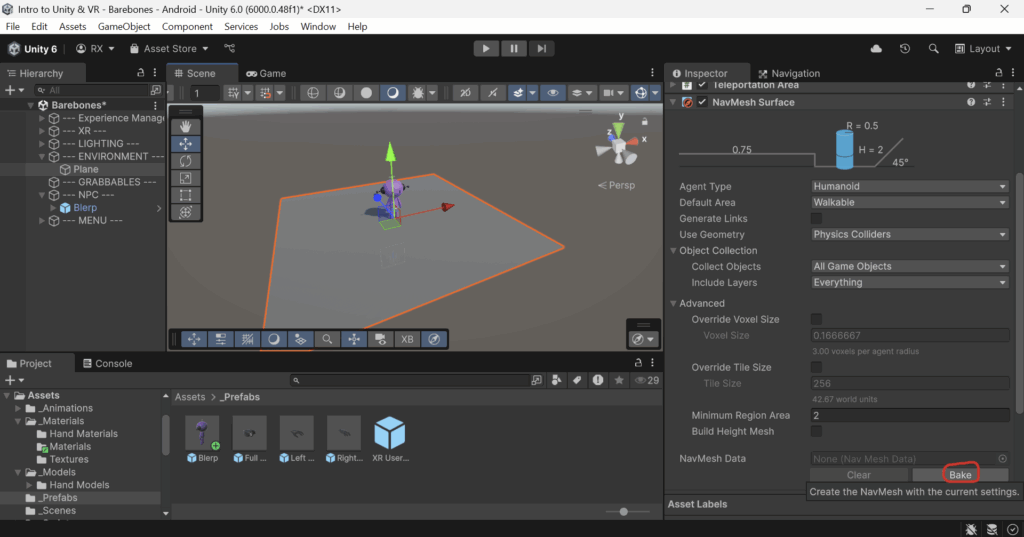
Barebones Scene located in Assets/Pre-College/Scenes.Inspector Window, click Add Component, then search for and add a Nav Mesh Surface component.Use Geometry variable in the Nav Mesh Surface component from Render Meshes to Physics Colliders.Bake (this process may take some time depending on how complex your floor is).Bake process is finished, with Gizmos on, you should see blue spots on your floor. These areas are where your NPC is able to traverse.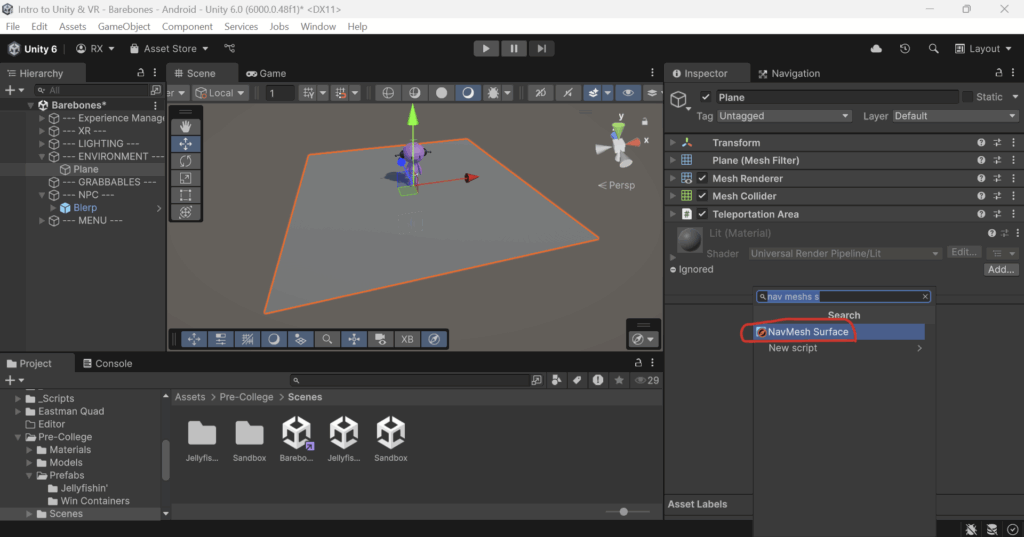
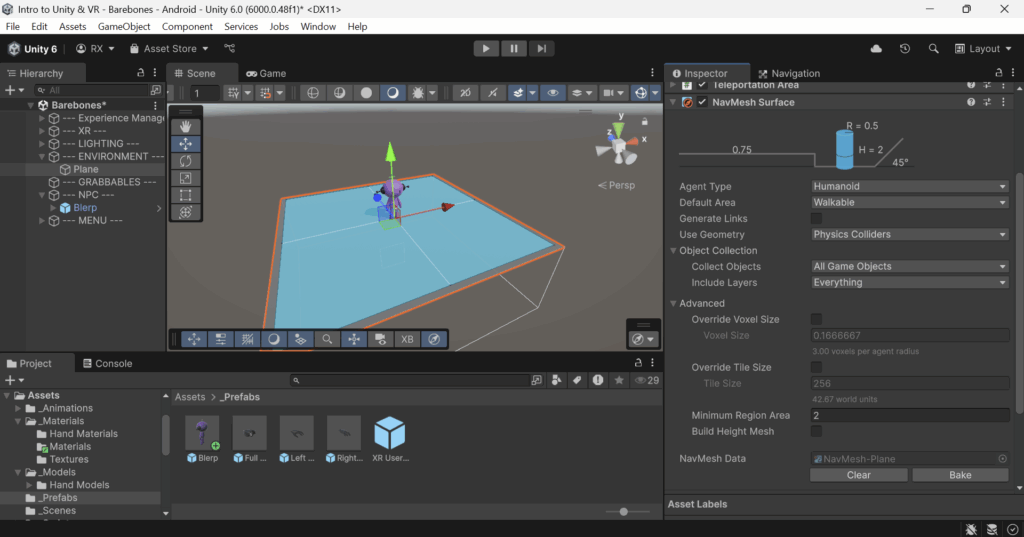
Step 8: Add patrol points so your NPC can move around.
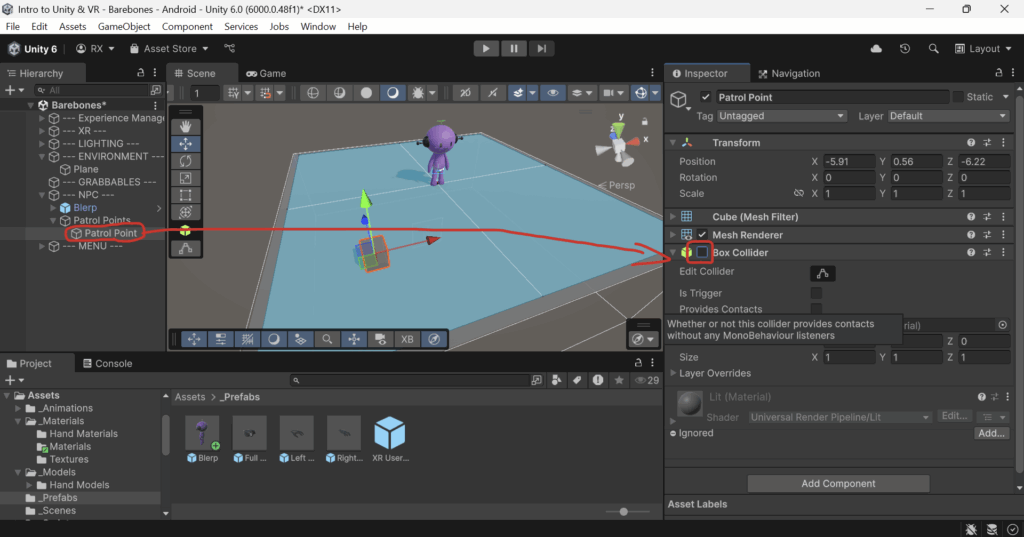
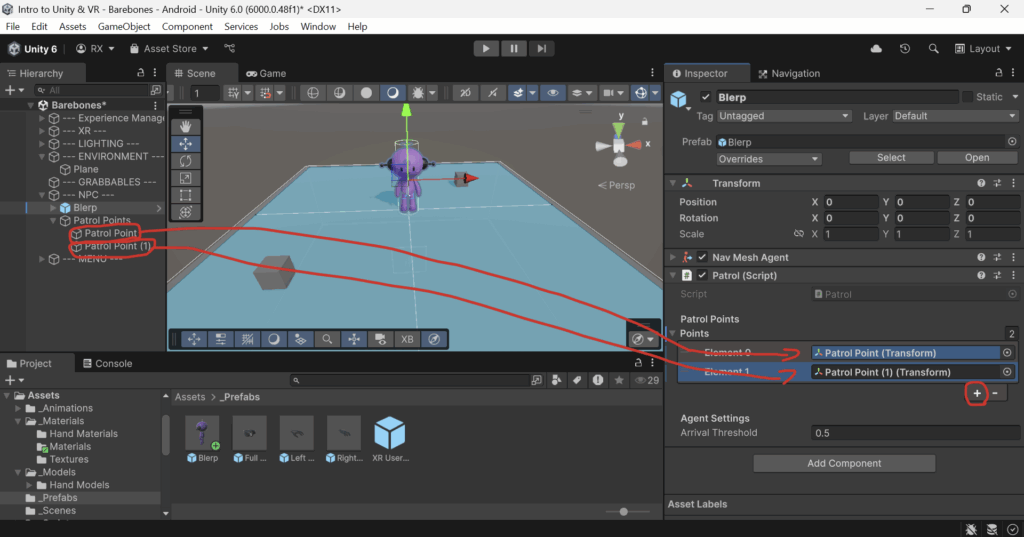
--- NPC --- folder, create a new empty GameObject called Patrol Points.Patrol Point. Disable its Box Collider component.Patrol Point object you made by selecting the Patrol Point object and pressing Control and D on your keyboard. Then move your new Patrol Point (1) object to a different position.Patrol Point objects you made to the Points variable in the Patrol component on your NPC’s parent GameObject by clicking the plus (+) icon and dragging the Patrol Point GameObjects from the Hierarchy Window into the Inspector Window. Mesh Renderer component on your Patrol Points so your player does not see them. It’s just useful to have them be visible while you’re developing. 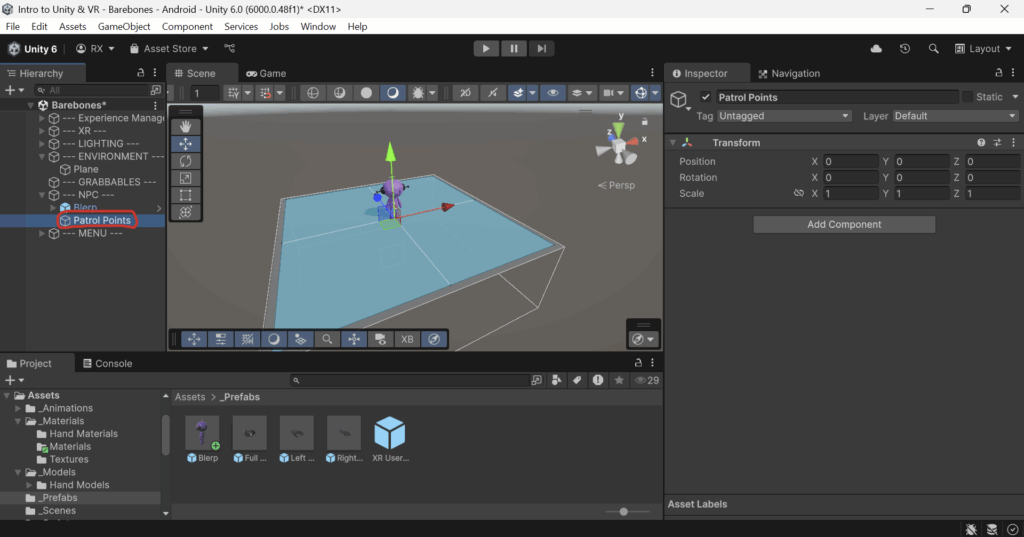
Step 9 (Optional): Make it so that your player “Loses” when they come into contact with your NPC.
Project Window.GameObject and name it Player Collider.Box Collider or other collider depending on the shape you’d like to use, and edit the collider until it covers your whole NPC.IsTrigger variable in the Collider component.
Enemy NPC script to the Player Collider GameObject.Sandbox Mode variable in your Experience Manager is not enabled when testing this)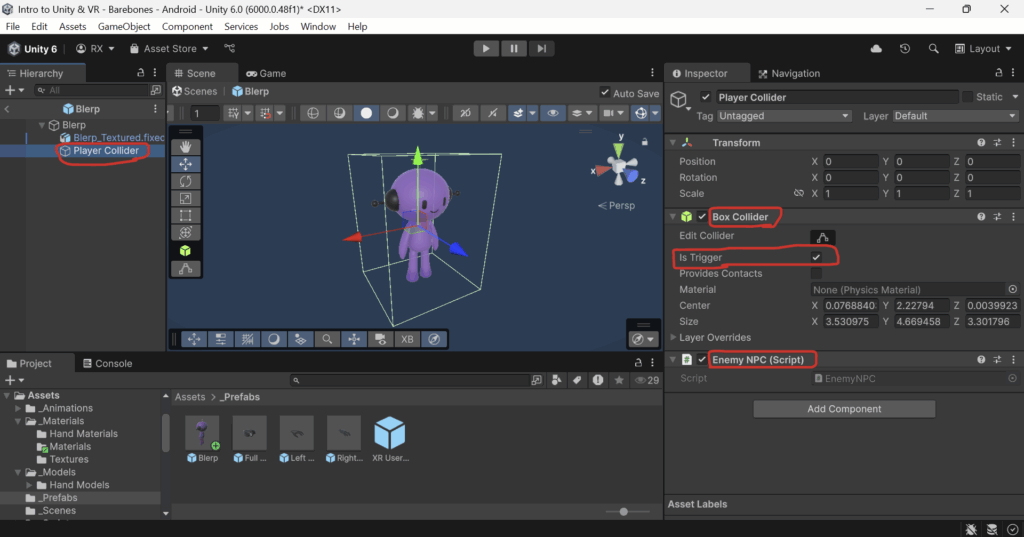
Next Steps:
Step 1: Open your NPC .blend file in Blender.
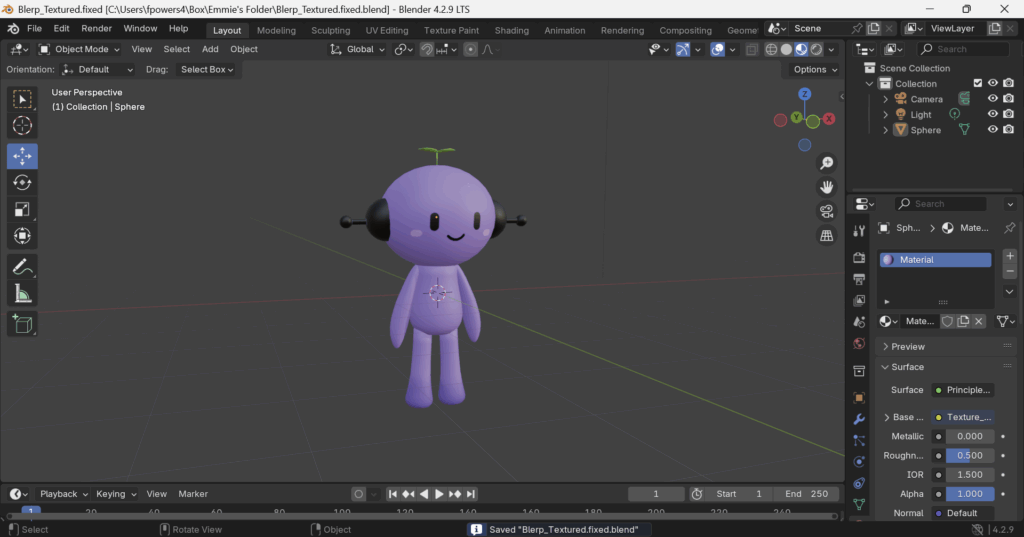
Step 2: Select your character’s model by clicking and dragging your mouse.
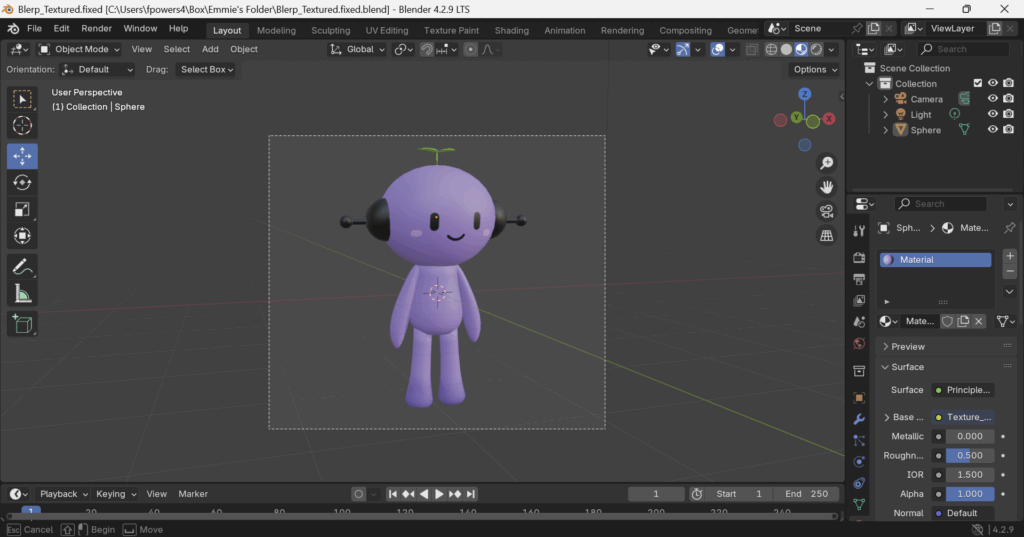
You will know your character is selected once it is fully outlined in orange.
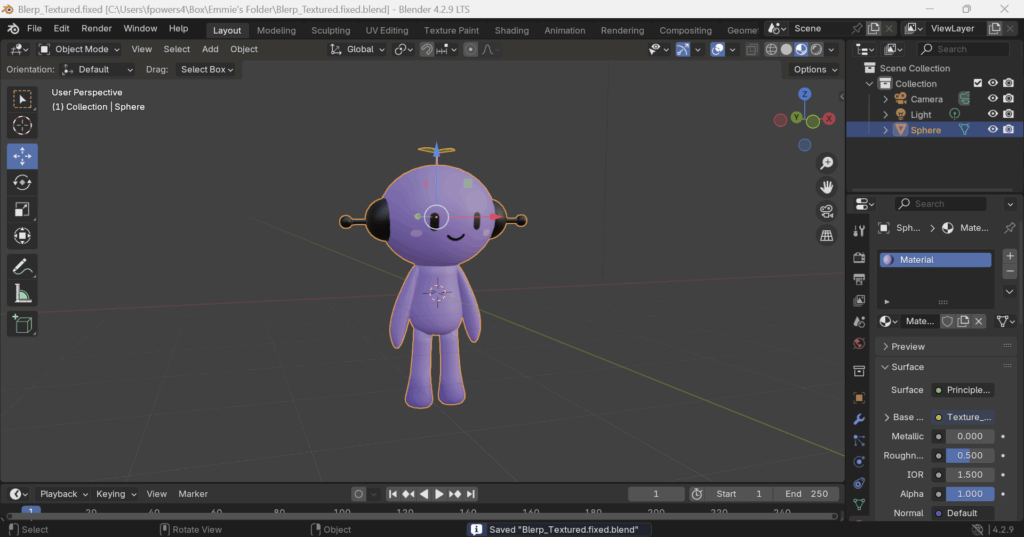
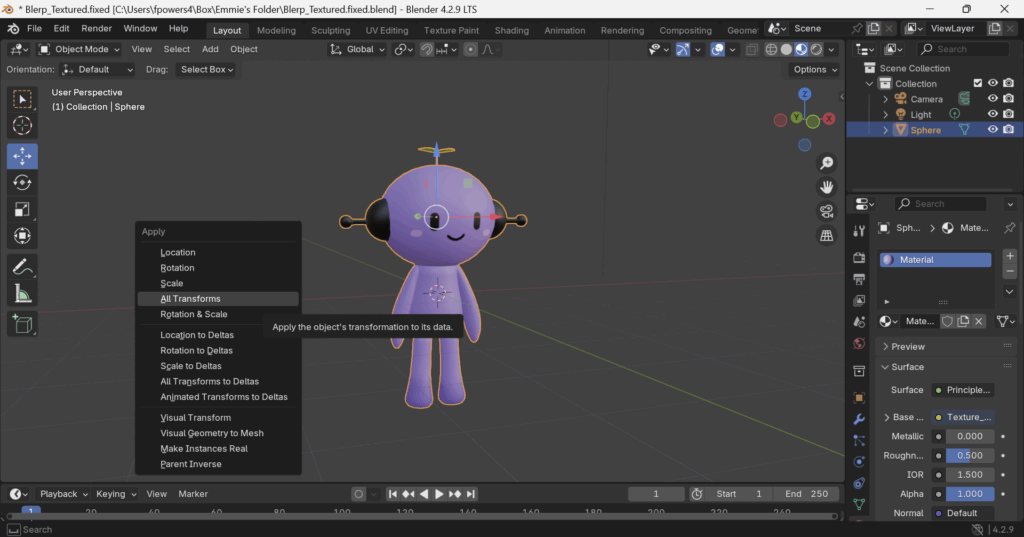
Step 3: Press the Control and A keys at the same time. Then, select All Transforms.
This sets the model’s scale to 1,1,1 and rotation to 0,0,0. This is how Unity expects imported models to be.
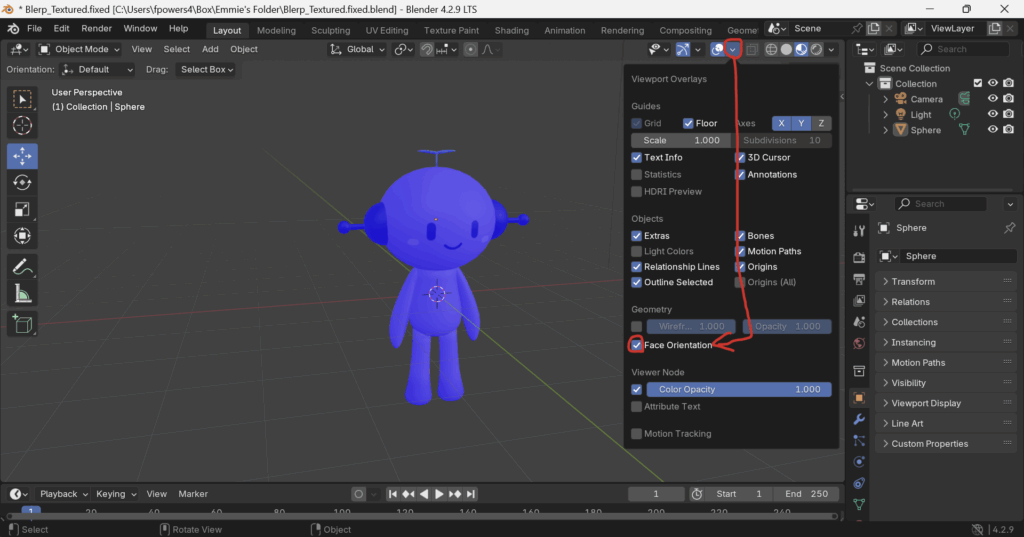
Step 4: Ensure Face Orientations are normal. Do this by entering the overlays menu and checking the Face Orientation setting. Your character should now be highlighted in blue (NOTE: In more recent versions of Blender, the blue highlight may not show up).
Move your view around your character and make sure there are no red highlights. If there are red highlights, see the Blender Tutorial How to Fix Face Orientations.
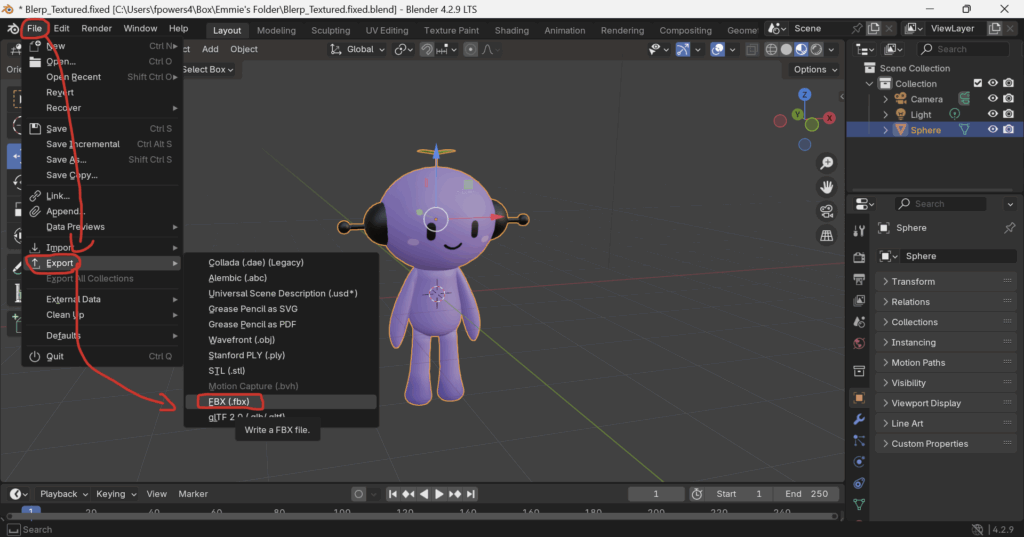
Step 5: While your model is selected, start the .fbx file export by going to File -> Export -> FBX (.fbx).
Unity prefers the .fbx file format because it’s a stable, widely supported format that imports consistently, while .blend files rely on Blender’s background conversion, which can cause version or compatibility issues.
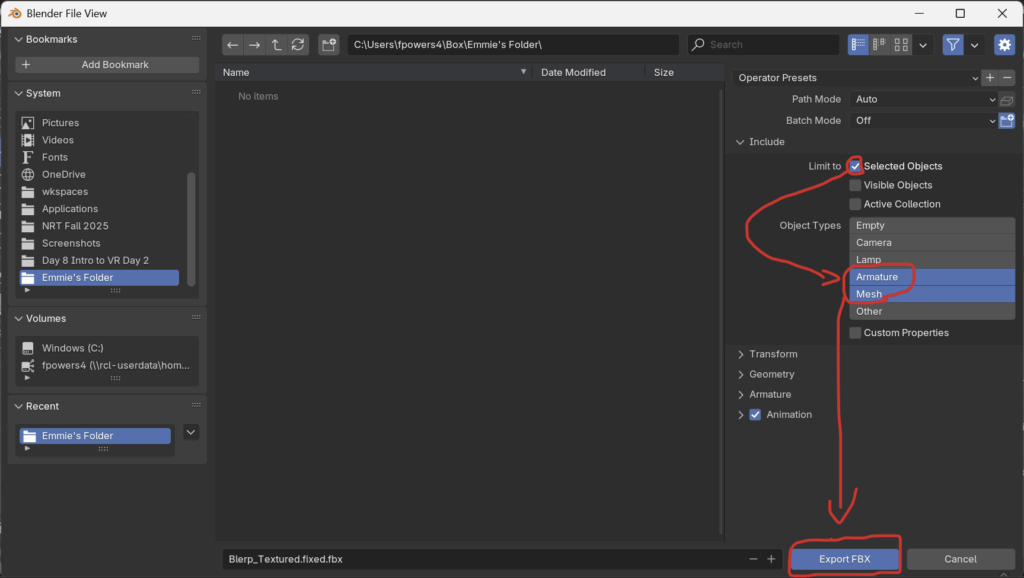
Step 6: Edit the export settings as so:
Include -> Limit to, check the box for Selected Objects (make sure only your model is currently selected in blender).Include -> Object Types, click the selections while holding the shift key down until only Armature and Mesh are left selected in blue.Then, select Export FBX.
Step 7: Open Unity, and navigate to the Assets/_Models folder in the project folder. Double click the _Models folder to enter it.
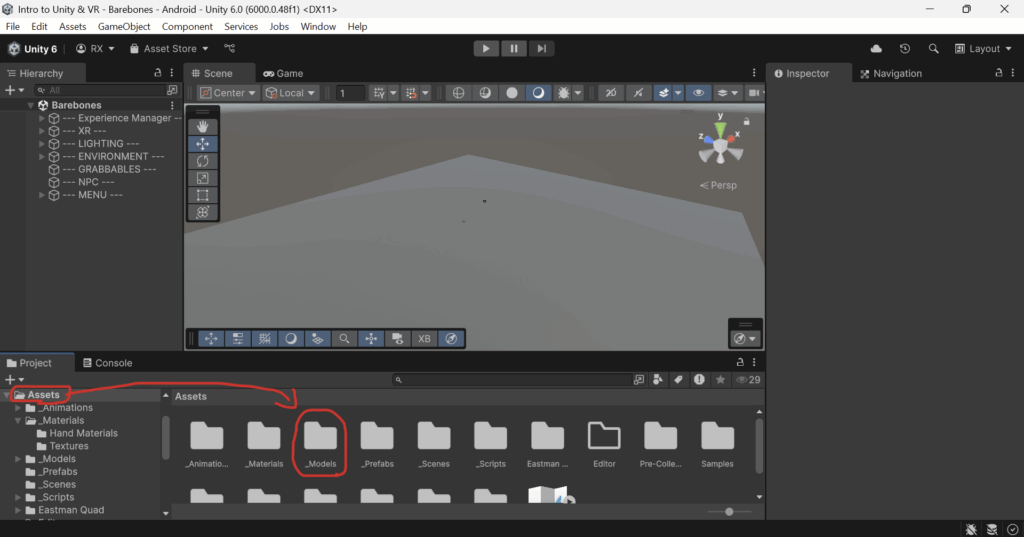
Step 8: Import the .fbx file into Unity by heading to Assets -> Import New Asset...
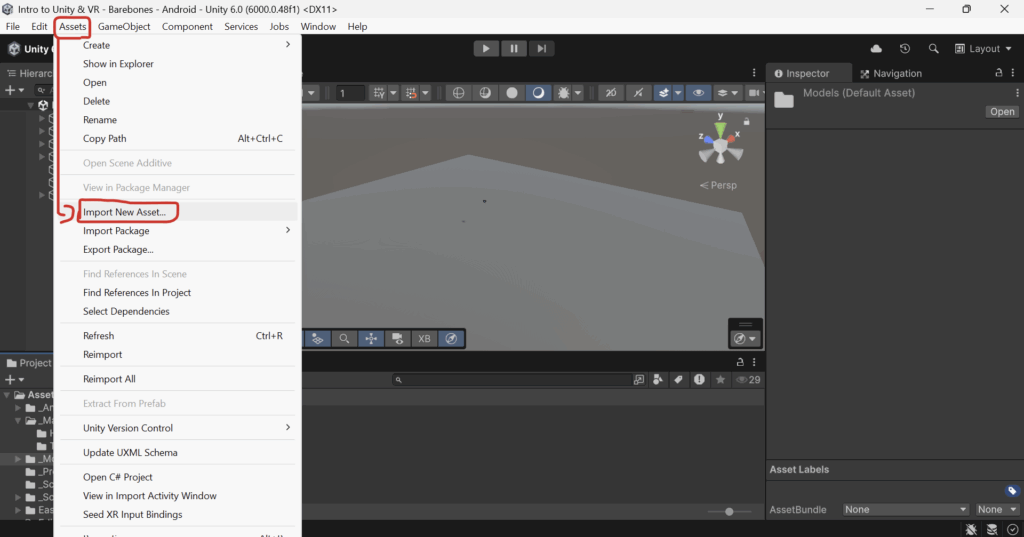
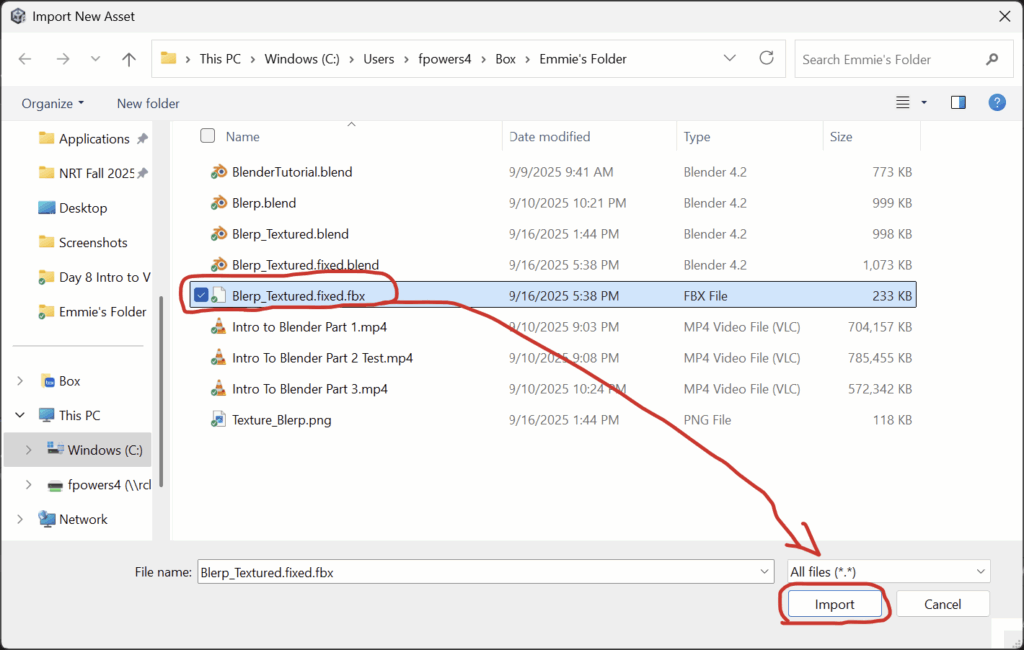
Then Select your .fbx file and click Import
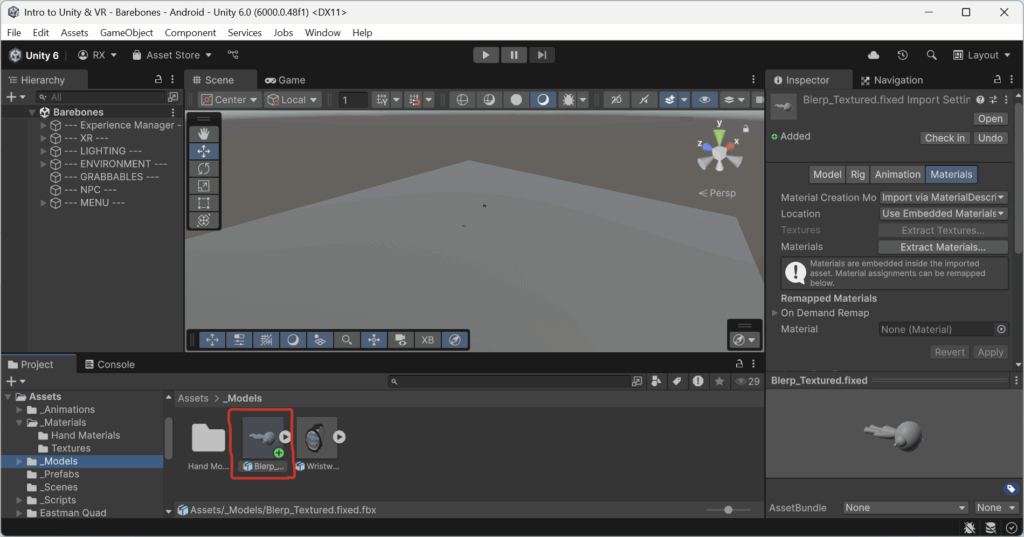
You should see your .fbx file in the _Models folder. If the .fbx file was placed in a different folder you can simply drag it into the _Models folder.
You will notice that your character’s textured material is not currently applied to your .fbx file. This is normal, and we will import the texture in a later step.
Step 9: Make a new Empty GameObject to hold your NPC model. Click the plus sign in the Hierarchy window, and then click Create Empty.
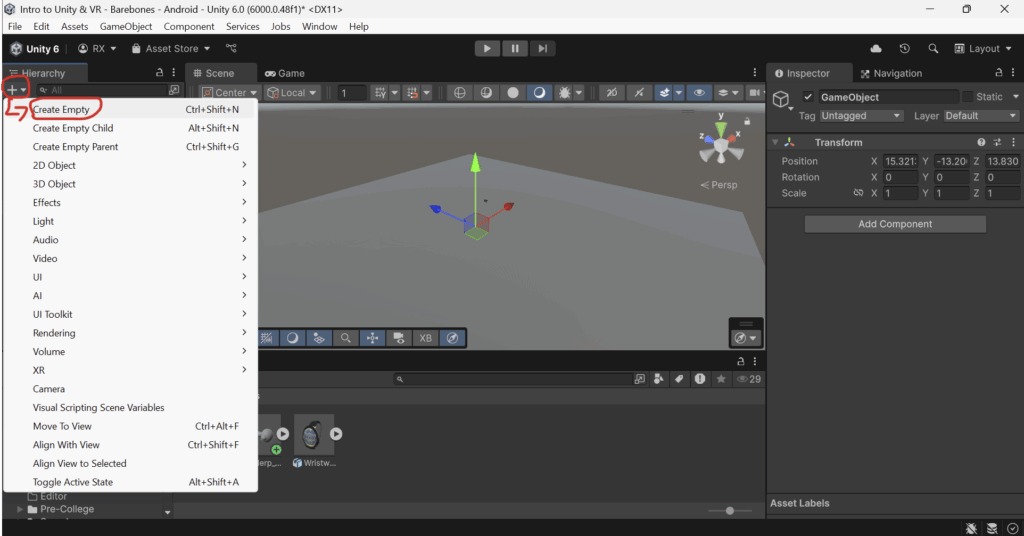
Rename the GameObject to whatever you like.
Step 10: Drag your model into the empty GameObject.
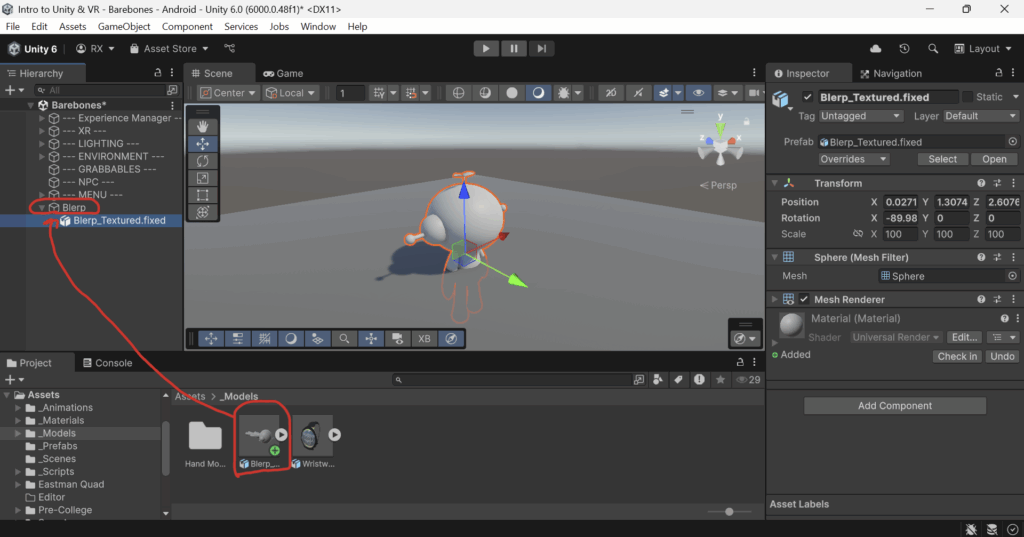
Step 11: Import the model’s texture.
Assets/_Materials/Textures folder in the project window. Assets -> Import New Asset... and import the .png file of your model’s texture.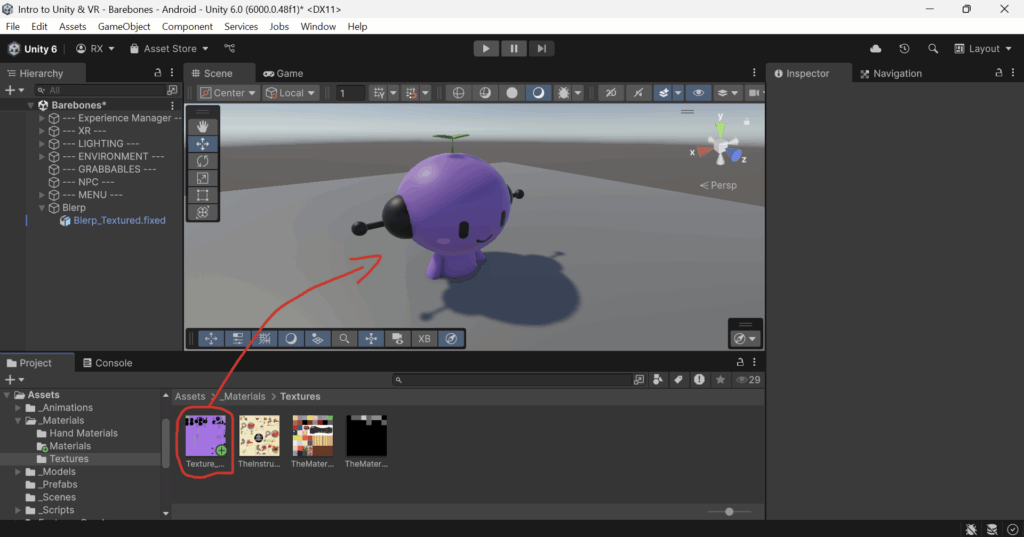
Step 12: Save your NPC as a Prefab by dragging it from the Hierarchy Window into the Assets/_Prefabs folder in the Project Window.
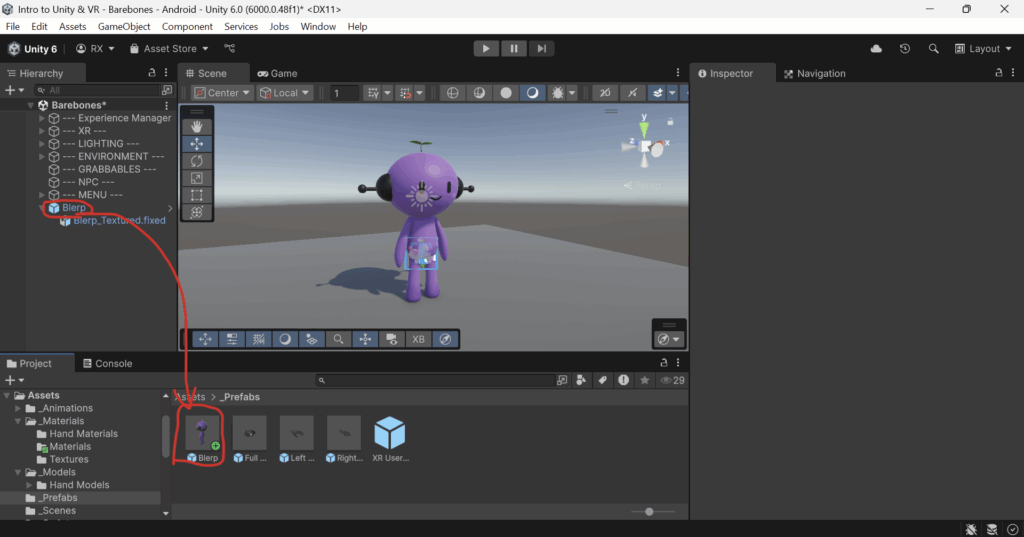
Next Steps:
Step 1: In Unity, navigate to the Barebones scene located in Assets/Pre-College/Scenes/Barebones. This is the scene in which you will create your own VR experience.
This scene is set up and pre-configured with:
XR Origin
XR Controls ManagerMain MenuExperience Manager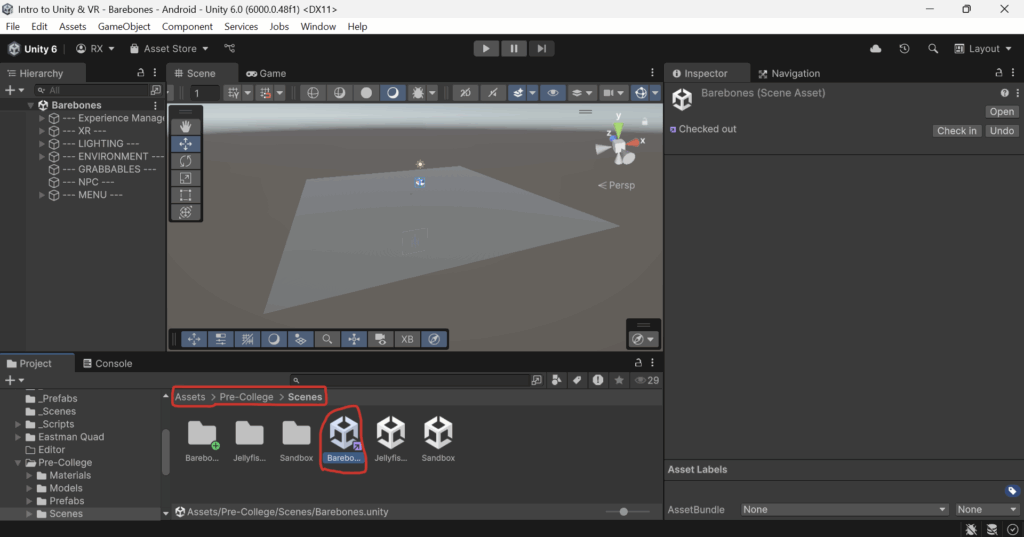
Step 2: Set up your Experience Manager.
--- Experience Manager --- GameObject.Inspector Window, edit the values in the Experience Manager script to match your experience/game.Experience ManagerSandbox Mode
Current Score
Starting Score
Score Needed
Win At Reach Score Needed
Score Needed, the player will have won and the experience will be over. Timer enabled in your experience. Score Needed. This would be useful if you want your players to get a “high score”.Timer Enabled
Seconds
Timer Enabled is enabled.Main Menu UI Elements
Main Menu.Experience Manager.Spawn Point
Main Menu.Spawn Point GameObject to wherever you would like your player to start the experience at.Disable Toggling Controls
Disable Teleportation Toggle variable.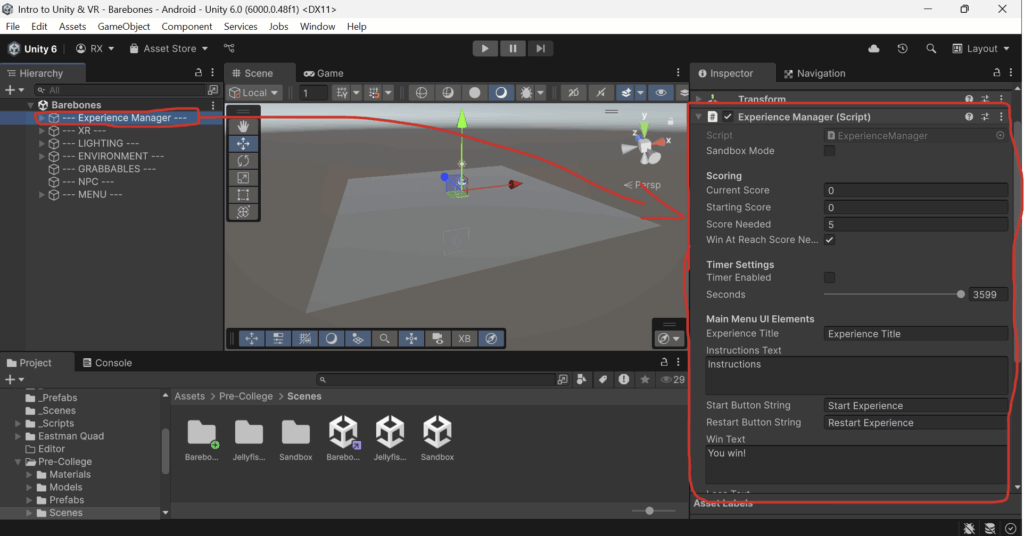
Step 3: Set up your XR Controls Manager PC component.
XR Origin (Pre-College) object, which is a child of the --- XR --- object.Disable Movement On Start variable.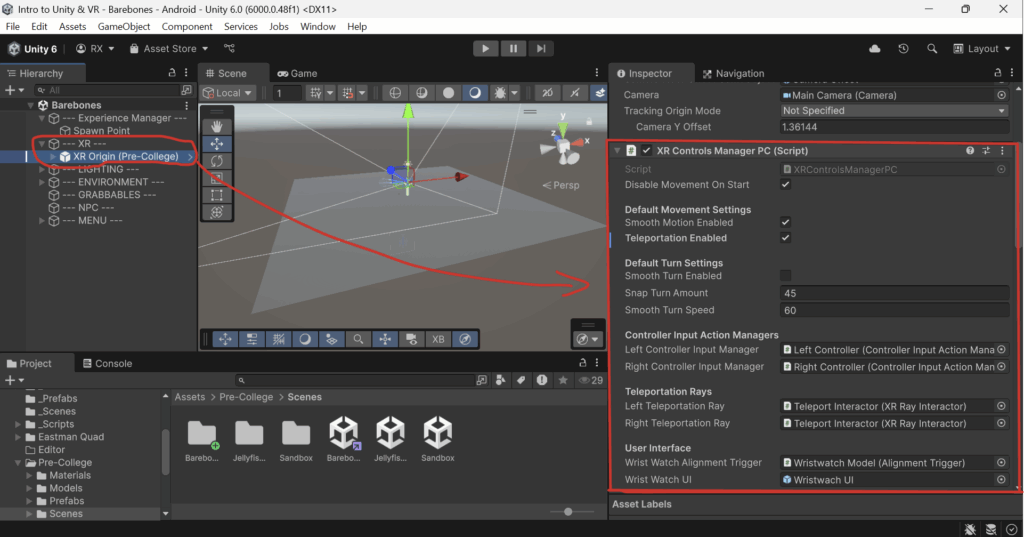
Next Steps: